Nuke Developer Guide v2.1
By: CS2113T-T13-2 Since: Feb 2020
Go to Webpage
Table of Contents
Introduction ➥
• Purpose ➥
• Scope ➥
• Design Goals ➥
Setting Up ➥
1. Architecture ➥
2. UI Component ➥
3. Logic Component ➥
4. Model Component ➥
5. Storage Component ➥
Design ➥
Structure Implementation ➥
1. Directory ➥
2. Directory Manager ➥
3. Directory Traverser ➥
Command Implementation ➥
1. Add Command ➥
2. List Command ➥
3. Delete Command ➥
4. Edit Command ➥
5. Change Directory Command ➥
6. Open File Command ➥
7. Info Command ➥
8. Undo and Redo Commands ➥
Storage Implementation ➥
Appendix ➥
• Product Scope ➥
• User Stories ➥
• Non-Functional Requirements ➥
• Glossary ➥
• Manual Testing ➥
Contact Us ➥
Introduction
Purpose
This document describes the structure and software design decisions for the Nuke application. The Nuke application is a simple yet powerful task management application that is dedicated to providing NUS students a more efficient way to organise their modules and tasks.
Scope
This document will cover the structure and software design decisions for the implementation of Nuke. The intended audience for this document are developers, designers and software testers of Nuke or other similar task management application.
Design Goals
Develop a structure that facilitates a more efficient organisation of the user’s tasks
Enhance speed to perform operations
Setting Up
1.1. Prerequisites
- JDK 11
- IntelliJ IDE
1.2. Setting up the project
-
Fork this repository, and clone the fork to your computer
-
Open the IntelliJ IDE. If you are not in the welcome screen, click
File>Close Projectto close the existing project. -
Set up the correct JDK version for Gradle
-
Click
Configure>Project Defaults>Project Structure -
Click
New...and find the directory of the JDK
-
-
Click on
Import Project -
Locate and select the
build.gradlefile, then clickOK -
Click
Open as Project -
Click
OKto use the default settings provided
1.3. Verifying the Setup
-
In an IntelliJ terminal, run
gradlew build -
Navigate to the folder
build>libsby executingcd build/libs/and then run:java -jar nuke-2.0.jar-
To use Nuke, type a valid command into the terminal and press the enter key to run the command. e.g. Typing
helpand pressing the enter key will show the available commands and their respective command usage help messages. -
Some example commands you can try to get familiar with Nuke:
help: Lists the commands that Nuke supports.addm cs2113t: Adds a module with module code cs2113t, Nuke will recognize it as the module Software Engineering & Object-Oriented Programming and add it to your Module List.
addt assignment2 -m cs2113t -c Assignment -d tmr 23:59 -p 20: Adds a task namedassignment2which belongs to modulecs2113tand categoryAssignmentwith a deadlinetomorrow 23:59and priority of20bye: Exits Nuke.
-
Design
1. Architecture
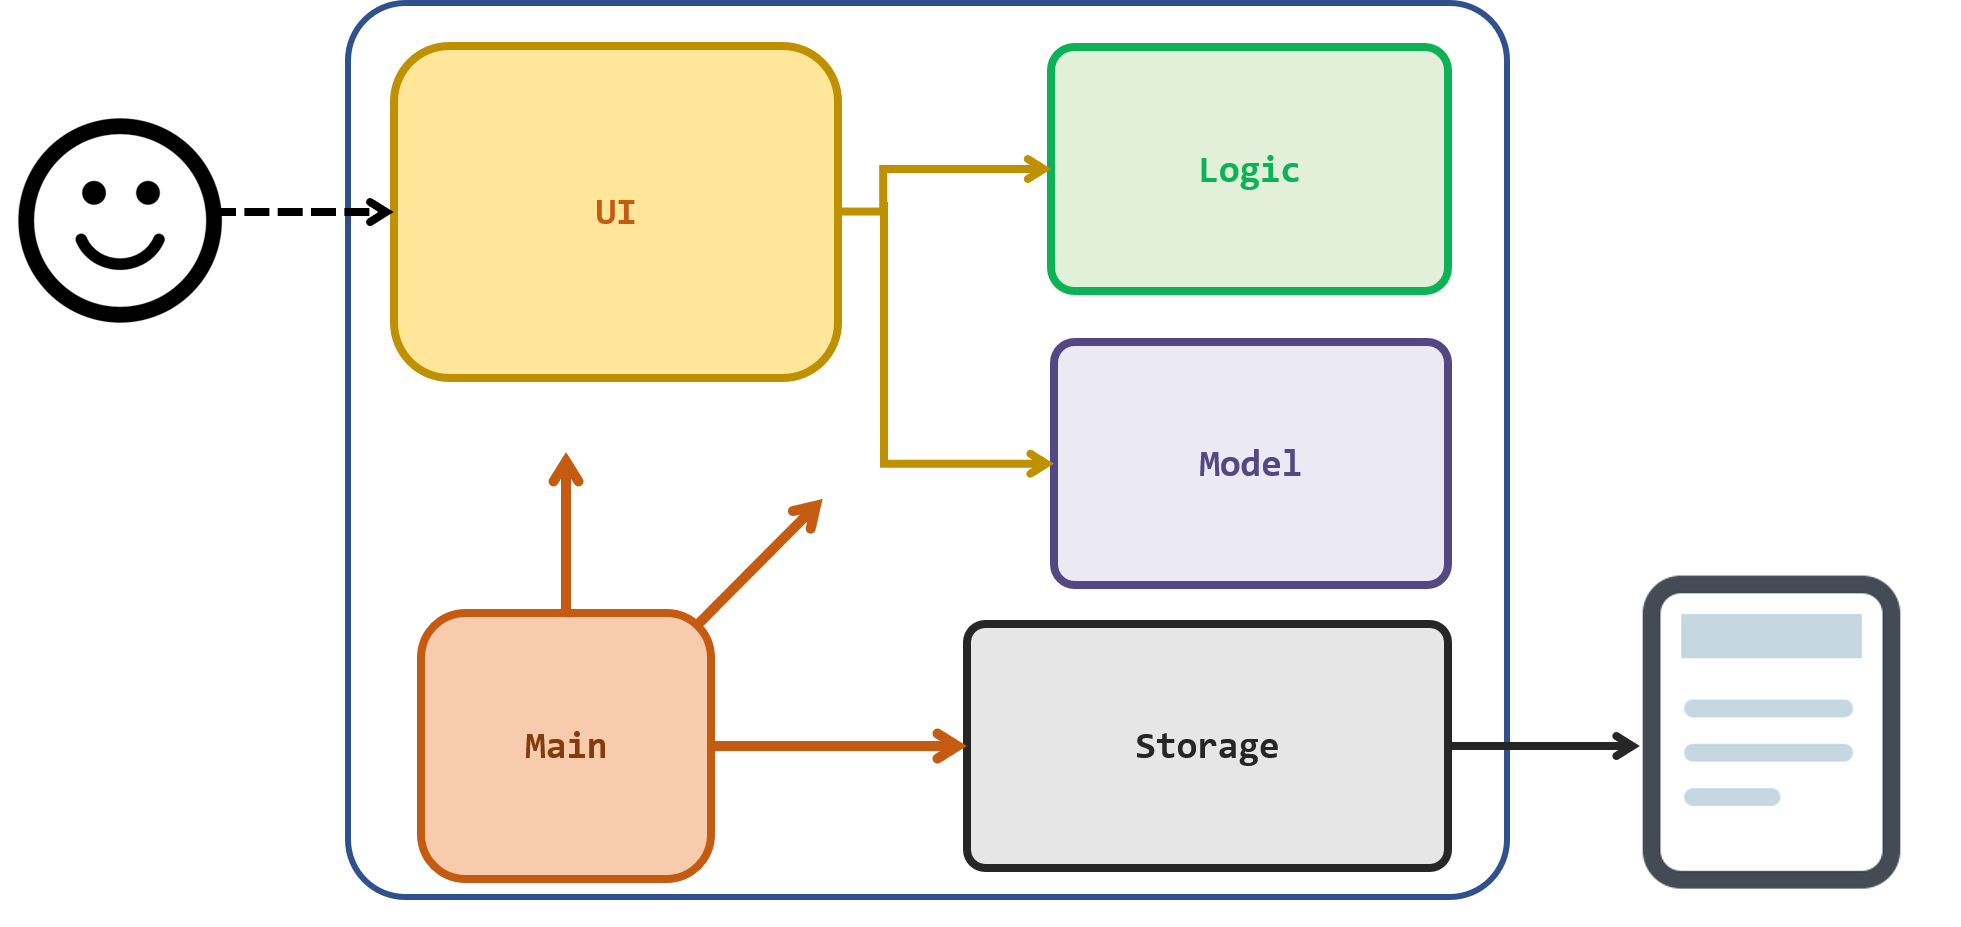
Figure Nuke Architecture
The Architecture Diagram given above explains the high-level design of the application. Give below is a quick overview of each component.
Main has only one class called Nuke. It is responsible for,
-
At launch: Initialises the components in the correct sequences, and connects them up with each other.
-
At running: Invoke UI to Show welcome messages, continuously invokes UI, Logic component to execute commands entered by user. Also invokes storage component to save data after execution of user’s commands
-
At shut down: Invokes UI component to show exit message.
There are four other components in the Nuke application.
-
UI: The UI of the application which complete interactions between User and Nuke. -
Logic: The command executor. -
Model: Holds different data types in the application. -
Storage: Loads data from, and writes data to, a file in the user’s hard disk.
Each of the four components
-
defines its API in several classes
-
exposes its functionalitiy by invoking different methods in these classes.
For example, the Storage component defines it’s API in several classes including Encoder and Decoder, and exposes its functionality by invoking different method in these classes by StorageManager class.
How the architecture components interact with each other
The Sequence Diagram below shows how the components interact with each other for the scenario where the user issues the command addm CS2113T. (As the Storage component will only be used when launching and exiting the applicatio, here the storage component is omitted.)
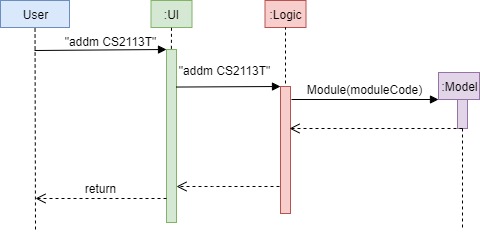
Figure Components interactions
2. UI Component
Classes used by UI component are in the seedu.nuke.ui package.
3. Logic Component
Classes used by Logic component are in the seedu.nuke.data package, seedu.nuke.parser package, DirectoryTraverse.java in seedu.nuke.directory package and Executor.java in seedu.nuke package.
The diagram below shows the Logic Component of the Nuke application in our current implementation:
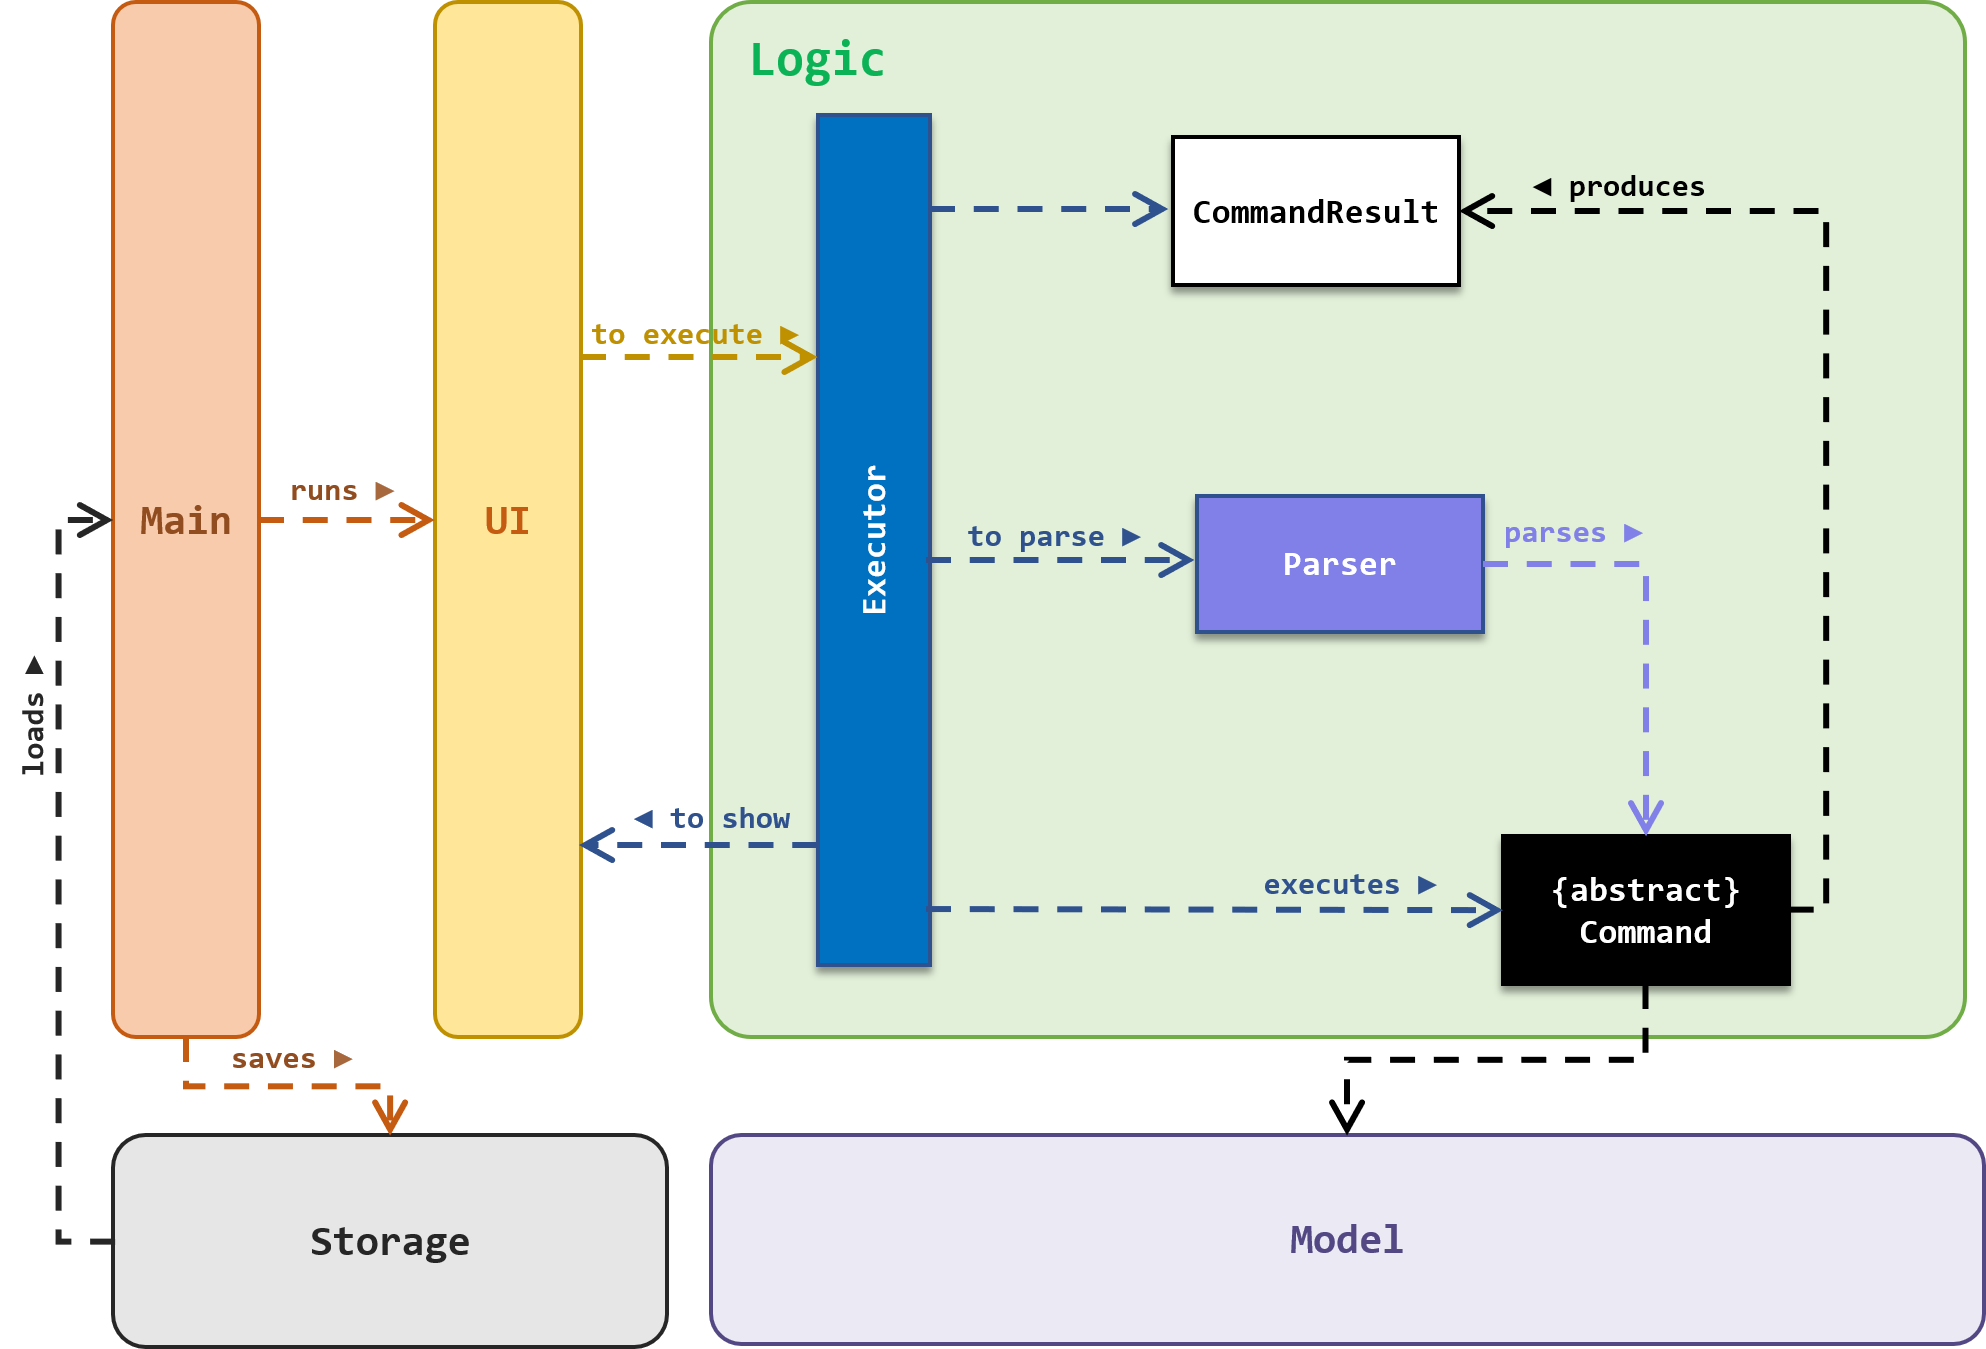
Figure Logic Component
4. Model Component
More information about the Model Component can be found here.
5. Storage Component
More information about the Storage Component can be found here.
Structure Implementation
1. Directory
Overview
There are altogether 5 levels in the current implementation of Nuke's Directory Tree:
| Directory Level | Description |
|---|---|
| Root | The base of the Directory Tree. Only one root exists in the entire Tree. |
| Module | The second level of the Directory Tree. |
| Category | The third level of the Directory Tree. |
| Task | The fourth level of the Directory Tree. |
| File | The last level of the Directory Tree. |
NULL, i.e. nothing.
The hierarchy of the Directory Tree set in place has to be followed strictly. That means, their levels in the Tree can never be changed.
Implementation
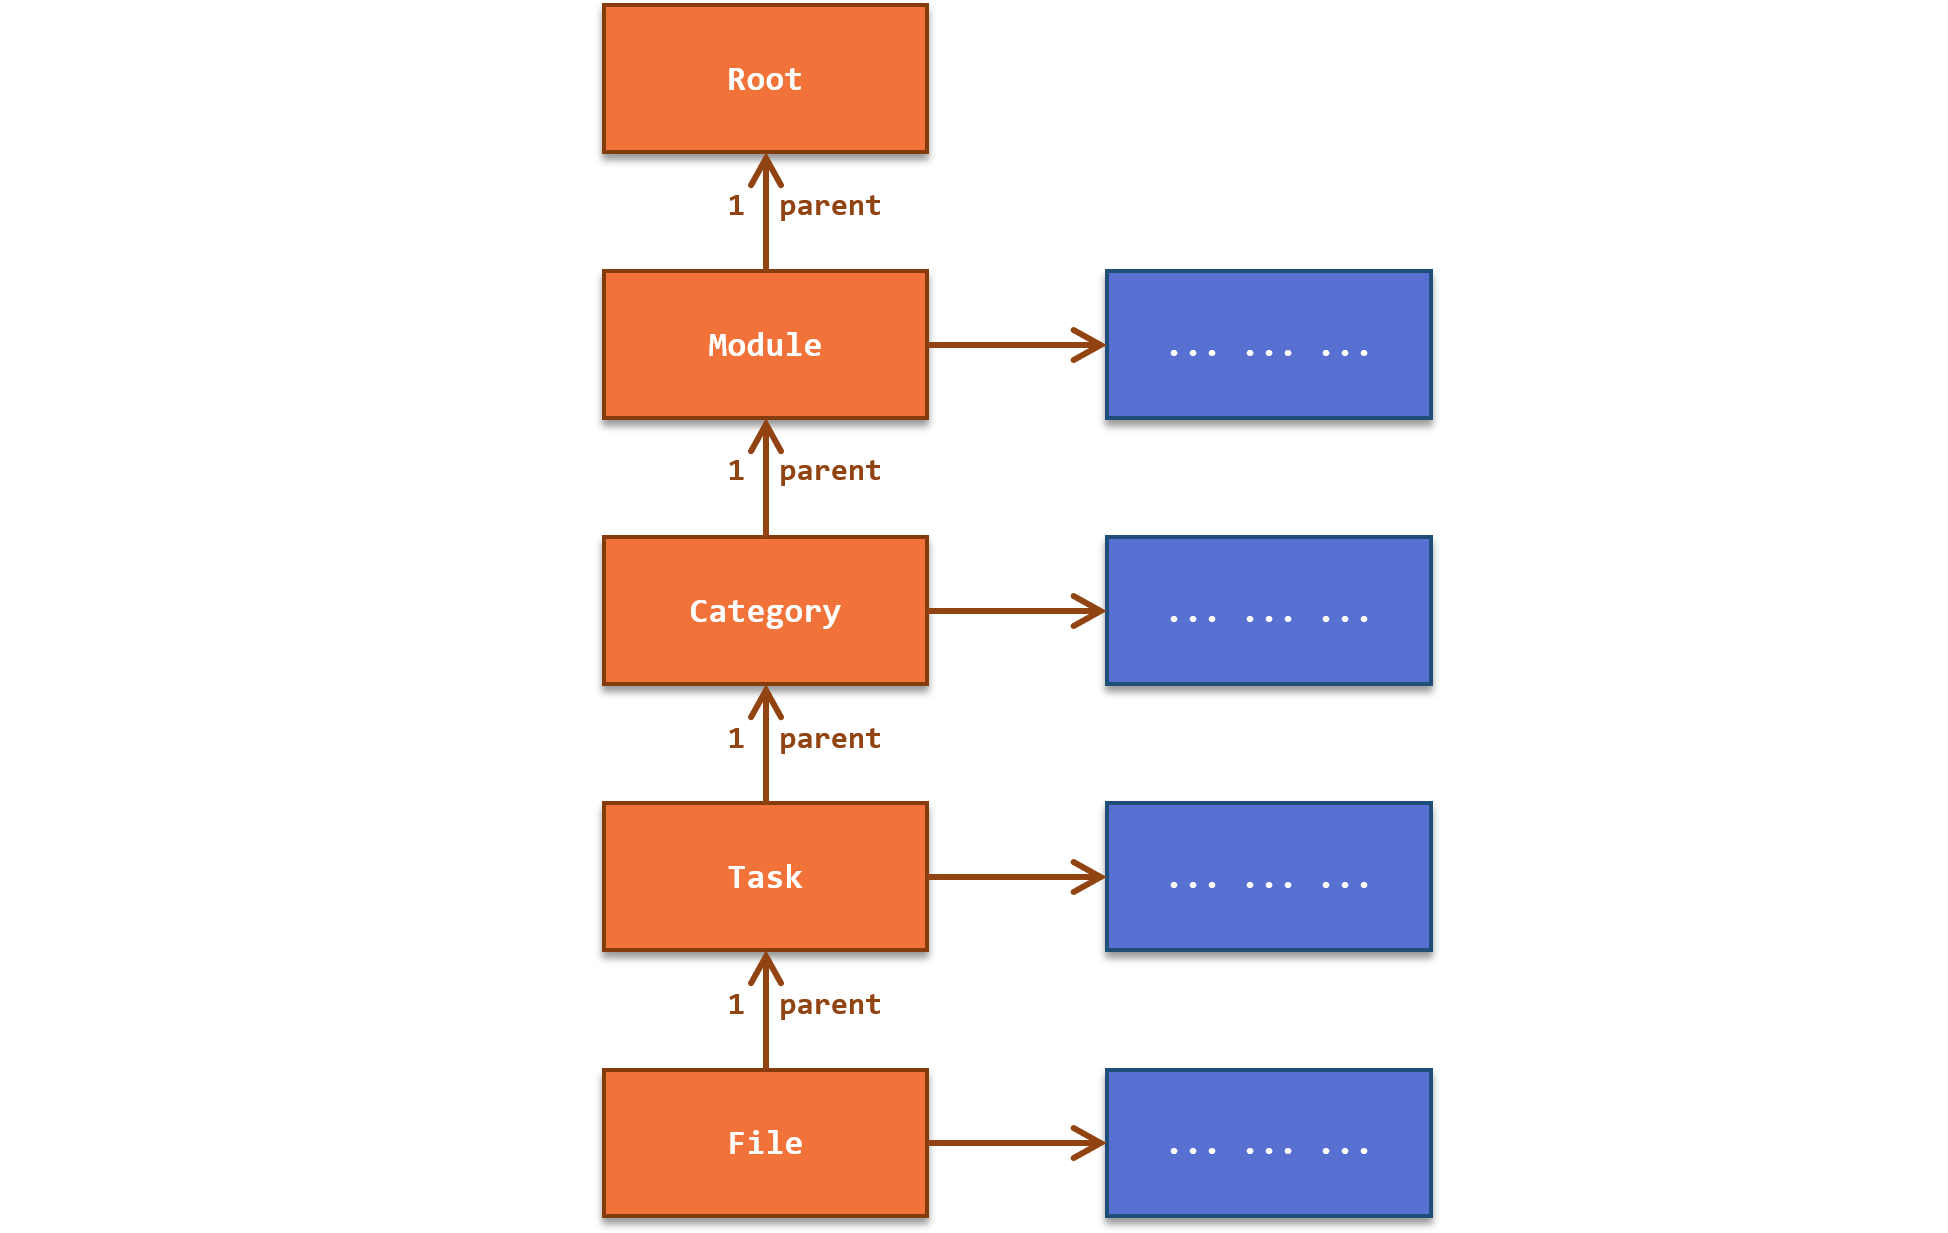
Figure Directory Class Diagram (Basic)
Module has a CategoryManager class that stores the module's categories, and manages their operations (such as adding and deleting).
We will show a more detailed class diagram, as well as describe each of the Directory's attributes below:
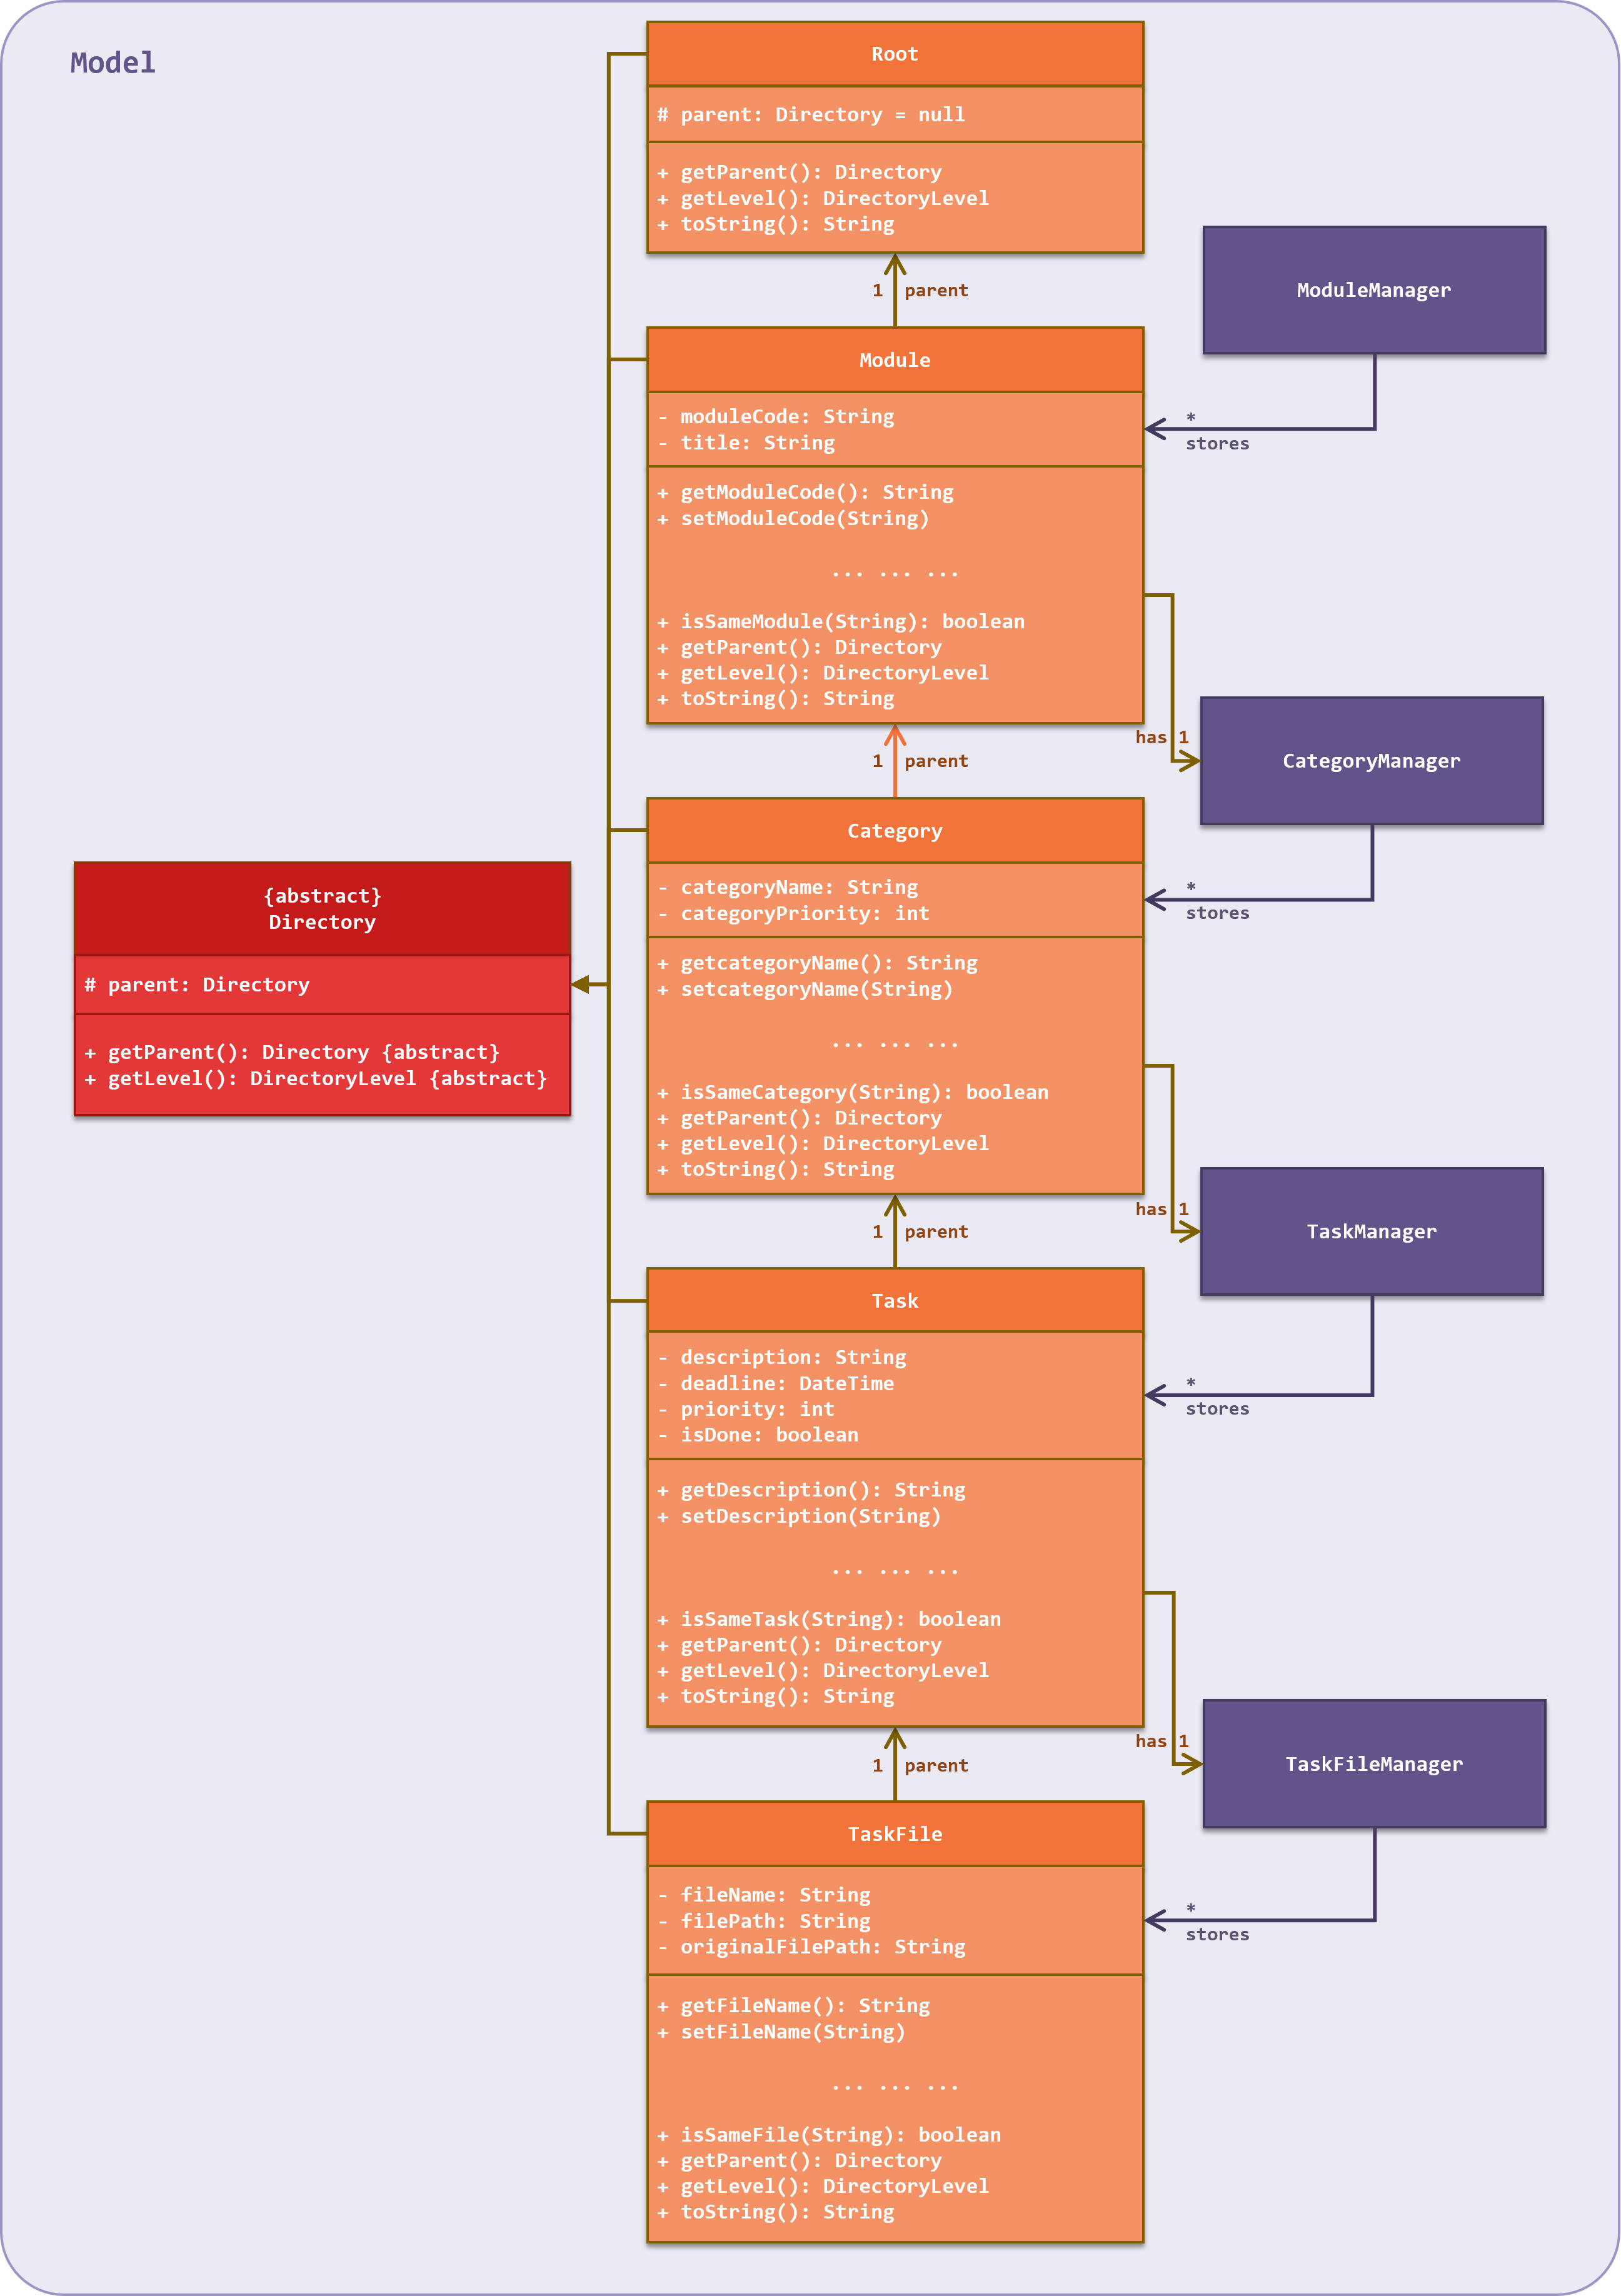
Figure Directory Class Diagram
Root
NULL.
Module
In our current implementation, when a user adds a module, the application automatically adds four categories into the module. They are "Lecture", "Tutorial", "Assignment" and "Lab". These are common categories and are added automatically to improve usability for users, since they do not need to add them on their own.
Category
Task
File
The original file path is the path to where the original file is taken from in the application. In our current implementation, Nuke will then make a copy of the file and save it into a new location, and the path to the new location is stored in the file path attribute.
2. Directory Manager
Overview
ModuleManager object will manage Module objects.
Implementation
ArrayList.
The Directory Manager classes also contain very similar methods to carry out operations regarding its Directories. For example, in the
ModuleManager class, there are:
getModule(moduleCode: String)– Gets aModuleobject from theArrayListbased on themoduleCodeprovidedadd(Module)– Adds aModuleobject into theArrayListof storedModuleobjectsdelete(Module)– Remove aModuleobject from theArray Listedit(Module, newModuleCode: String)– Edits aModuleobject'smoduleCodeto a new onefilter(moduleKeyword: String)– Filters forModuleobjects in theArrayListwithmoduleCodethat contains themoduleKeywordfilterExact(moduleKeyword: String)– Filters forModuleobjects in theArrayListwithmoduleCodethat equals themoduleKeyword
The Directories and Directory Managers together make up the Model component of the Nuke application.
Design Considerations
Structure Decision
- Alternative 1: No Directory Tree structure; have one Task List</b> which stores all the user’s tasks
- Pros: Implementation-wise will be trivial. Any operations relating to the task can be done directly from the Task List
- Cons: The Task List can become too large overtime. It can become messy and unorganised since categorisation of tasks is not explicitly implemented. Also, it will prevent having duplicated common names. For example, many tasks may have the same task description Tutorial 3.
- Alternative 2: Have a Directory Tree structure (current implementation)
- Pros: The structure is more layered and well-organised. A folder and sub-folder structure is intuitive to the user since it tends to follow how he would normally store and organise their tasks. Duplicated Directory names are also supported 😊 provided they come from different parent Directories.
- Cons: Can be challenging to implement 😩. There are many other structures and methods that we need to implement to facilitate the Tree structure. For example, methods to traverse the Tree, and how Directories have knowledge of their parent Directory. For the users, this would mean more commands and features for them to know.
Directory Operations
- Alternative 1: Merge Directory classes with Directory Manager classes
- Pros: We will be able to implement one less class for each Directory. Also it may be intuitive at first to combine them since they perform “similar” functions. For example
ModuleandModuleManagerclasses both have operations that largely involveModuleobjects. - Cons: The operations of Directory classes with Directory Manager classes are not exactly similar. Directory classes form the basic structure of the Directories, while the Directory Manager classes manage storing and operating Directories. Merging the two will thus violate Single Responsibility Principle and Separation of Concerns as the merged class will have two different roles.
- Pros: We will be able to implement one less class for each Directory. Also it may be intuitive at first to combine them since they perform “similar” functions. For example
- Alternative 2: Have separated Directory classes and Directory Manager classes (current implementation)
- Pros: The classes are more specialised and perform more distinct roles, which is an ideal coding practice.
- Cons: A separate class needs to be implemented for each of the Directories. Both Directory classes and Directory Manager classes also tend to be very closely associated to each other and increases coupling.
3. Directory Traverser
Overview
The Directory Traverser also helps to fill in the missing path attributes in various commands by using the information from the current and parent Directories. For example, if a user is at the Module level, with module code CS2100, and wants to add a category, he does not have to enter the directory path to the module in the command as such:
addc toAdd -m cs2100. Instead, he can just type addc toAdd. This also works when the user is at the Category, Task and File levels.
Implementation
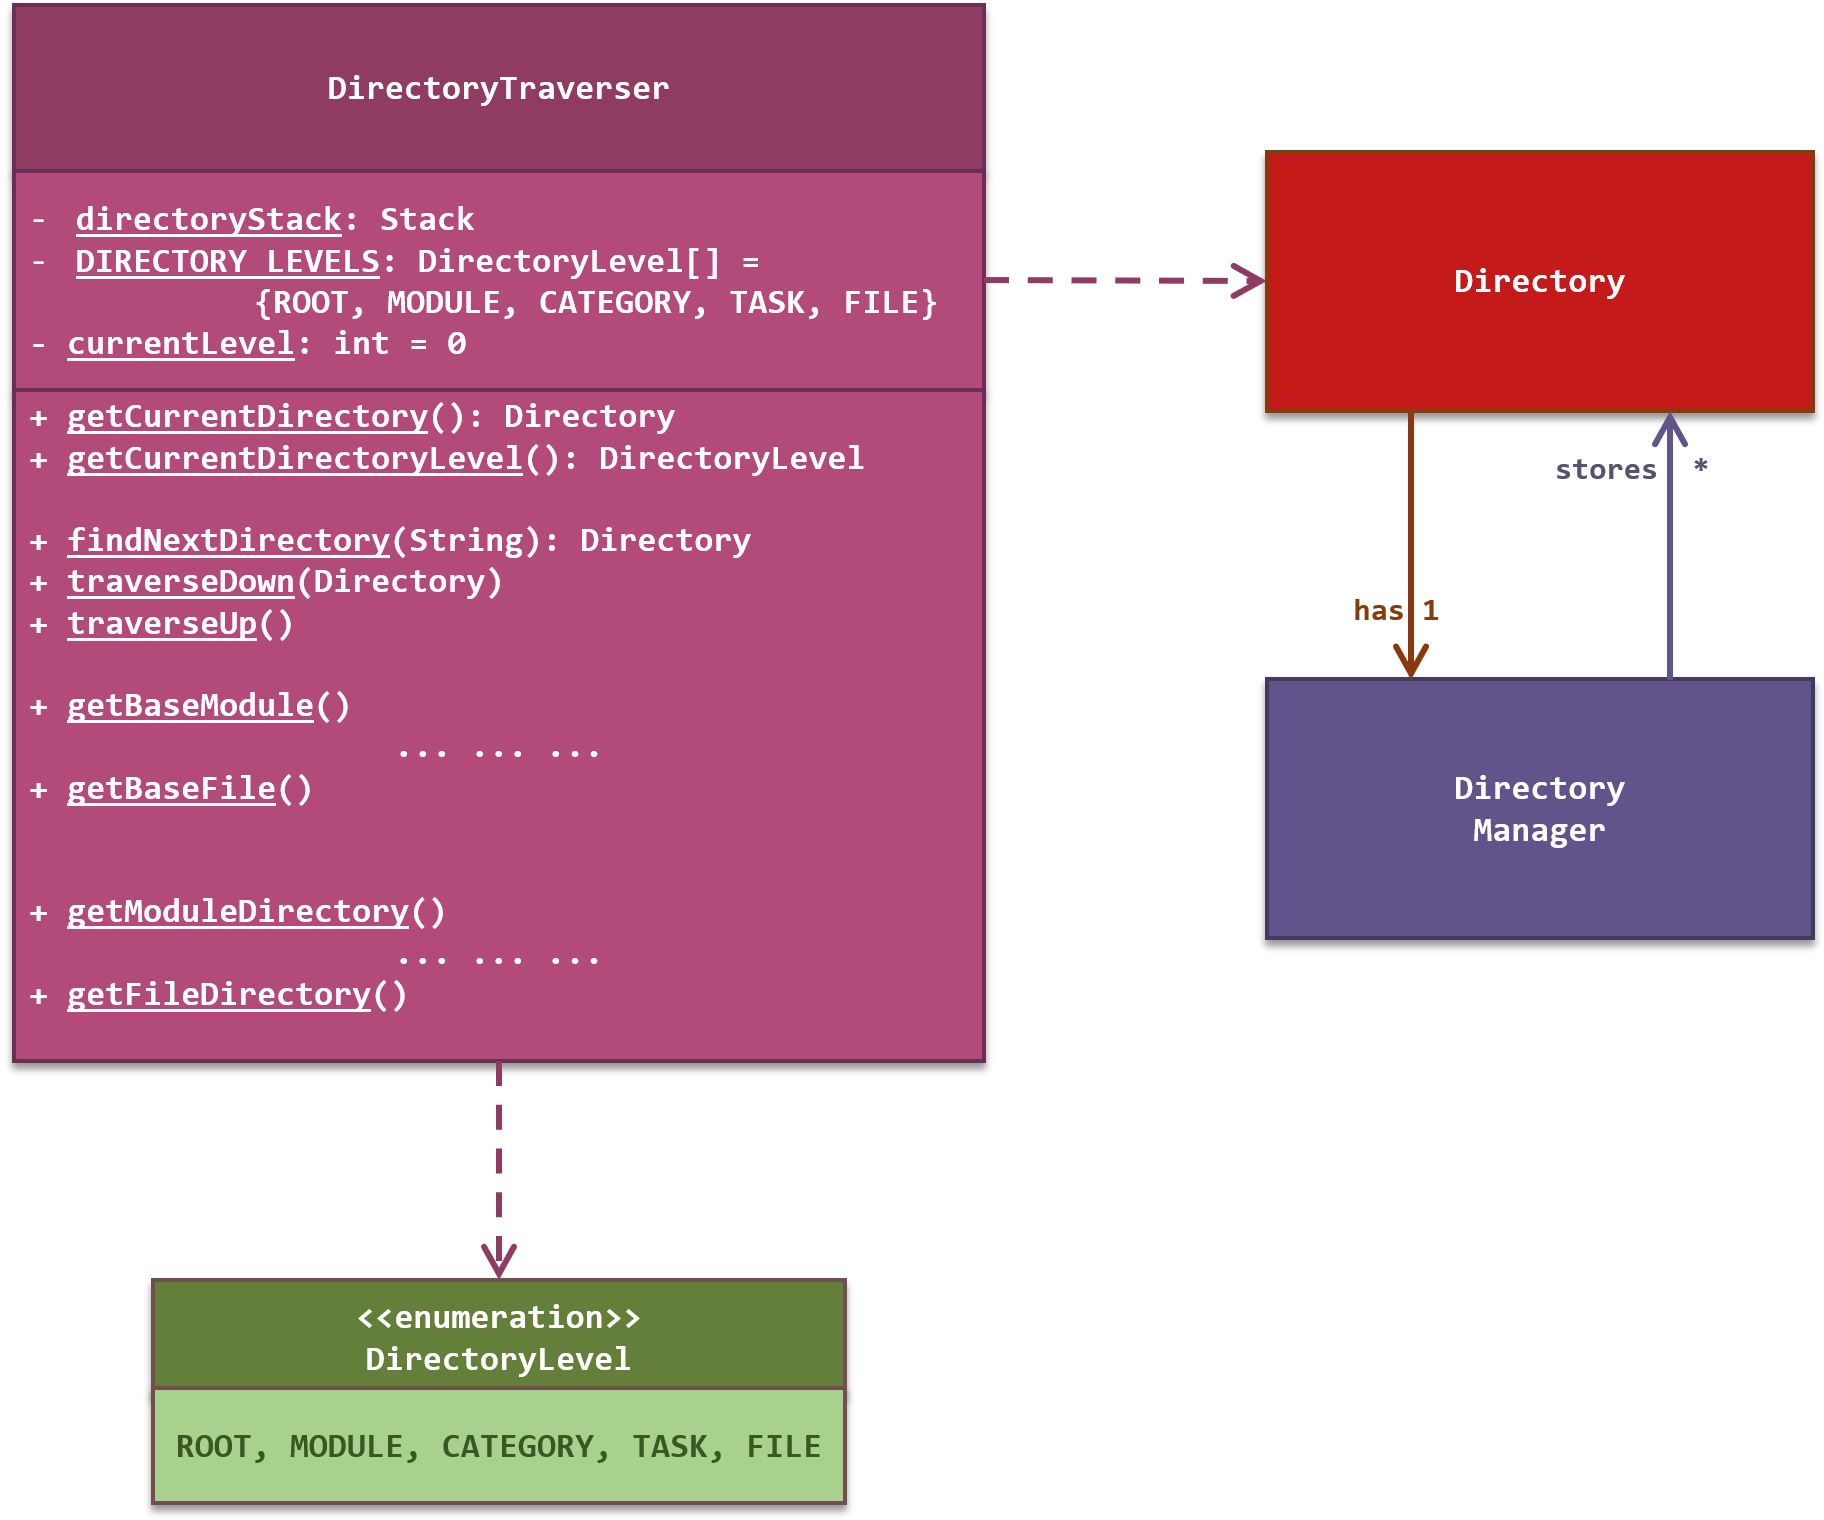
Figure Directory Traverser Class Diagram
DirectoryTraverser class is a static class which has several public static methods. That means other classes can use the DirectoryTraverser class's methods without having to instantiate a DirectoryTraverser object.
DirectoryTraverser stores the current path information as a Stack. When traversing down to a child Directory, it pushes the child Directory into the Stack. Similarly, when traversing up to its parent Directory, it pops the current Directory out of the Stack. This helps to track what is the current Directory, which will always be at the top of the Stack.
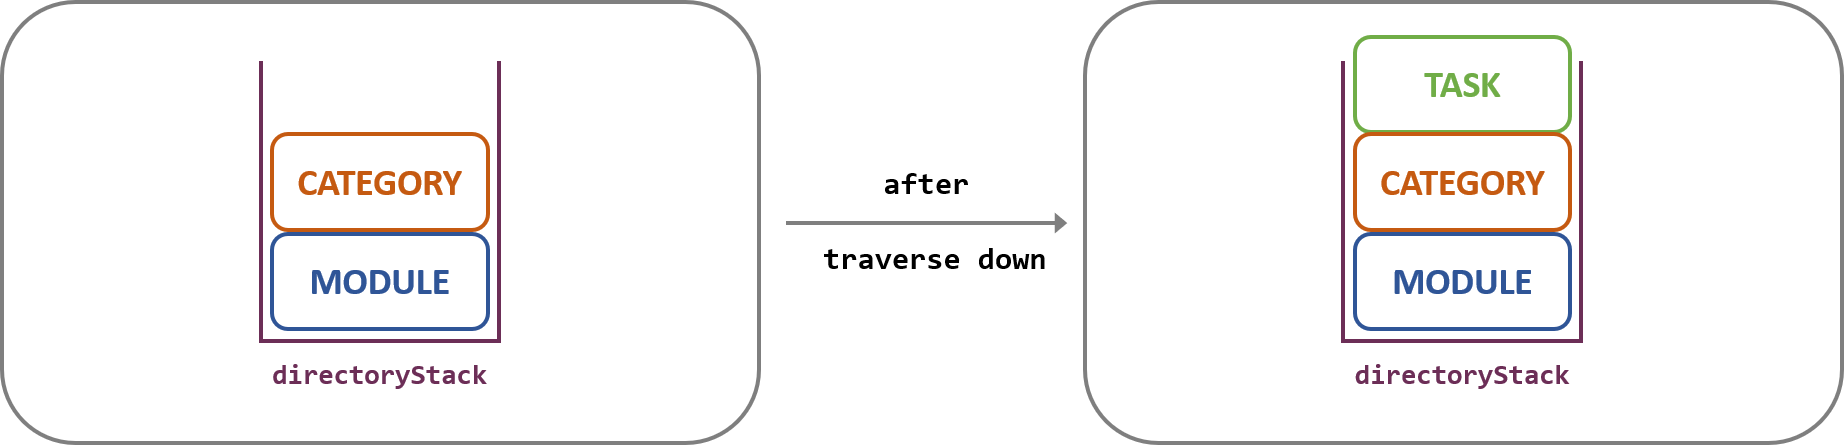
Figure Directory Traverser Traverse Down
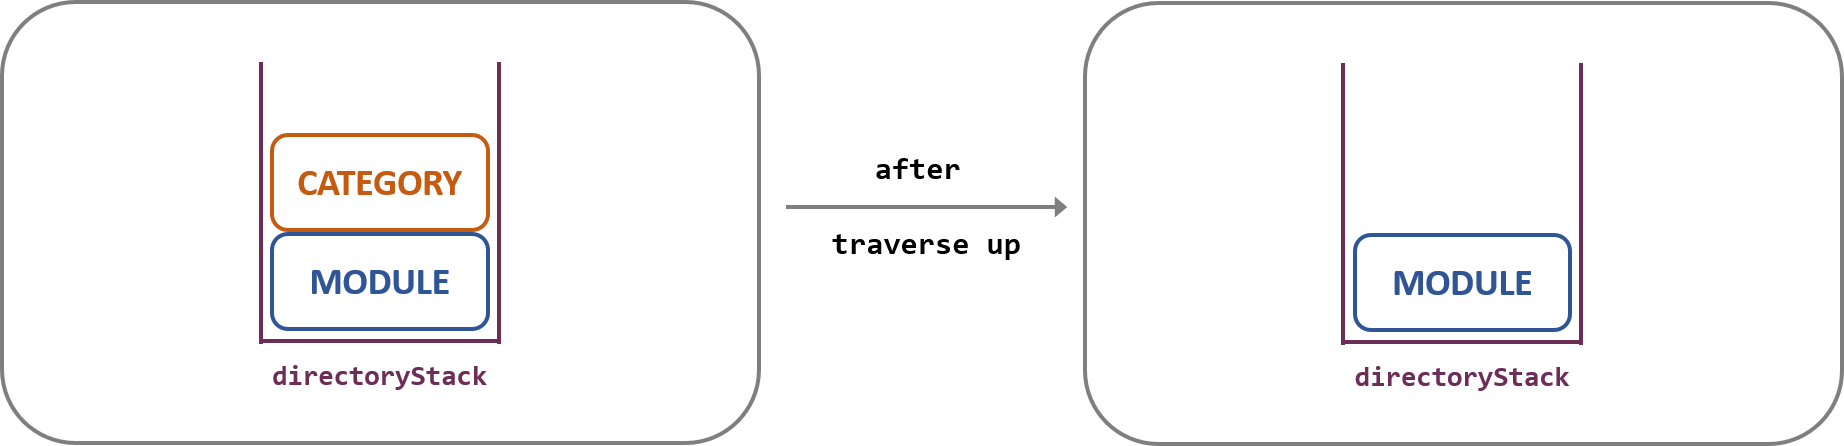
Figure Directory Traverser Traverse Up
DirectoryTraverser class has two main functions:
Traversal
The
DirectoryTraverser class contains three main methods to facilitate traversing up and down Directories. They are:findNextDirectory(nextDirectoryName: String)– Finds a presentDirectoryin the next Directory level with the matchingnextDirectoryNametraverseDown(nextDirectory: Directory)– Traverses down to thenextDirectoryby pushing thenextDirectoryinto thedirectoryStacktraverseUp()– Traverses up to the parent Directory by popping the topDirectoryfrom thedirectoryStack
The Root Directory and the File Directory are the first and last directories in the Directory Tree respectively. If the user attempts to traverse down up the Root Directory, or traverse down a File Directory, an error message will be shown to the user instead. 😯
The above three methods plays an important role in the Change Directory command.
Attributes Matching
Matching attributes to fill in the missing path attributes given by the user is not so straightforward.
DirectoryTraverser has to search through each of the Directory in its directoryStack to extract the relevant information.
At times, the user may be at an inadequate Directory level for
DirectoryTraverser to fully extract the path information. In this case, DirectoryTraverser has to be able to recognise this, and throw an exception 😞. For example, if the user is at the Root level and enters addt do task -c Assignment to add a task, in our current implementation, the following will happen:
DirectoryTraverserwill attempt to fill in the missing path attribute for the module- However, since the user is at the Root level,
DirectoryTraverseris unable to fill the missing path to the module DirectoryTraverserwill throw an exception and an error message is shown to the user to either move to the correct level, or enter the full Directory path
To support the attributes matching feature,
DirectoryTraverser has 2 distinct groups of methods, with one method for each Directory level from Root to File (i.e. in total 8). The methods are:
getBaseModule()– Gets the parent Module Directory, or the current Directory if it is at the Module levelgetBaseCategory()– Gets the parent Category Directory, or the current Directory if it is at the Category levelgetBaseTask()– Gets the parent Task Directory, or the current Directory if it is at the Task levelgetBaseFile()– Gets the current Directory if it is at the File levelgetModuleDirectory(String)– Gets the Module levelDirectoryafter first filling missing path attributesgetCategoryDirectory(String, String)– Gets the Category levelDirectoryafter first filling missing path attributesgetTaskDirectory(String, String, String)– Gets the Task levelDirectoryafter first filling missing path attributesgetFileDirectory(String, String, String, String)– Gets the File levelDirectoryafter first filling missing path attributes
As of the current implementation, the above methods are sufficient for the attributes matching property.
Design Considerations
Attributes Matching
- Alternative 1: Do not have any attribute matching, i.e. missing path attributes are not allowed
- Pros: Simple to implement. We only need to check if every path attribute is provided by the user, and that the Directory from the given path exists.
- Cons: The user needs to consistently enter the full path to the Directory he is targeting. This can become rather time-consuming and very inconvenient to the user.
The commands targeting the File Directroy requires the longest path. For example, the format for the add file command would look something like
addf assignment_1 -m ma1521 -c Assignment -t do assignment. Having the user to constantly type such long commands 😫 would really inconvenience them.
- Alternative 2: Have attribute matching (current implementation)
- Pros: User can omit certain path attributes, or the entire path altogether if he is at the correct Directory. Commands would be shorter and can be entered faster, which meets the expectation stated in the user stories.
- Cons: A lot harder to implement 😧. There are many considerations to be made for the correct implementation of this feature such as how missing attributes can be derived and the correct matching of attributes.
Command Implementation
This section will describe the significant details of how the commands in Nuke are being implemented.
Below is a diagram which summarises the commands in the current Nuke application.
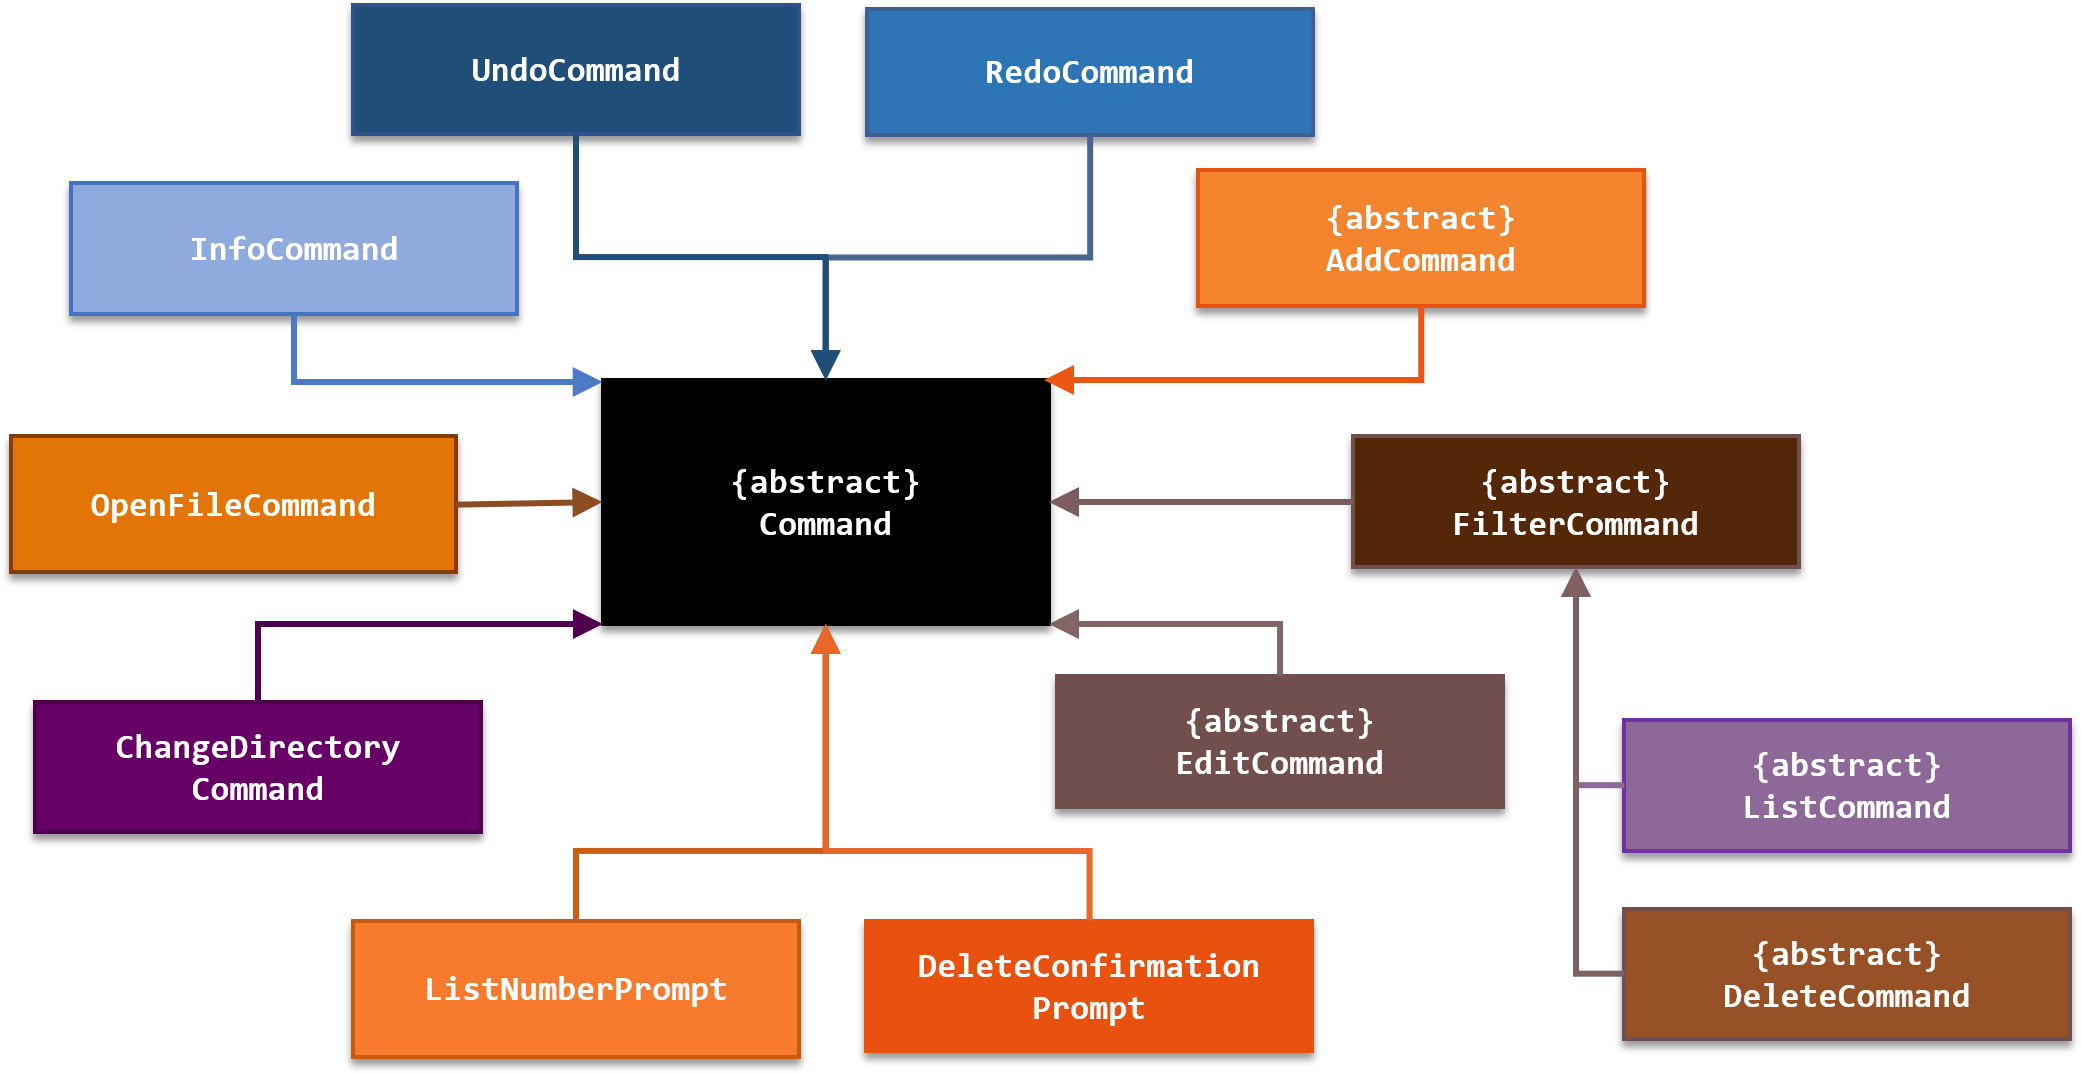
Figure Nuke Commands
1. Add Command
Overview
The add feature adds modules, categories, tasks and tags into the Module, Category and Task List respectively.
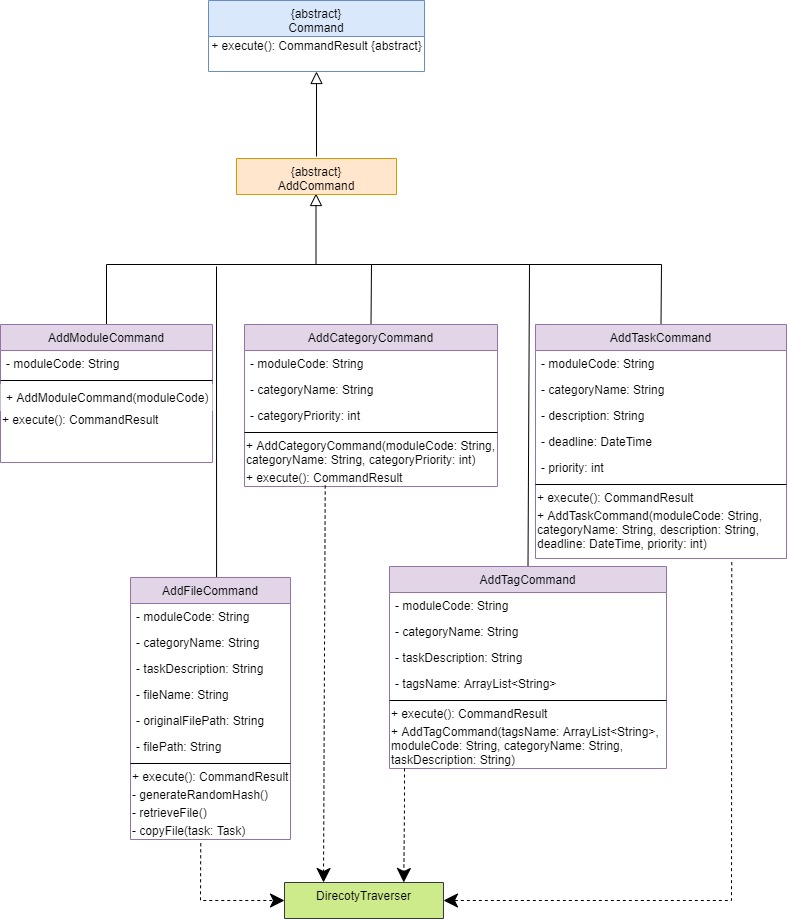
Figure Add Command Classes Diagram
1.1. Add Module Command
The add module feature enable the user to add modules into the Module List.
When the user first requests to execute the addm command(assuming the command format given is valid) to add a module by providing its name, the application will parse the input after addm command word as the module code. From here, there are three possible outcomes:
- The module specified by the user is not provided by NUS – No module will added.
- The module specified by the user is already added – No module will be added.
- The module specified by the user is provided by NUS and have not been added – Module will be added.
Implementation
This feature is facilitated by the AddModuleCommand class which add the modules specified by the user. It overrides the execute() method which extends from the abstract AddCommand class which extends from the abstract Command class. The execute() method’s role is to execute the adding module operation and do necessary checks .
The AddCommand will first try to call the static method add in ModuleManager class, which will try to add the module specified by the user, exception will thrown according the following rules:
DuplicateModuleExceptionwill be thrown if the module specified by the user is contained in theArrayListnamedmoduleListinModuleManagerclass.ModuleNotProvidedExceptionwill be thrown if the module code specified by the user is not contained in theHashMapnamedmodulesMapinModuleManagerclass.
Example Usage
The addition of modules will be illustrated as follows.
James is a user and wants to add the module with the module code of “CS3235”. Assume that he has the current modules:
+--------------------------------------------------------------------------------------------------+
 NO |  MODULE CODE   |                                 MODULE TITLE
+--------------------------------------------------------------------------------------------------+
 1  |     CS1231     |                             Discrete Structures
 2  |     CS2100     |                            Computer Organisation
 3  |     CS2113     |              Software Engineering & Object-Oriented Programming
+--------------------------------------------------------------------------------------------------+
Total modules: 3
+--------------------------------------------------------------------------------------------------+
❶
James will simply enter the command addm cs3235
After the input is parsed as an add module task and executed, the AddModuleCommand#execute() will call ModuleManager#add() to add the module cs3235. In the ModuleManager#add() method, it will call ModuleManager#contains() to check if the module cs3235 exists in the ArrayList named moduleList , then it will check if the module code “cs3235” is a key in the HashMap named modulesMap, after all, it will instantiate an Module object with the module code “CS3235” and respective title “Computer Security”, then add the object into the moduleList.
❷ James receive the following feedback:
 root :
 addm cs3235
 SUCCESS!! Module CS3235 Computer Security has been added.

 root :
 lsm
 Here are what you are looking for...

 +--------------------------------------------------------------------------------------------------+
  NO |  MODULE CODE   |                                 MODULE TITLE
 +--------------------------------------------------------------------------------------------------+
  1  |     CS1231     |                             Discrete Structures
  2  |     CS2100     |                            Computer Organisation
  3  |     CS2113     |              Software Engineering & Object-Oriented Programming
  4  |     CS3235     |                              Computer Security
 +--------------------------------------------------------------------------------------------------+
 Total modules: 4
 +--------------------------------------------------------------------------------------------------+
Below is a sequence diagram to illustrate the above example scenario.
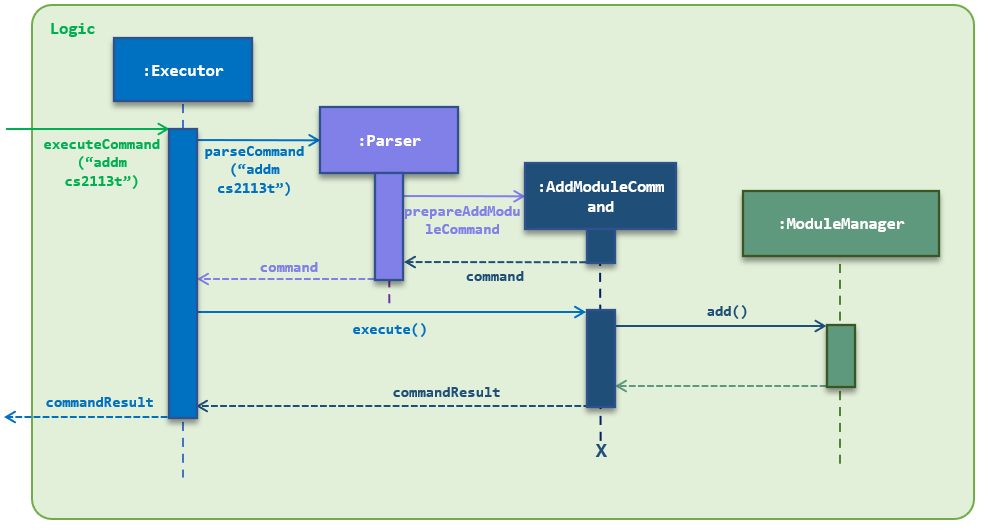 Figure Add Module Command Class Diagram
1.2. Add Category and Task Commands
Since add category and add task feature are implemented in a similar pattern, they can be explained together.
The add category/task enable the user to add category/task/tag into Category/Task/Tag List.(One to one correspondence, which means the user can only add category to Category List, task to Task List).
When the user first request to execute the add command(assuming the command format given is valid) to add a category/task by providing its name, the application will parse the input after addm /addc command word as the name for category/task. From here, there are three possible outcomes:
- The specified upper parent directory does not exist. – No category/task will be added.
- The name of the specified category/task already exist. – No category/task will be added.
- The specified upper parent directory exist and the name of the specified category/task does not exist. – The specified category/task will be added.
Implementation
This feature is facilitated by the AddCategoryCommand and AddTaskCommand class which add the corresponding category or task respectively.
The above-stated two classes overrides the execute() method which extends from the abstract AddCommand class which extends from the abstract Command class. The execute() method’s role is to execute the adding category/task operation and do necessary checks.
The AddCategoryCommand and AddTaskCommand will first call the getParentDirectory() method to get the parent directory, then it will instantiate a Category/Task object and try to call add method in their respective parent directory class to add the new object, exception will be thrown according to the following rules:
ModuleNotFoundExceptionwill be thrown if the specified module code does not exists in theArrayListof Module when adding a new category or task.CategoryNotFoundExceptionwill be thrown if the specified category name does not exists in theArrayListof Category inCategoryManagerinModulewhen adding a new task.IncorrectDirectoryLevelExceptionwill be thrown if the user is performing theaddc/addtcommand in the wrong directory without specifying their full parent directories.(For example, when user trying to executeaddcin aRoot/Taskdirectory, or trying to executeaddtin aRoot/Moduledirectory)DuplicateTaskException/DuplicateCategoryExceptionwill be thrown if the name of the category/task already exist in the current directory.
Below are the class-diagram for the involved classes:
to-do: add the class-diagram
Example Usage
The addition process for category and task are similar. In this example, the addition process for category will be illustrated as a series of steps.
James is a user and wants to add a category named “misc” under the module cs3235. Assume that he has the current Module List and current Category List in the module cs3235:
+--------------------------------------------------------------------------------------------------+
 NO |  MODULE CODE   |                                 MODULE TITLE
+--------------------------------------------------------------------------------------------------+
 1  |     CS1231     |                             Discrete Structures
 2  |     CS2100     |                            Computer Organisation
 3  |     CS2113     |              Software Engineering & Object-Oriented Programming
 4  |     CS3235     |                              Computer Security
+--------------------------------------------------------------------------------------------------+
Total modules: 4
+--------------------------------------------------------------------------------------------------+
+--------------------------------------------------------------------------------------------------+
 NO |     MODULE     |                                CATEGORY                                | PTY
+--------------------------------------------------------------------------------------------------+
 1  |     CS3235     |                               Assignment                               |  4
 2  |     CS3235     |                                  Lab                                   |  3
 3  |     CS3235     |                                Lecture                                 |  1
 4  |     CS3235     |                                Tutorial                                |  2
+--------------------------------------------------------------------------------------------------+
Total categories: 5
+--------------------------------------------------------------------------------------------------+
-
James has two choices:
- enter
cd cs3235to enter the module directory then enteraddc miscto add the category. - enter
addc misc -m cs3235to add the category at the root directory.
Suppose James use the first method, after the second input, the input is parsed as an add task command and executed, the
AddCategoryCommand#execute()will callAddCategoryCommand#getParentDirectory()to get the current parent directory, then it will instantiate anCategoryobject with the name “misc”. After whichCategoryManager#add()will be called to add the new object. In theCategoryManager#add()method, it will callCategoryManager#contains()method to check if the current parent directory contains the category with name “misc”, finally add the object into theArrayListofcategoryList. - enter
-
James receive the following feedback:
root :
addc misc
SUCCESS!! Category misc is created.
Below is a sequence diagram to illustrate the above example scenario.
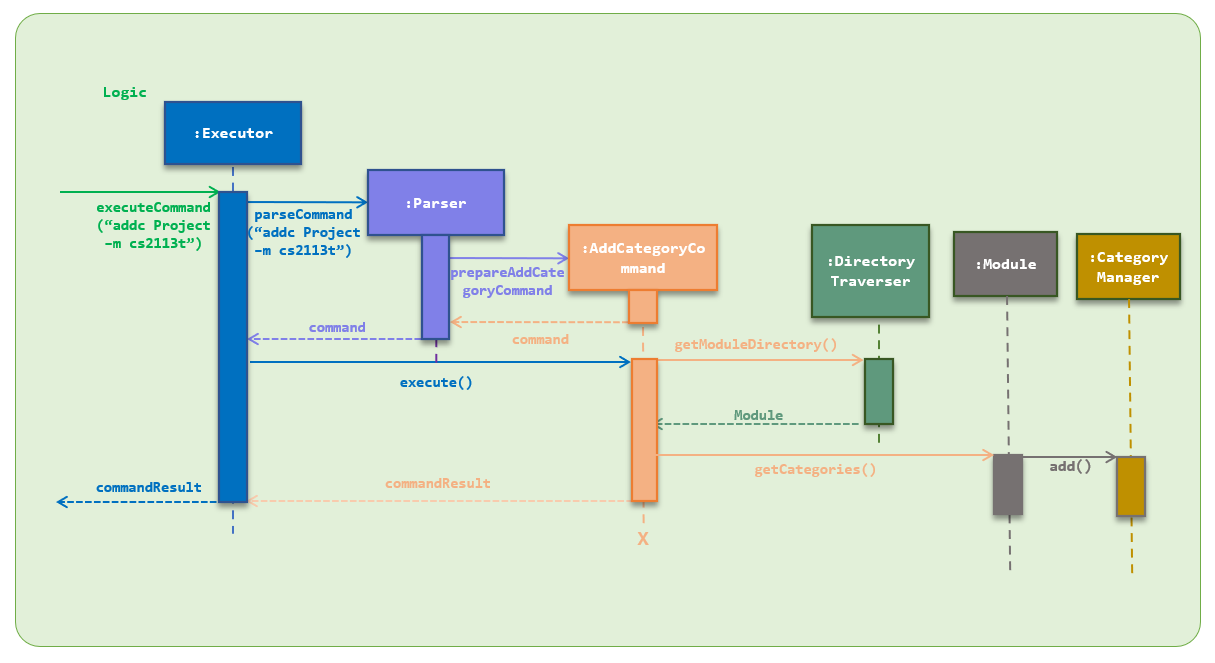 Figure Add Module Command Sequence Diagram
Design Considerations
Character Limit
- Alternative 1: Have no character limit to the names of the Directory being added
- Pros: Simple to implement. No need to do any checking and create error messages aside from duplicated names.
- Cons: If the name is too long, it would affect the formatting of the list to be printed in the list command.
- Alternative 2: Have a character limit (current implementation)
- Pros: The list to be shown to the user in the list command will not run into formatting issues.
- Cons:At times, user may want to have a particularly long name for the Directory. However, they are unable to do so anymore if a word limit is imposed.
The word limit that we have implemented in Nuke are the following:
Module Code: No character limit, but has to be an NUS provided module
Category Name: 15 characters
Task Description: 25 characters
File Name: 30 characters
These numbers are chosen in view of the realistic length of words a user will usually use for such names. So in most cases, the user should not be exceeding the character limit 😏.
2. List Command
Overview
The List feature lists out modules, categories and tasks from the Module, Category and Task List respectively.
When the user first requests to execute the list command to list out directory by providing its name, the application will first filter for directories with matching names. From here, there are three possible outcomes:
- There are no matches – Nothing is listed out.
- There are matches – The list of matches will be shown to the user.
Implementation
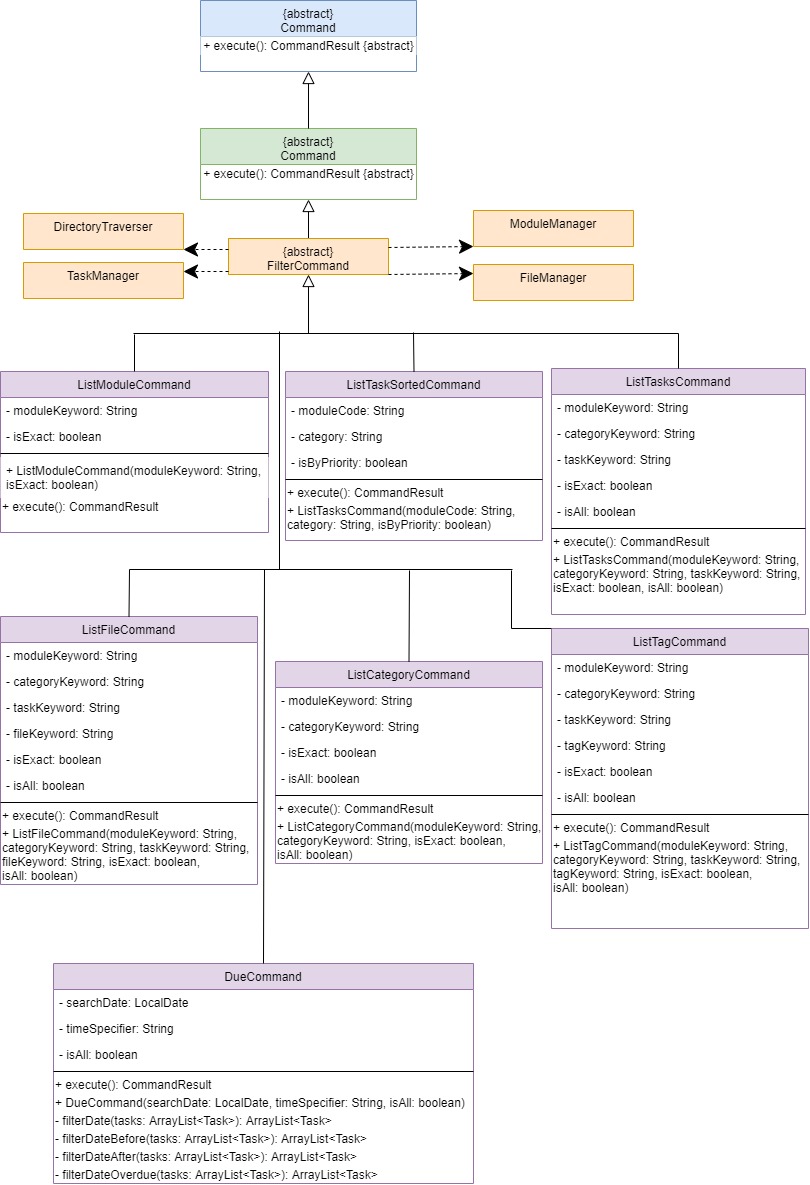
Figure List Command Class Diagram
The ListModuleCommand, ListCategoryCommand, ListTaskCommand, ListFileCommand, DueCommand, ListModuleTaskCommand, ListTaskSortedCommand classes in the application facilitates this list feature. They are in charge of listing out modules, categories, tasks, files, all tasks at the specified time period, tasks of module in ascending order of deadline and all undone tasks sorted by deadline or priority respectively.
As shown in the figure above, those seven classes each extends from the abstract ListCommand class. They also override the ancestor Command class’s execute() method, which role is to list out desired entries to the user.
The ListCommand class in turn extends the FilterCommand abstract class. The FilterCommandClass contains the following vital methods for filtering:
createFilteredModuleList()– Creates anArrayListof the filtered modules.createFilteredCategoryist()– Creates anArrayListof the filtered categories.createFilteredTaskList()– Creates anArrayListof the filtered tasks.
Lastly, the FilterCommand class extends the abstract Command class that contains the execute() method to execute the actual list command.
Example Usage
The listing process for modules, categories, tasks, files, all tasks at the specified time period, tasks of module in ascending order of deadline and all undone tasks sorted by deadline or priority are similar. In this example, the listing process for modules will be illustrated as a series of steps.
James is a user and wants to list out all of his modules with moduleCode begin with “CS”. Assume that he has the current Module List:
+--------------------------------------------------------------------------------------------------+
 NO |  MODULE CODE   |                                 MODULE TITLE
+--------------------------------------------------------------------------------------------------+
 1  |     CS2101     |             Effective Communication for Computing Professionals
 2  |    CS2113T     |              Software Engineering & Object-Oriented Programming
 3  |     CS3230     |                      Design and Analysis of Algorithms
 4  |     CS3235     |                              Computer Security
 5  |    GEH1036     |                           Living with Mathematics
 6  |    IFS4103     |                         Penetration Testing Practice
+--------------------------------------------------------------------------------------------------+
Total modules: 6
+--------------------------------------------------------------------------------------------------+
James will first enter the command to list out modules with moduleCode begin with “CS”:
lsm CS
After the input is parsed as a list module command and executed, the ListModuleCommand#execute() will call FilterCommand#createFilteredModuleList() to create the filtered list of modules containing the Modules with moduleCode begin with “CS”. ListModuleCommand#execute() will then call its parent class’s method FilterCommand#sortModuleList(filteredModuleList) to sort the modules by their respective moduleCode. And finally the sorted Arraylist of Modules is used to instantiate a CommandResult object and returned, and ui#showResult(commandResult) will be called to show the result to the user. And Listing process ends.
Below is a sequence diagram to illustrate the above example scenario.
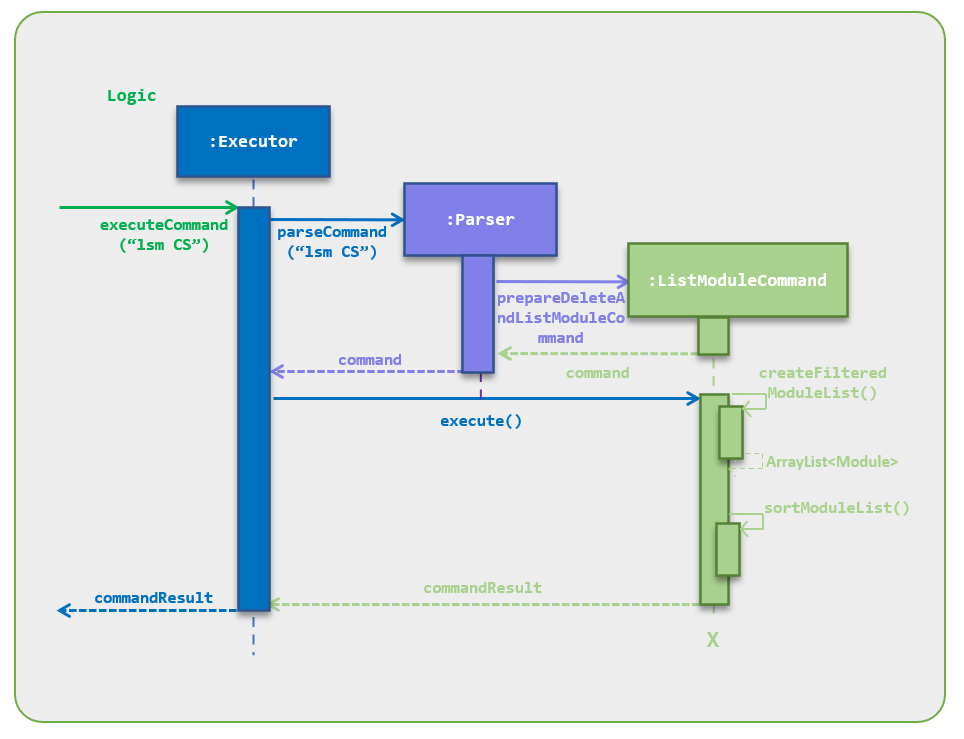
Figure List Module Command Sequence Diagram
3. Delete Command
Overview
When the user first requests to execute the delete command to delete a directory by providing its name, the Nuke application will first filter for directories with matching names. From here, there are three possible outcomes:
- There are no matches – Nothing is deleted.
- There is one match – A prompt will be given to the user to confirm the deletion.
- There are multiple matches – The list of matches will be shown to the user, and the user chooses which ones to delete. A further prompt will be given to confirm the deletion(s).
Implementation
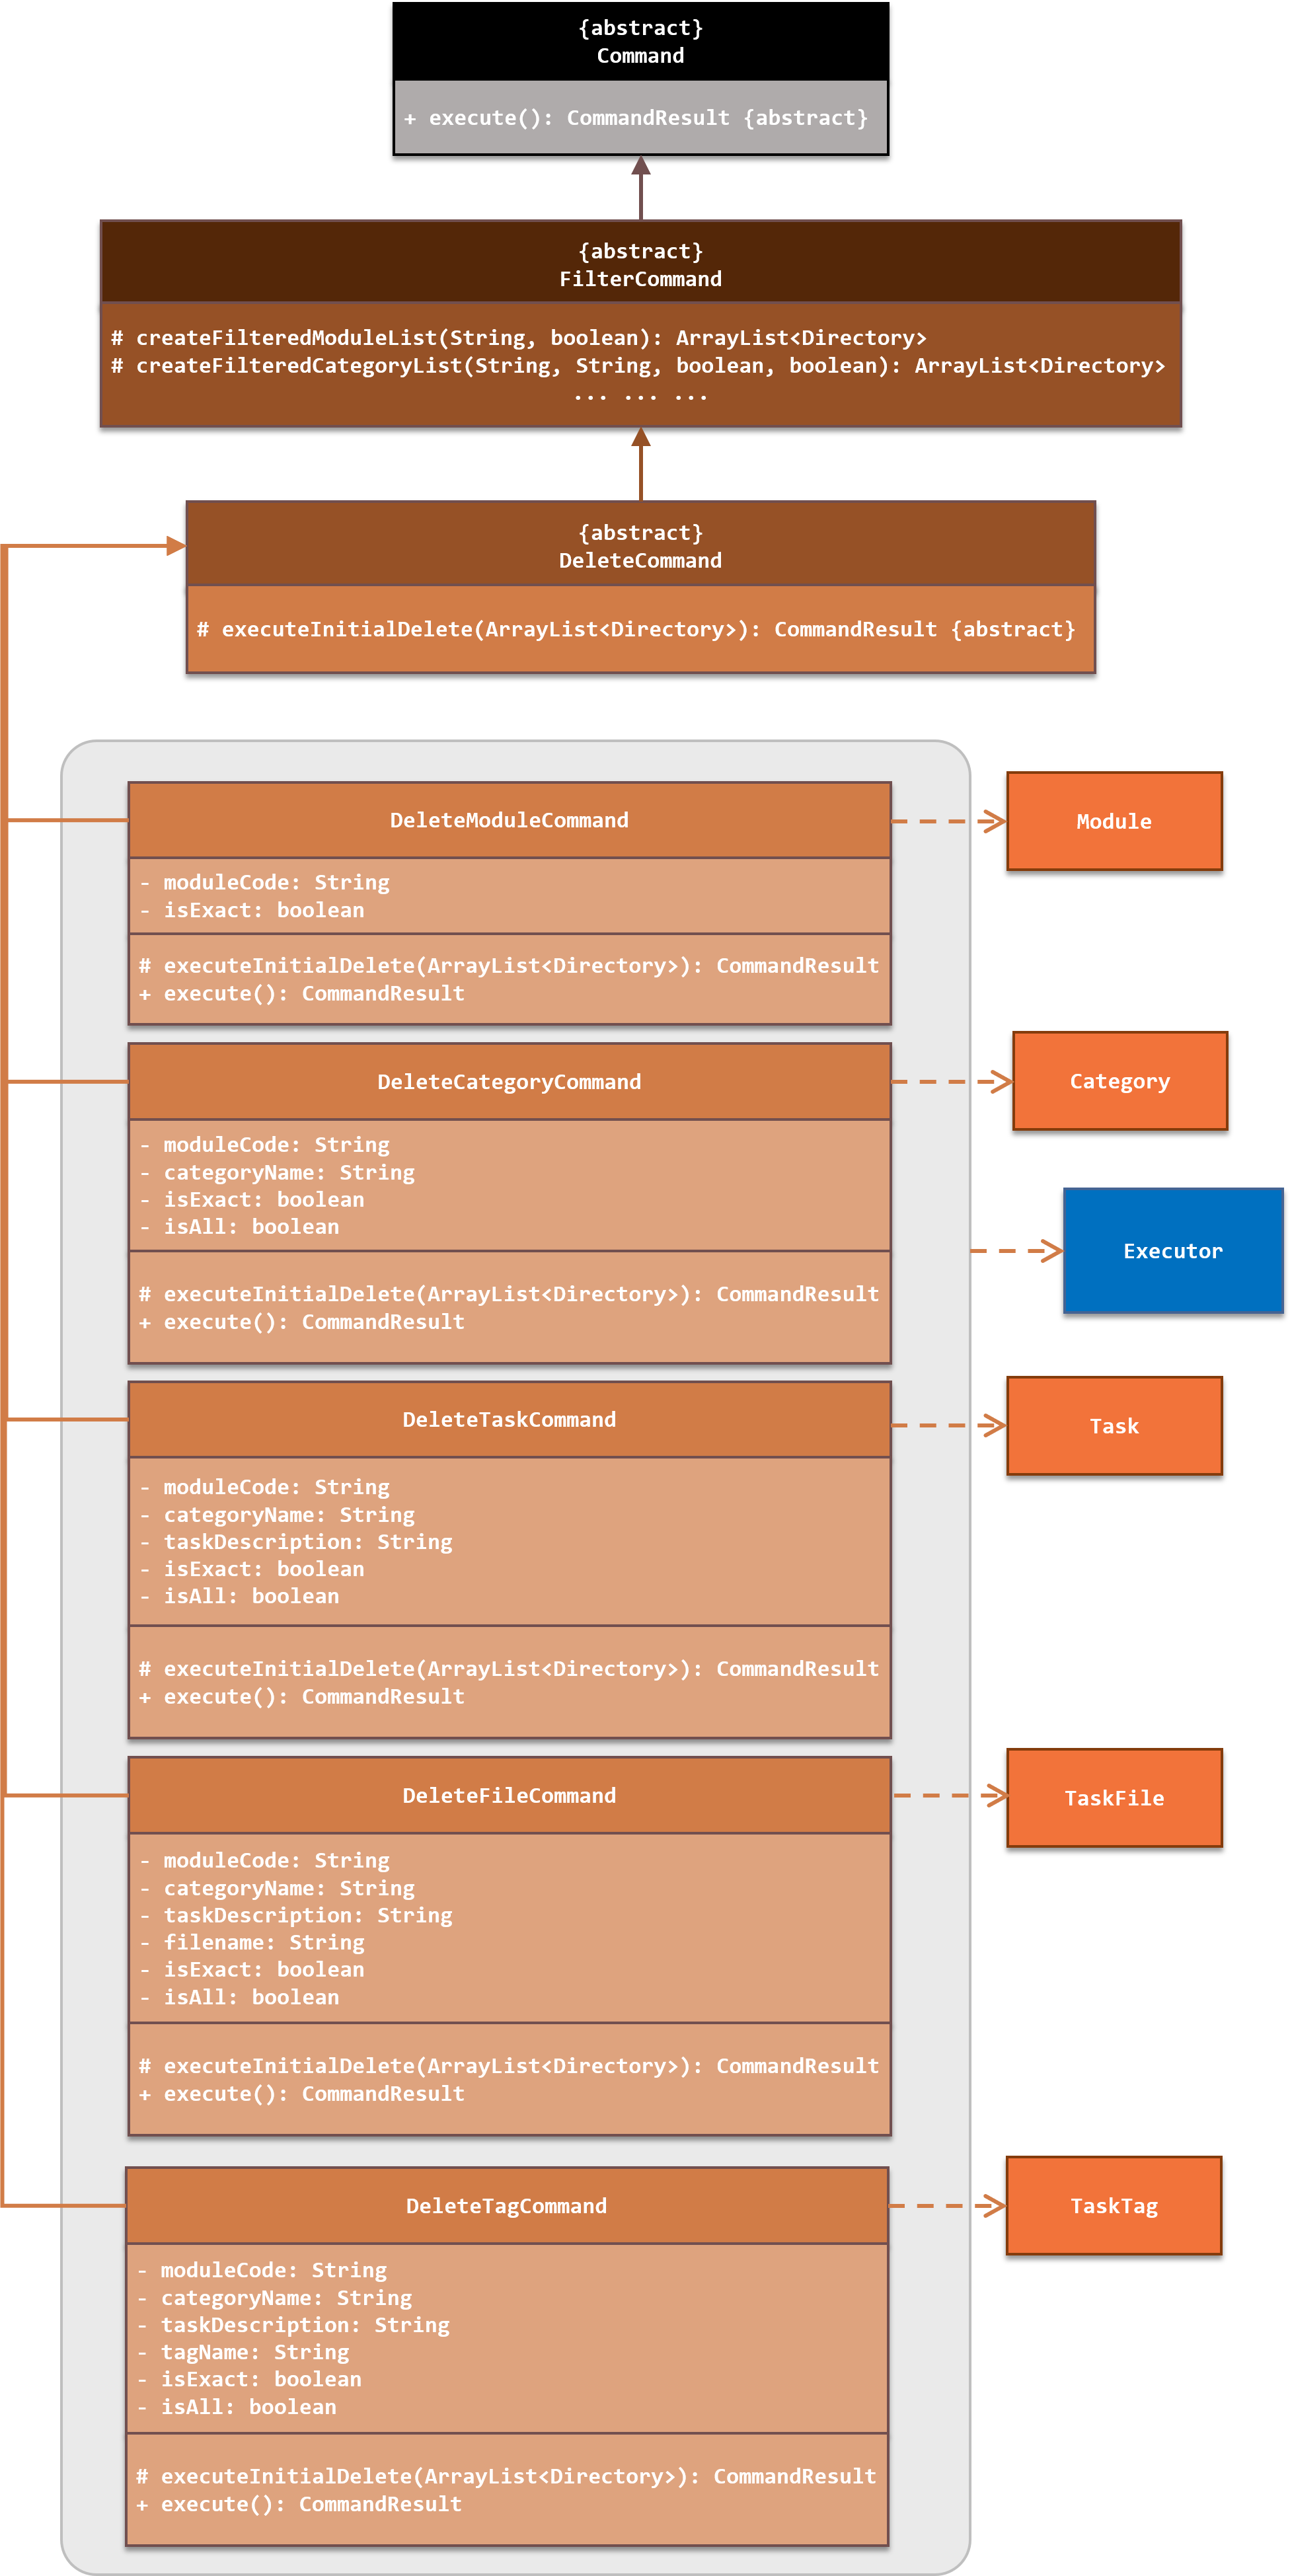
Figure Delete Command Class Diagram
DeleteTaskCommand class will only delete tasks (and not modules, categories or files).
Like the list commands, the delete commands function with a filter property. That is to say, the delete commands will first filter for the possible directories to delete based on the user-provided keywords. If there are multiple matches after the filtering, the user will be prompted to choose which of the directories they wish to delete.
Since the delete commands are quite similar to the list commands, the
DeleteCommand class extends from the same FilterCommand class as the ListCommand class. The DeleteCommand class thus inherits the same methods in the FilterCommand class.
Each of the delete commands extends from the abstract
DeleteCommand class. The DeleteCommand class has an abstract method, executeInitialDelete(), and each of the delete commands must implement this method. The role of executeInitialDelete() is to prepare the necessary prompt to show the user, depending on the number of filtered matches (See above).
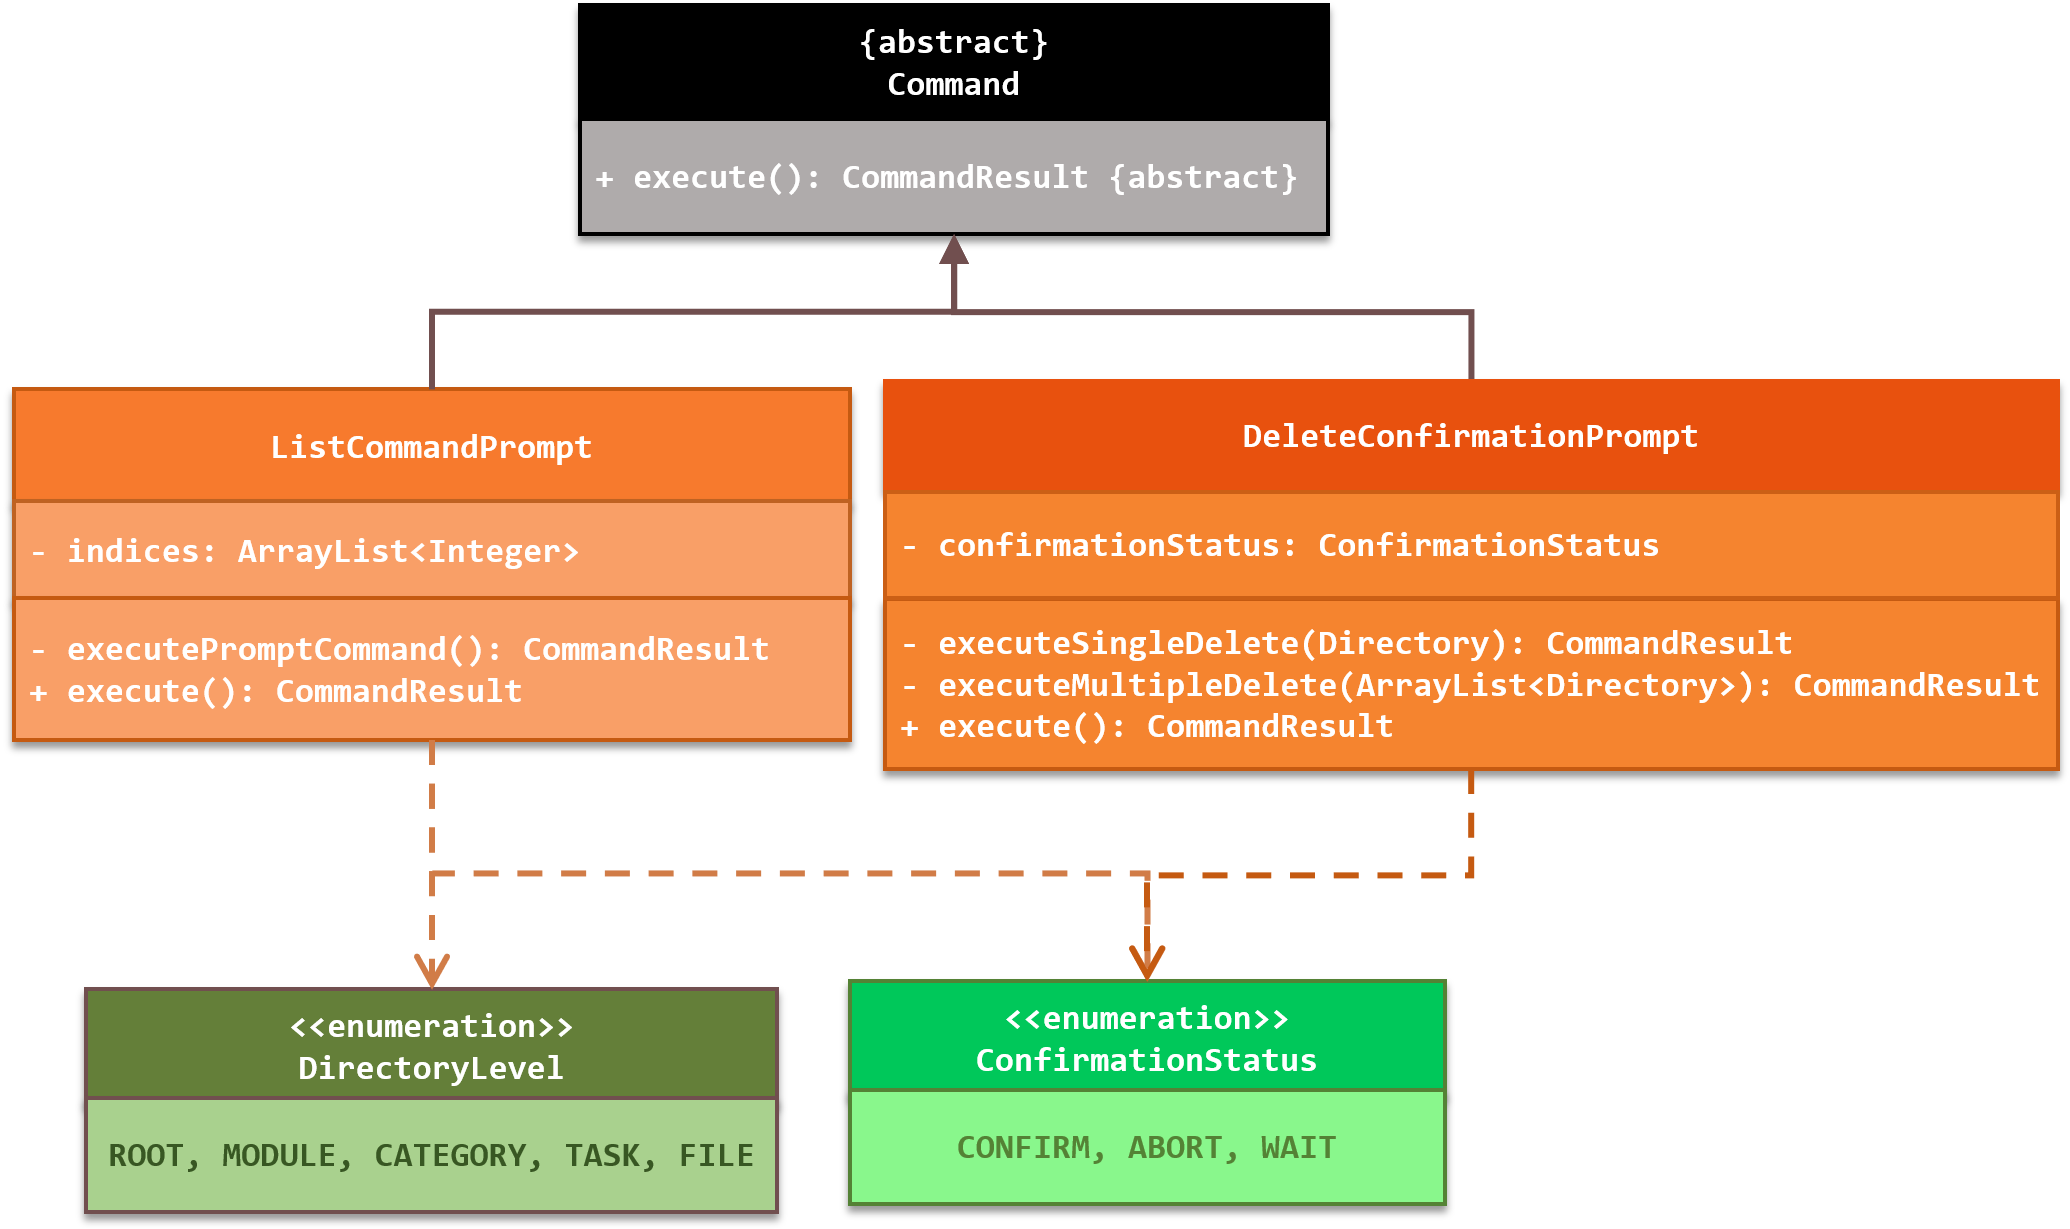 Figure Prompt Command Class Diagram
Two prompt commands are involved in the deletion process:
ListNumberPromptmanages the event after the user has input the list numbers of the directories to delete when there are multiple matches.DeleteConfirmationPromptmanages the event after the user has responded to the confirmation prompt to delete the directories
The
ListNumberPrompt class will only be executed if there are multiple matches. Otherwise, only the
corresponding DeleteCommand and DeleteConfirmationPrompt objects will be executed in the deletion process.
The deletion process can thus be broken down into 3 stages. We provide for you the relevant sequence diagrams to help you to see how each stage works in our current implementation of the delete command.
+--------------------------------------------------------------------------------------------------+
 NO |  MODULE CODE   |                                 MODULE TITLE
+--------------------------------------------------------------------------------------------------+
 1  |     CS1231     |                             Discrete Structures
 2  |     CS2101     |             Effective Communication for Computing Professionals
 3  |     CS2102     |                               Database Systems
 4  |    CS2113T     |              Software Engineering & Object-Oriented Programming
 5  |     CS3235     |                              Computer Security
 6  |    GEH1036     |                           Living with Mathematics
 7  |    IFS4103     |                         Penetration Testing Practice
+--------------------------------------------------------------------------------------------------+
Total modules: 7
+--------------------------------------------------------------------------------------------------+
delm cs to execute the command.
The Nuke
Parser will parse the input as a delete module command. The DeleteModuleCommand object is instantiated and executed. The object will first filter modules containing the keyword "cs". This is done by the FilterCommand#createFilteredModuleList() method. Then, DeleteModuleCommand will call its own executeInitialDelete(filteredList) method to prepare the prompt to ask Peter to choose which modules he would like to delete.
The sequence diagram for stage ❶:
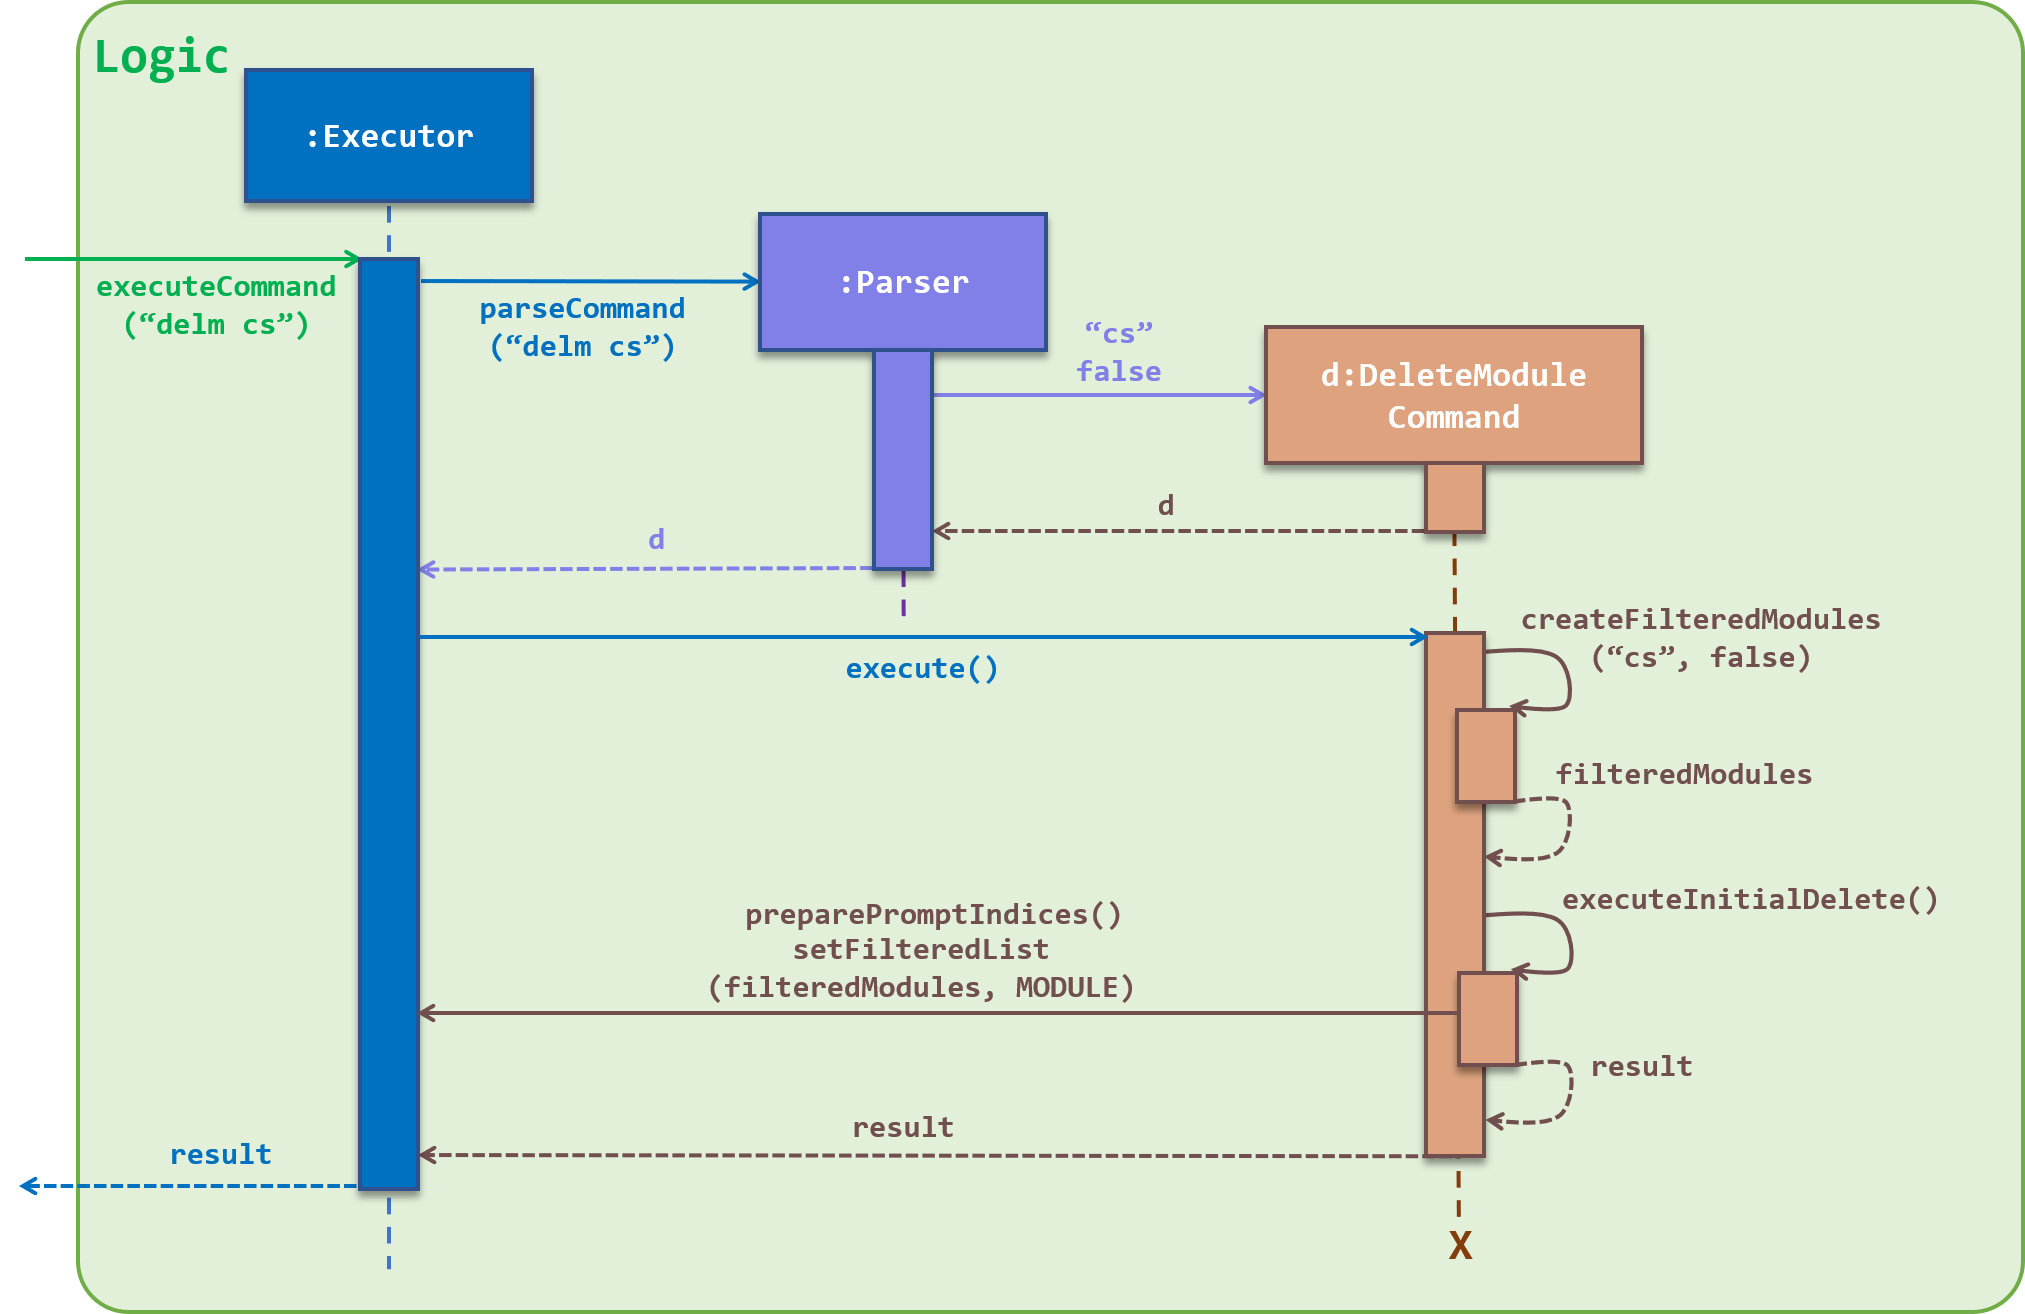
Figure Delete Command Sequence Diagram 1
Multiple matching modules were found.
+--------------------------------------------------------------------------------------------------+
 NO |  MODULE CODE   |                                 MODULE TITLE
+--------------------------------------------------------------------------------------------------+
 1  |     CS1231     |                             Discrete Structures
 2  |     CS2101     |             Effective Communication for Computing Professionals
 3  |     CS2102     |                               Database Systems
 4  |    CS2113T     |              Software Engineering & Object-Oriented Programming
 5  |     CS3235     |                              Computer Security
+--------------------------------------------------------------------------------------------------+
Total modules: 5
+--------------------------------------------------------------------------------------------------+

Enter the list number(s) of the modules to delete.
1 3 to delete modules CS1231 and CS2102.
Since there are multiple matches, the application will first request for the user to choose the directories he wants to delete. If there is only a single match, this stage is skipped, and the application will continue at stage ❸
After the
Parser has parsed the list numbers, the ListNumberPrompt object is constructed. ListNumberPrompt will prepare the prompt for the delete confirmation, and then calls its executePromptConfirmation(filteredList, MODULE) method.
This is the sequence diagram for stage ❷:
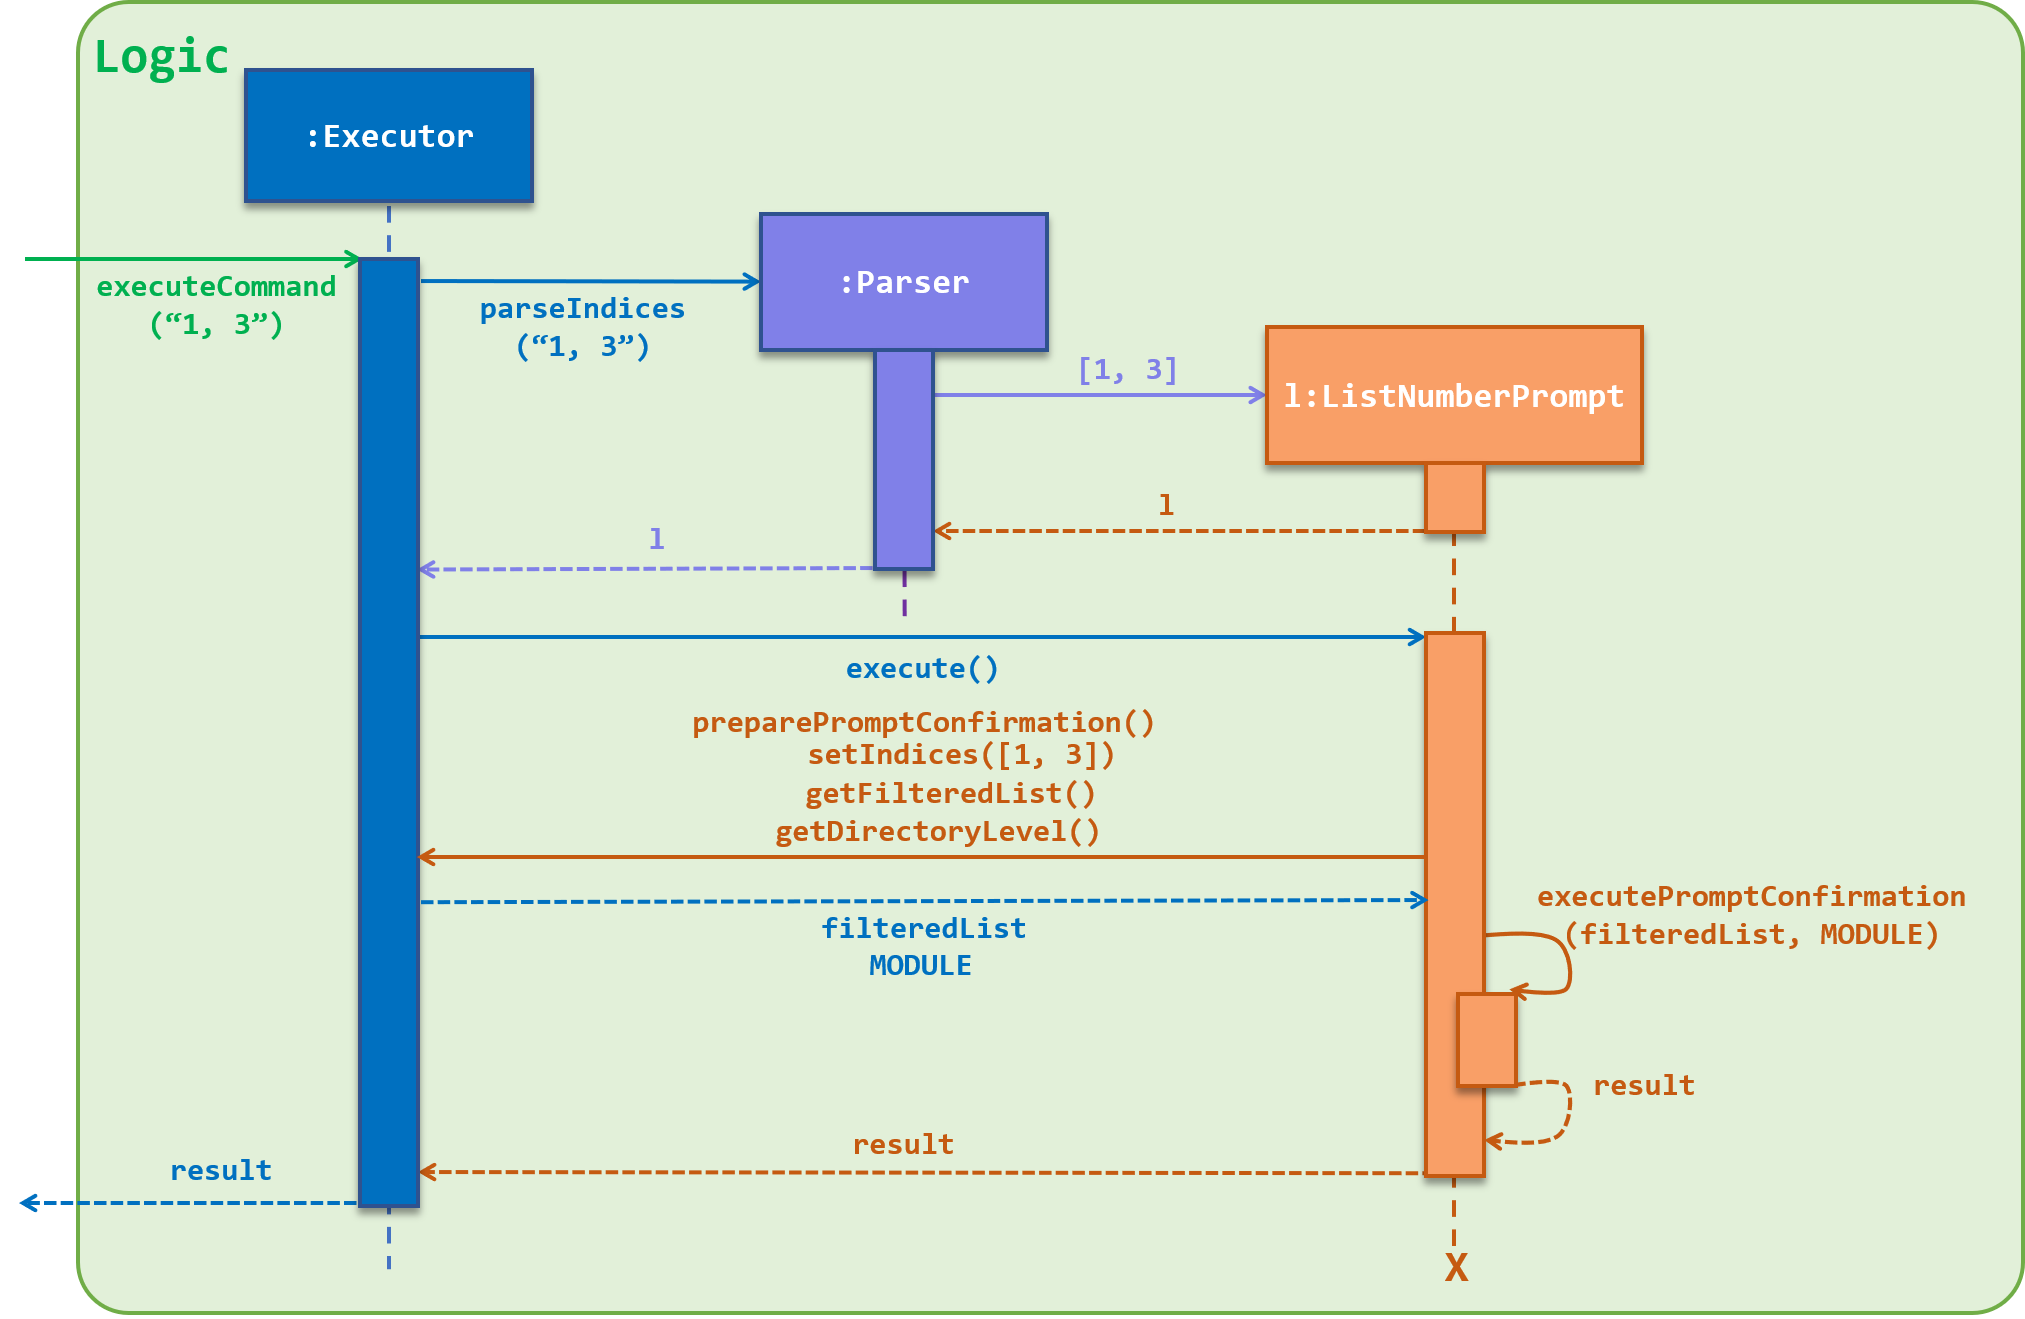
Figure Delete Command Sequence Diagram 2
Confirm delete these modules?
CS1231 Discrete Structures
CS2102 Database Systems
yes to confirm the deletion.
At the backend, the
Parser will parse the confirmation, and constructs the DeleteConfirmationPrompt object. After getting the list of modules to delete, DeleteConfirmationPrompt then calls executeMultipleDelete(filteredList, MODULE) to delete Peter's selected modules from his Module List.
Below is the sequence diagram for stage ❸:
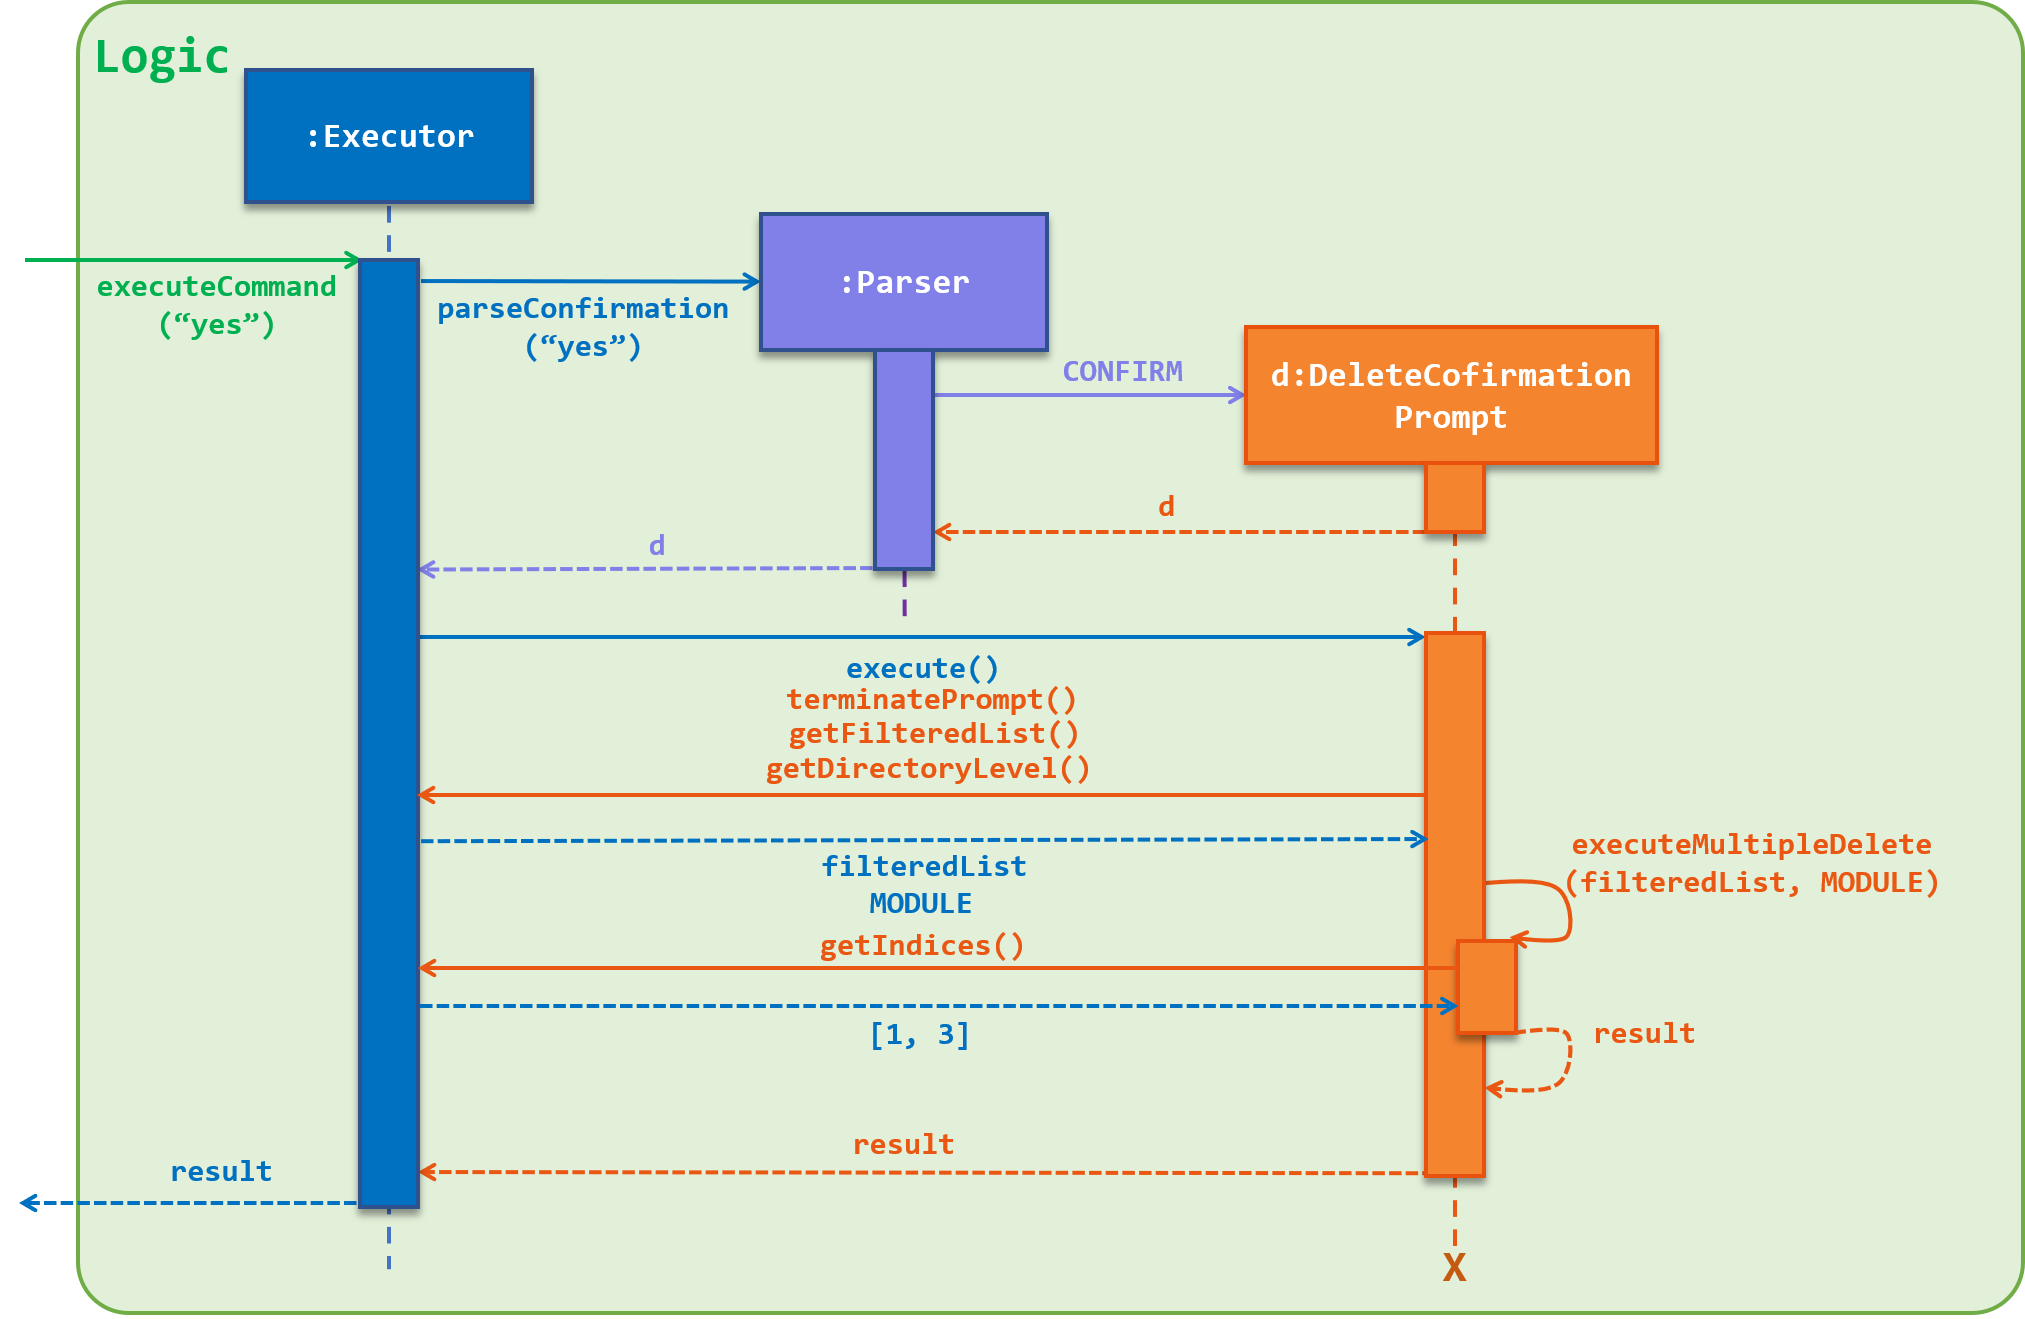
Figure Delete Command Sequence Diagram 3
SUCCESS!! Module(s) have been deleted.
Design Considerations
Filtering for Deletion
- Alternative 1: Do not allow filtering for deleting directories
- Pros: Easy to implement. We would only have to check if the directory exists, and then delete it from its respective list.
- Cons: Multiple deletions would not be supported. User has to delete one directory at a time, and can be tedious, especially if the user wants to delete several directories with the similar names.
- Alternative 2: Allow filtering for deleting directories (current implementation)
- Pros: User can delete multiple directories at the same time with ease. This is especially useful when deleting directories with similar names, such as deleting a set of tasks with descriptions starting with “tutorial”.
- Cons: Relatively harder to implement. 😧
Prompts for Deletion
- Alternative 1: No prompts for deletion
- Pros: Easy to implement. Deletion process will be fast! 😁 Simply search for the directories and then delete them.
- Cons: The user may accidentally delete the wrong directory! 😱 (although may still be undone with the undo command) This is made worse if a wrong deletion is made during multiple deletions.
- Alternative 2: Prompts are enabled (current implementation)
- Pros: User has another chance to choose to confirm the deletion. 😅 This reduce the chance of accidental deletions happening.
- Cons: Deletion process is now longer. The user has to go through another layer of confirmation despite being sure that he he deleting the correct directories (but who knows?). Moreover, we will have a harder time to implement the delete command, since it has now become multi-staged. Considerations have to be made to counter scenarios with zero, one or more matches after filtering. We will also have to consider how the
Parserwill be able to recognise if the user’s input is a regular command, or an input corresponding to a prompt for list number, or a prompt for delete confirmation.
4. Edit Command
Overview
Implementation
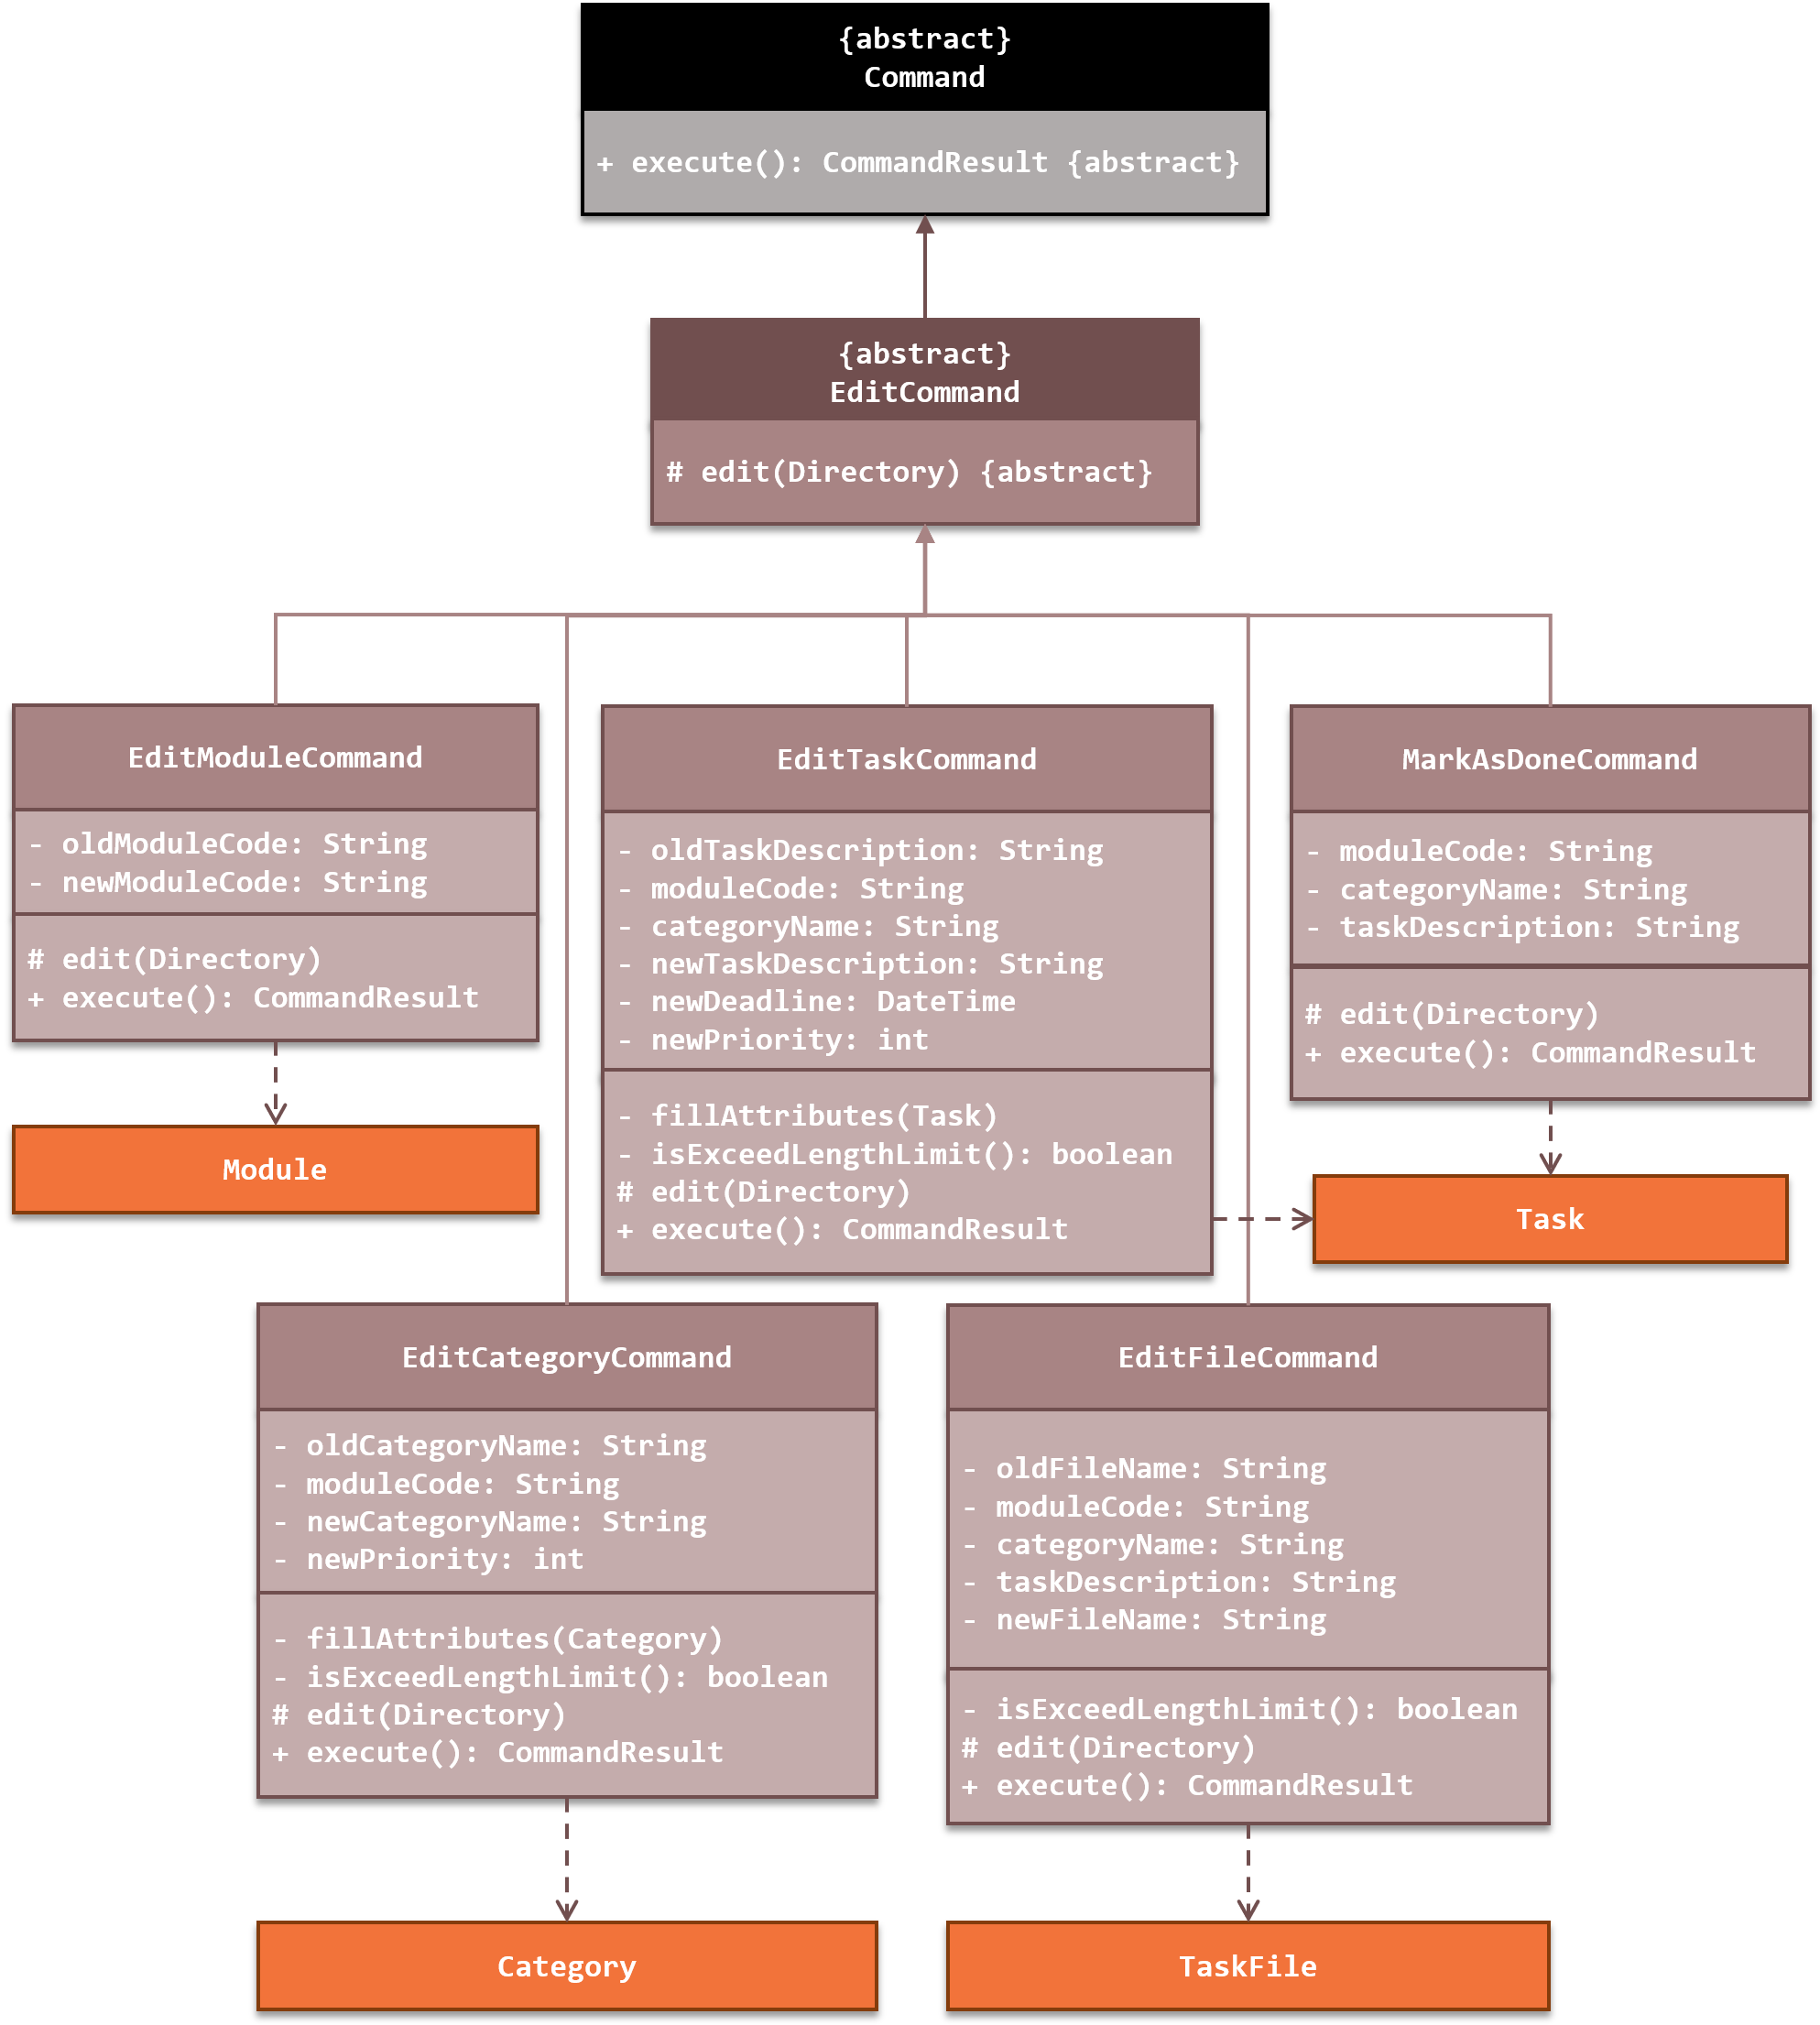
Figure Edit Commands Class Diagram
EditCommand class. The EditCommand class has an abstract method, toEdit(Directory), which is to be implemented by each of the edit commands.
The edit command will first checks if the attribute String exceeds a fixed length by its own
isExceedLengthLimit() method (See here for the considerations of the length limit). It then calls DirectoryTraverser class to get the appropriate Directory to edit.
If the attribute String exceeds the length limit, an exception will be thrown 😐 and the user will be shown an error message.
In addition, for
EditCategoryCommand and EditTaskCommand, it will fill in any missing attributes not specified by the user in their input. This is done through the command's fillAttributes() method.
Finally, the edit command will perform the
edit() method to edit the Directory.
The
Parser object also helps to check if the user's input contains attributes of the directory to edit. For example, if a user executes the edit module command, but does not enter a new module code to be edited, the application will prompt the user to enter a new module code.
An example sequence diagram is shown below when a user requests to edit a category:
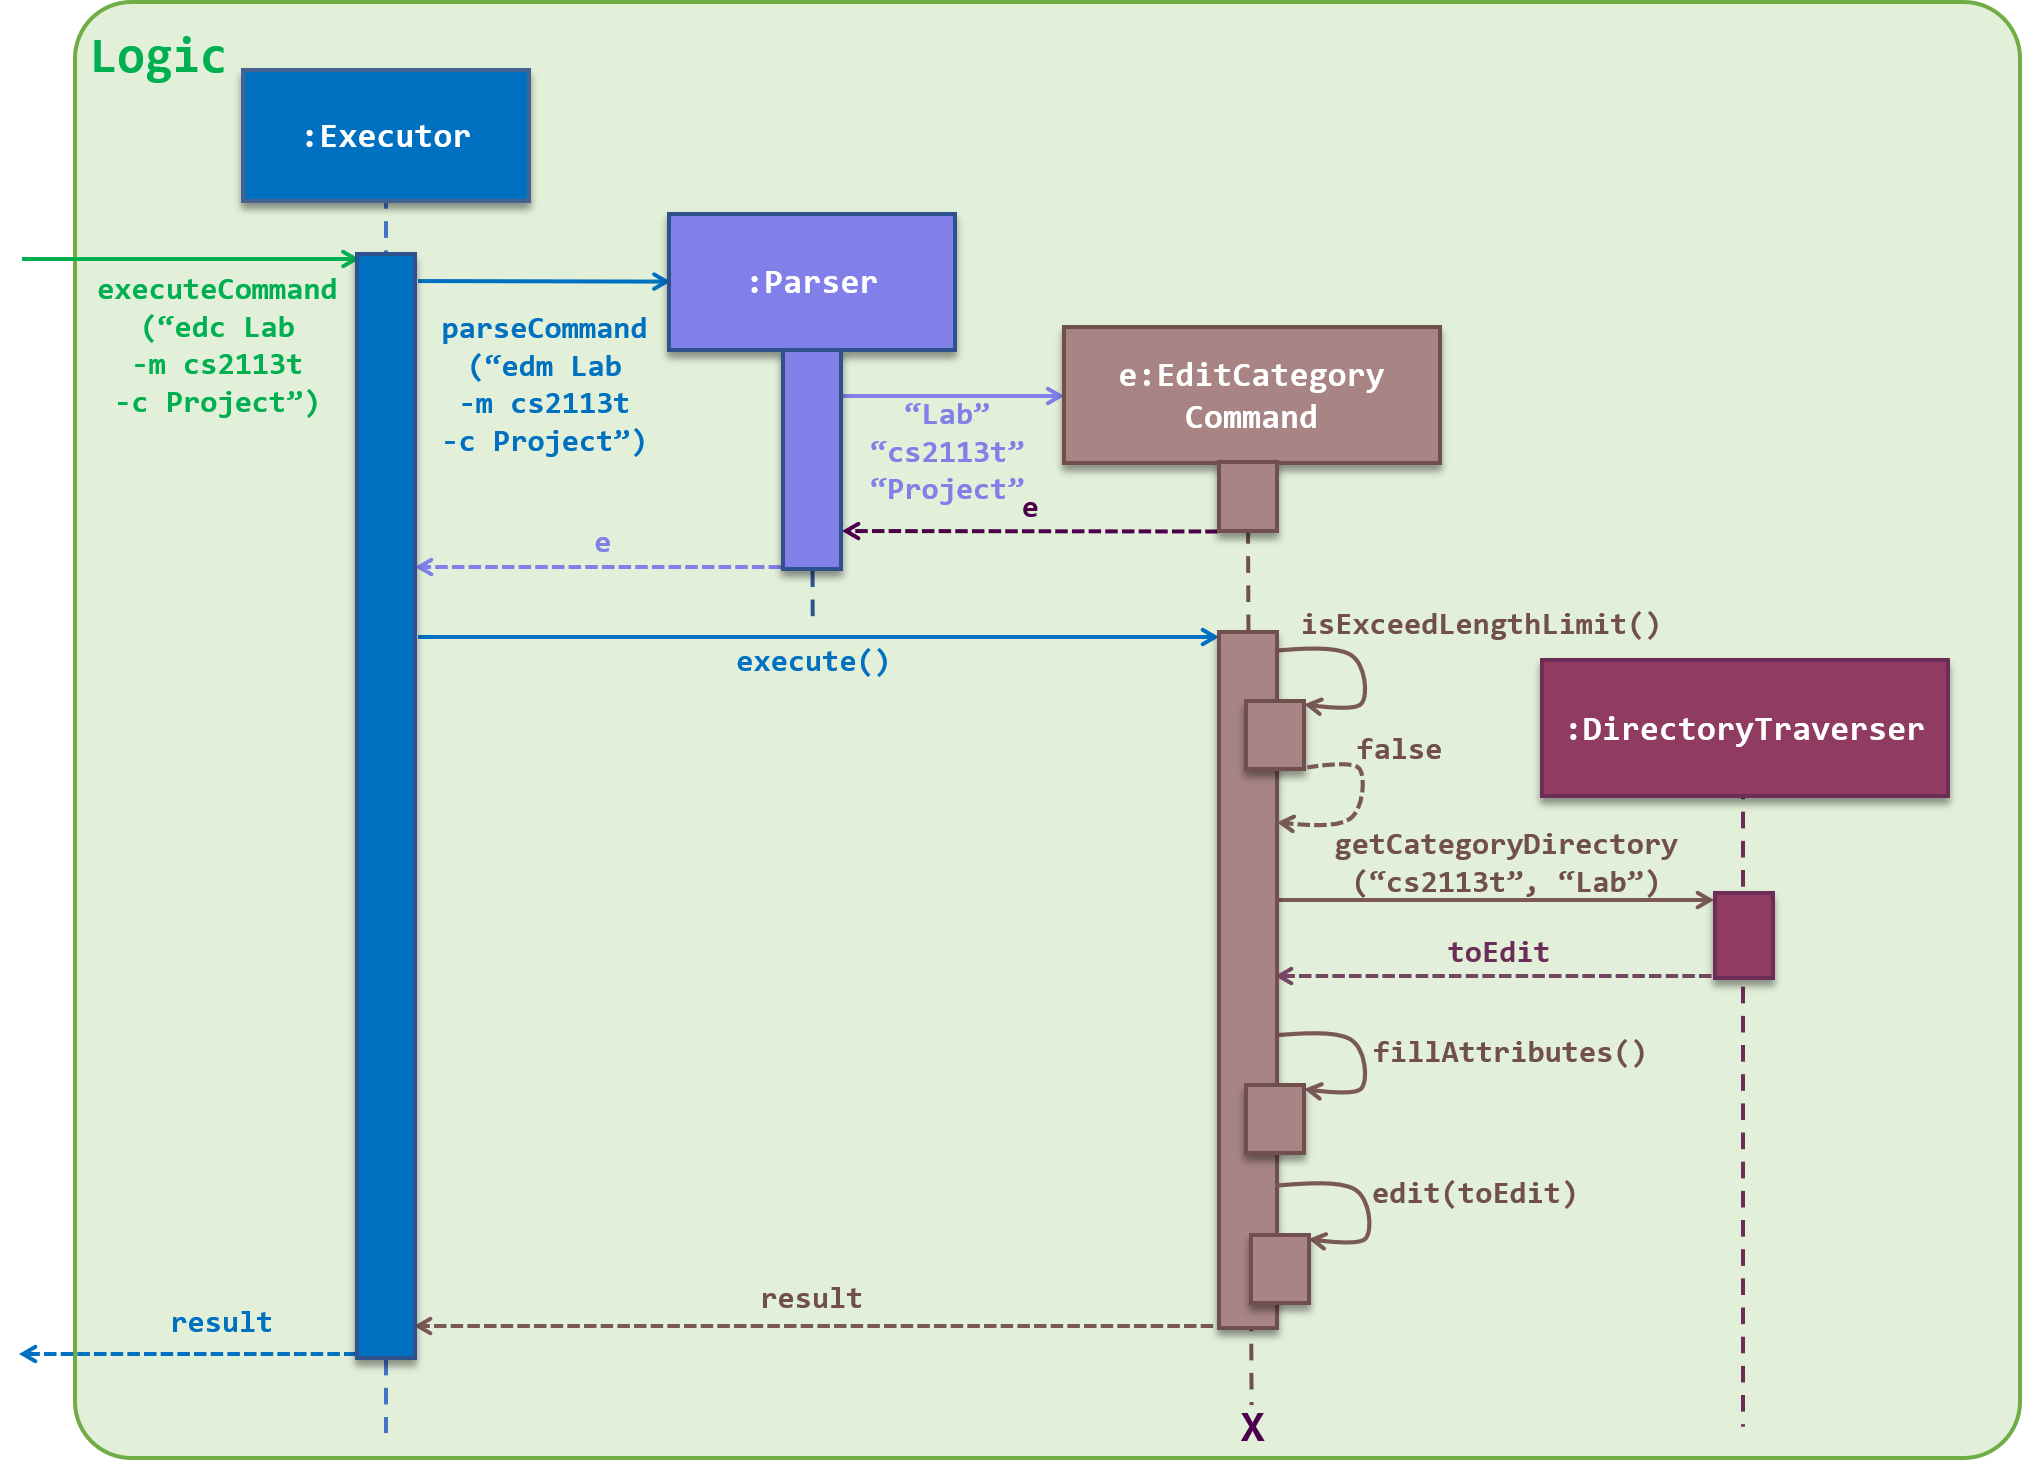
Figure Edit Command Sequence Diagram
Design Considerations
Editing Task
- Alternative 1: Merge
EditTaskCommandclass withMarkAsDoneCommandclass- Pros: There is one less class to implement. Also, the user does not need to remember another command word.
- Cons: While there may be one less command word, there may be one more prefix for the user to remember as well. Also, marking a task as done seems to be more specific compared to changing the attributes of the task such as its description and deadline.
- Alternative 2: Have separate
EditTaskCommandandMarkAsDoneCommandclasses (current implementation)- Pros: Have a more specialised class just to mark user’s tasks as done. Easier to implement and differentiates from the standard
EditTaskCommand. - Cons: There is one more command word for the user to remember.
- Pros: Have a more specialised class just to mark user’s tasks as done. Easier to implement and differentiates from the standard
Edit Multiple Attributes
- Alternative 1: User can only edit one attribute of a directory at a time
- Pros: May be easier to implement. Checking that the user has provided an attribute to edit is also simple (just check if the attribute is empty).
- Cons: The user may want to edit more than one attributes at the same time. For example, the user may want to change both the name and priority of a category. This means that the user will have to execute the edit category command twice, which is not efficient.
- Alternative 2: User can edit any number for attributes of a directory at a time (current implementation)
- Pros: The user does not need to keep executing the edit command when editing more than one attribute.
- Cons: Possibly slightly harder to implement. We now have to check if the user has provided at least one attribute to be edited. Also, we need to be able to efficiently extract the individual attributes from the user’s input. However, this could be made easier by grouping and matching the attributes using Java’s RegEx patterns.
5. Change Directory Command
Overview
.. to traverse to the parent directory
Implementation
DirectoryTraverser class in its execution. If the user wants to traverse down to a directory, the
ChangeDirectoryCommand will call DirectoryTraverser#findNextDirectory(nextDirectoryName) to get the Directory to traverse to. Then, ChangeDirectoryCommand will call DirectoryTraverser#ftraverseDown(nextDirectory) to move the user to that directory.If the user want to traverse up from the current directory instead,
ChangeDirectoryCommand will call DirectoryTraverser#traverseUp() to bring the user back to the parent directory.
The Root Directory and the File Directory are the first and last directories in the Directory Tree respectively. If the user attempts to traverse down up the Root Directory, or traverse down a File Directory, an error message will be shown to the user instead. 😦
Shown below is the sequence diagram when a user executes the change directory command to traverse down to another directory.
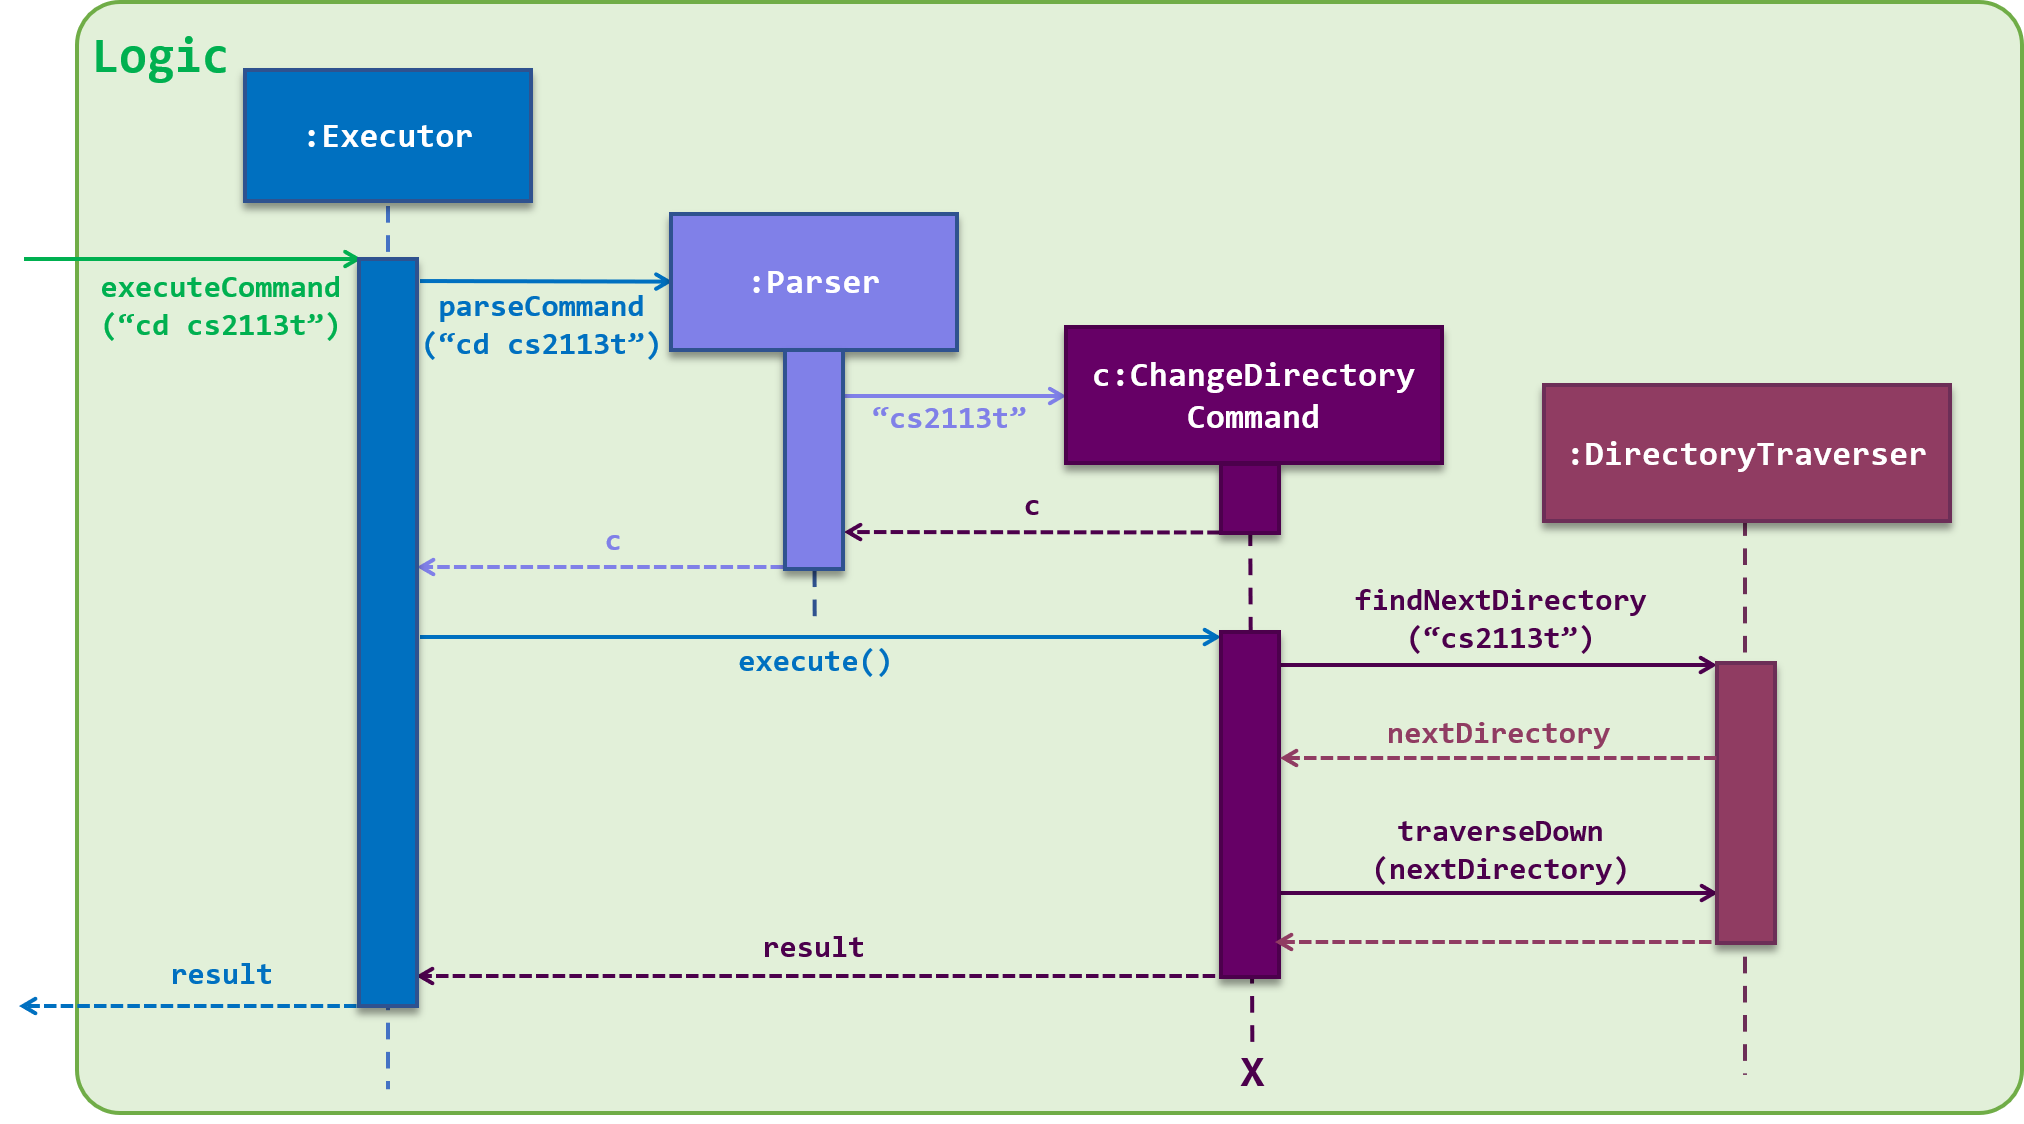
Figure Change Directory Command Sequence Diagram
Design Considerations
Traversal Method
- Alternative 1: User can only traverse one level at a time (current implementation)
- Pros: Simple to implement. Only need to consider getting the direct parent or child directory.
- Cons: User may have to keep executing the change directory command just to reach their desired directory, especially if the user’s current directory is “far” from the destination directory.
- Alternative 2: User can traverse more than one level at a time, similar to Linux Shell.
- Pros: Saves user time from having to possibly execute the change directory command multiple times. User can simply enter
cd directory1/directory2/directory3and move four directory levels down. - Cons: Much harder to implement as we need to consider how the split the String into individual directory names. Furthermore, we have to consider the case if the provided directory name contains
/, and how we will implement a method to differentiate the/in the name from a/in the directory path.
- Pros: Saves user time from having to possibly execute the change directory command multiple times. User can simply enter
6. Open File Command
Overview
Implementation
java.io.File and java.awt.Desktop. The first API is responsible for operations involving file access, while the second API is used to open the file to the Desktop. The
OpenFile object first obtains the list of files from the task to open via the OpenFile#getFilesToOpen() method. Then, OpenFile executes the OpenFile#openFiles() method to open each of the files in the list.
If there is an error opening a particular file in the list 😖, the opening process will not be terminated immediately. Instead, the application will continue to open the rest of the files in the list.
After it has gone through the list, it will then show the user the files that were not opened due to an error.
This is done by collecting the file names of the failed to open files into a String, and thereafter throw an exception with the String of file names as the message.
Below is a sequence diagram of how the open file command operates:
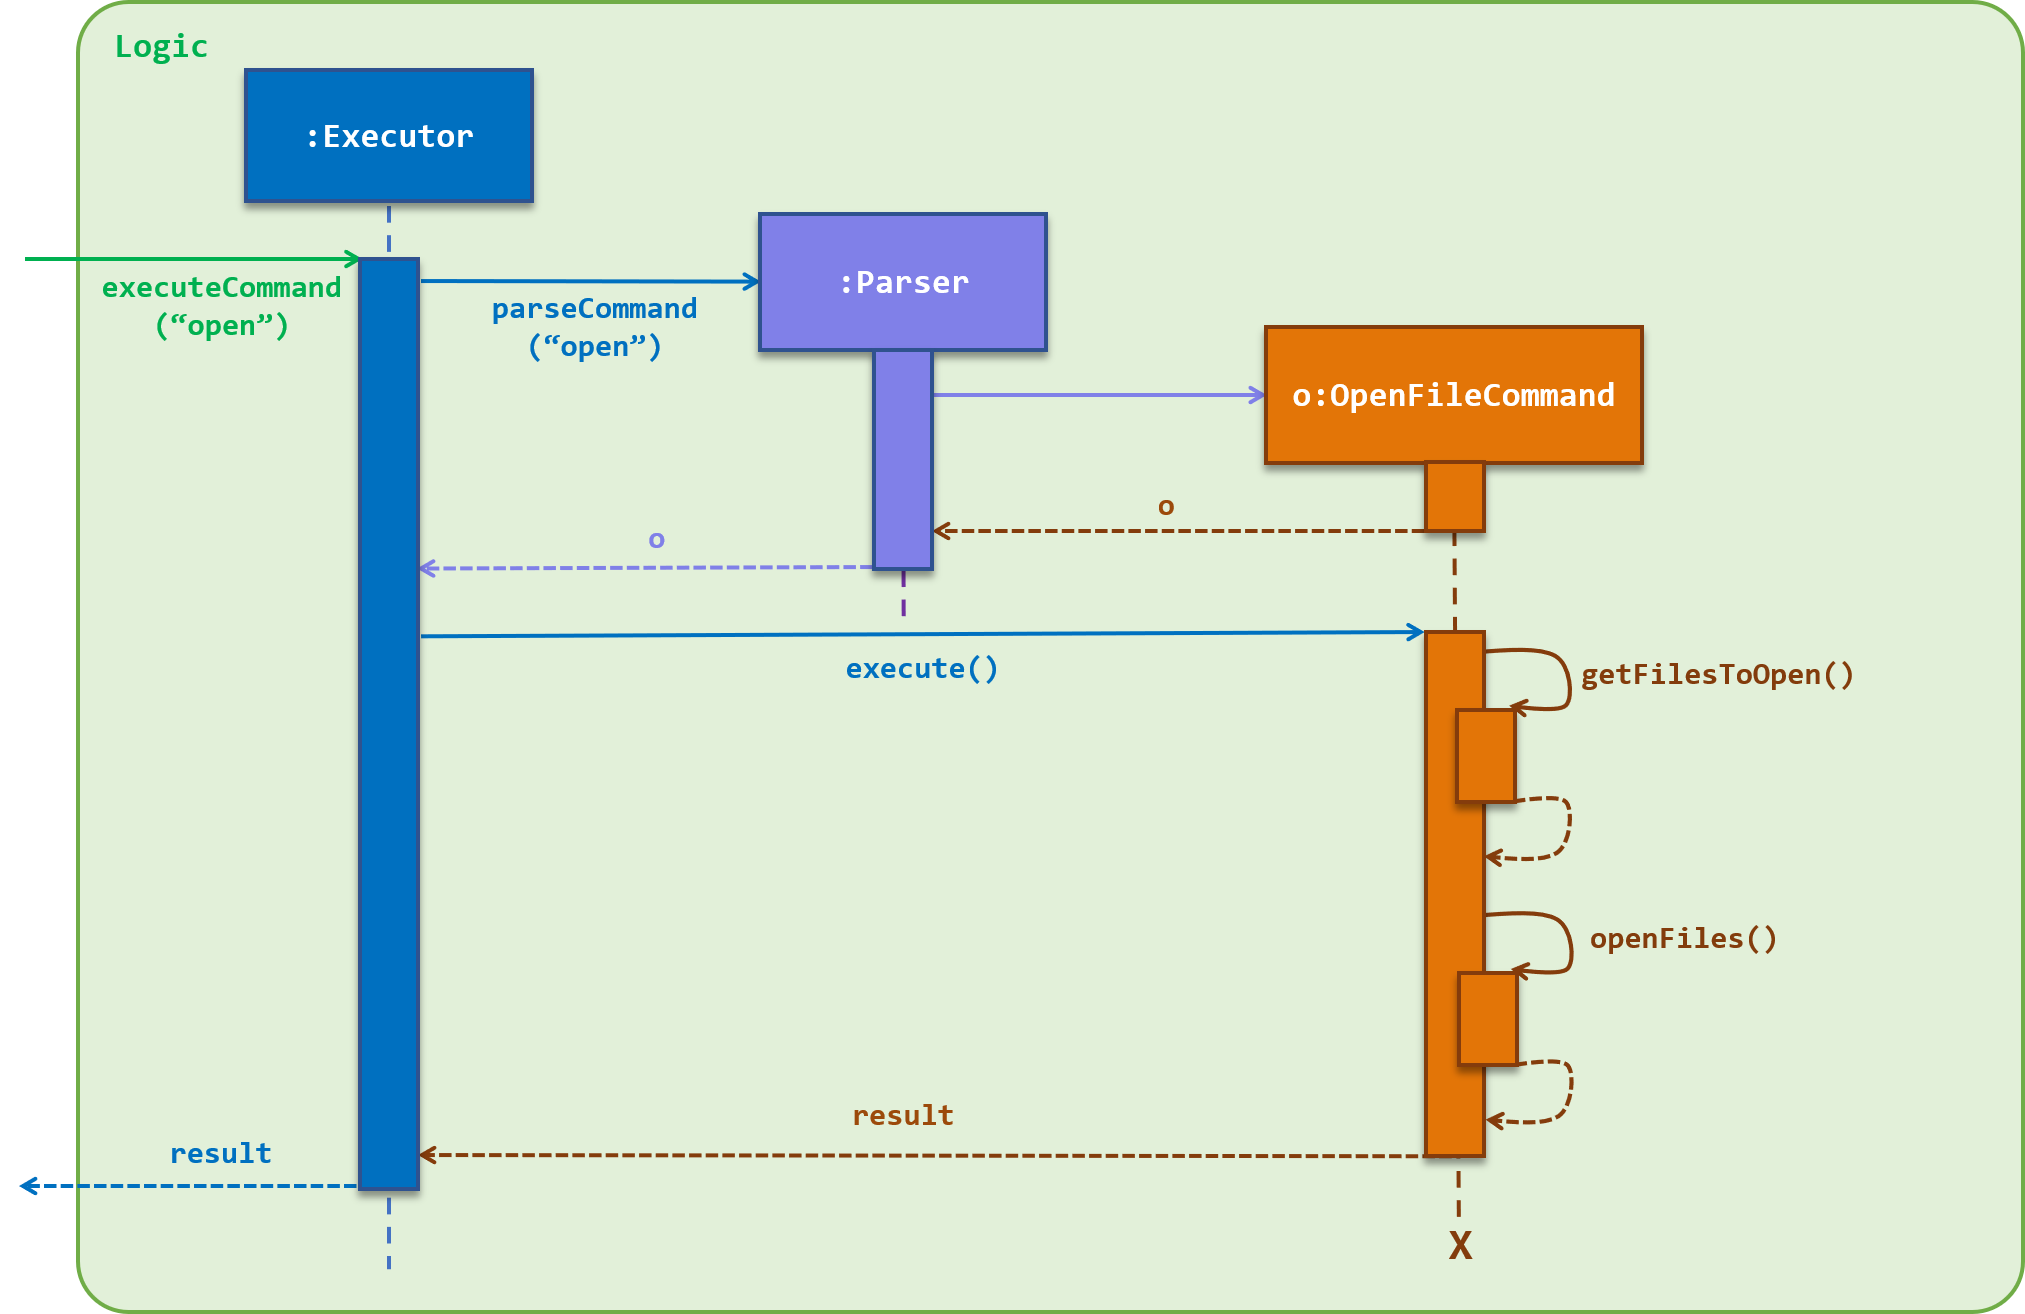
Figure Open File Command Sequence Diagram
Design Considerations
Allow opening of multiple files
- Alternative 1: User can open only one file at a time
- Pros: Simple to implement. Just search for the corresponding File Directory, get the file path, then open the real file in that path.
- Cons: User would usually want to open all or most of the files attached to the task. Opening each file one by one will reduce the ease of using the application.
- Alternative 2: User can choose which files they want to open from a list of files shown to them
- Pros: User can open exactly the files that they require at the moment.
- Cons: Much harder to implement as we need to consider how the process to prompt the user to choose the files would be enforced. Thereafter, we need to check if the selection exists in the list of files.
- Alternative 3: User can choose to open a specified file, or all the files of the task (current implementation)
- Pros: User now has a choice, and can choose the best between two options.
- Cons: User now has to close the unwanted files that was opened in the process, which may inconvenience the user.
7. Info Command
Overview
Implementation
The
InfoCommand object will call for the DirectoryTraverser object to get the current Directory. Then, the information of the Directory is obtained by calling Directory#toString(). The list to show is generated by the InfoCommand#getListToShow() method. These information will eventually be shown to the user through the
Ui.
The sequence diagram of what happens when a user executes the info command is as illustrated:
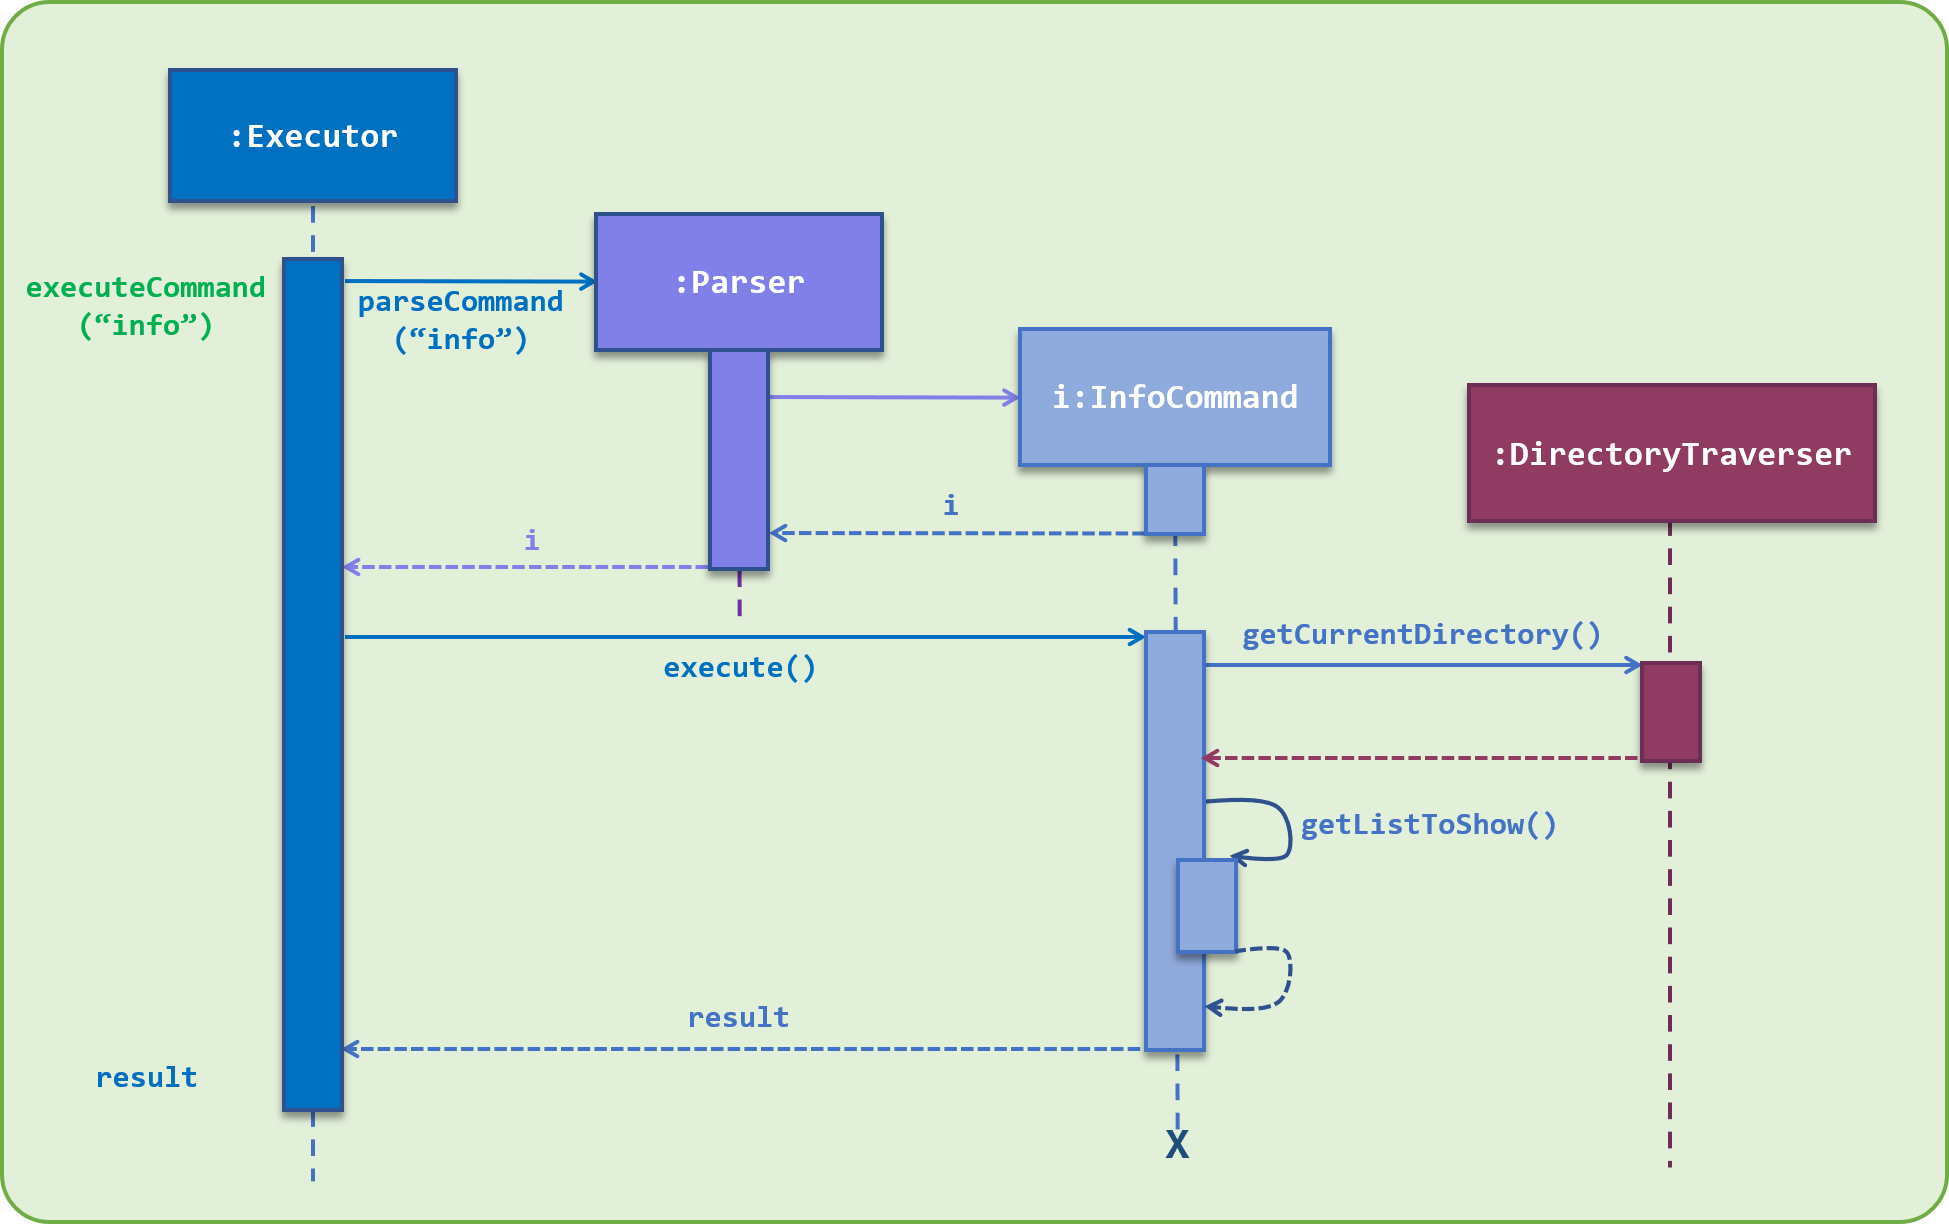
Figure Info Command Sequence Diagram
8. Undo and Redo Commands
Overview
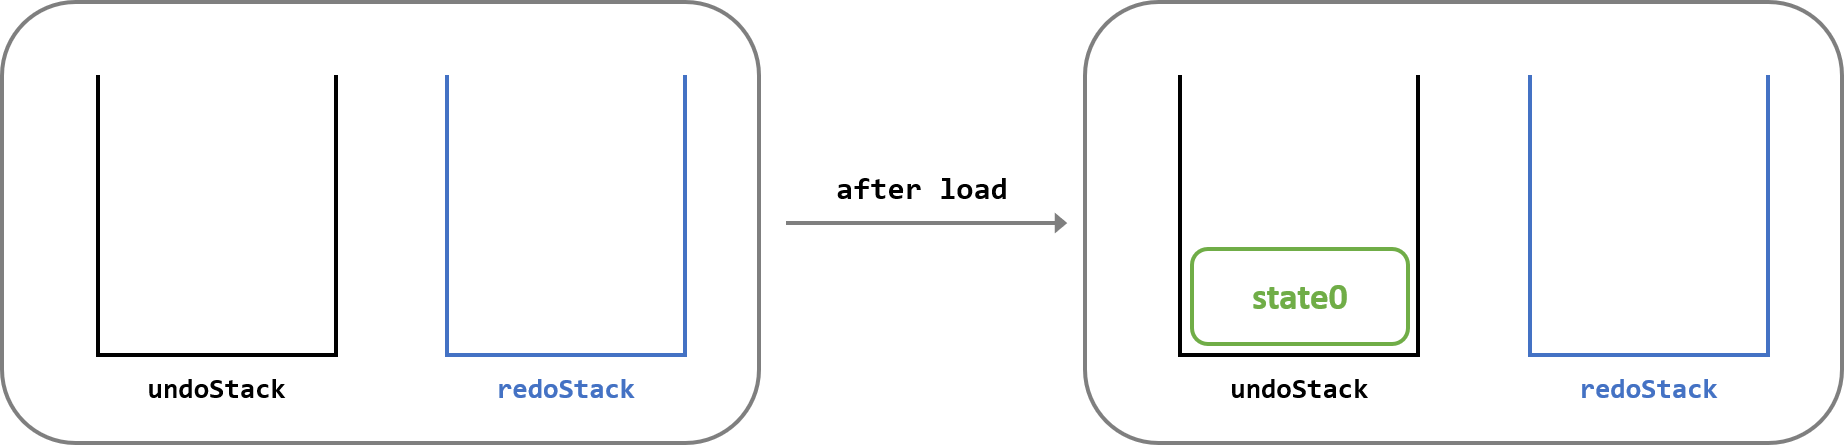
Implementation
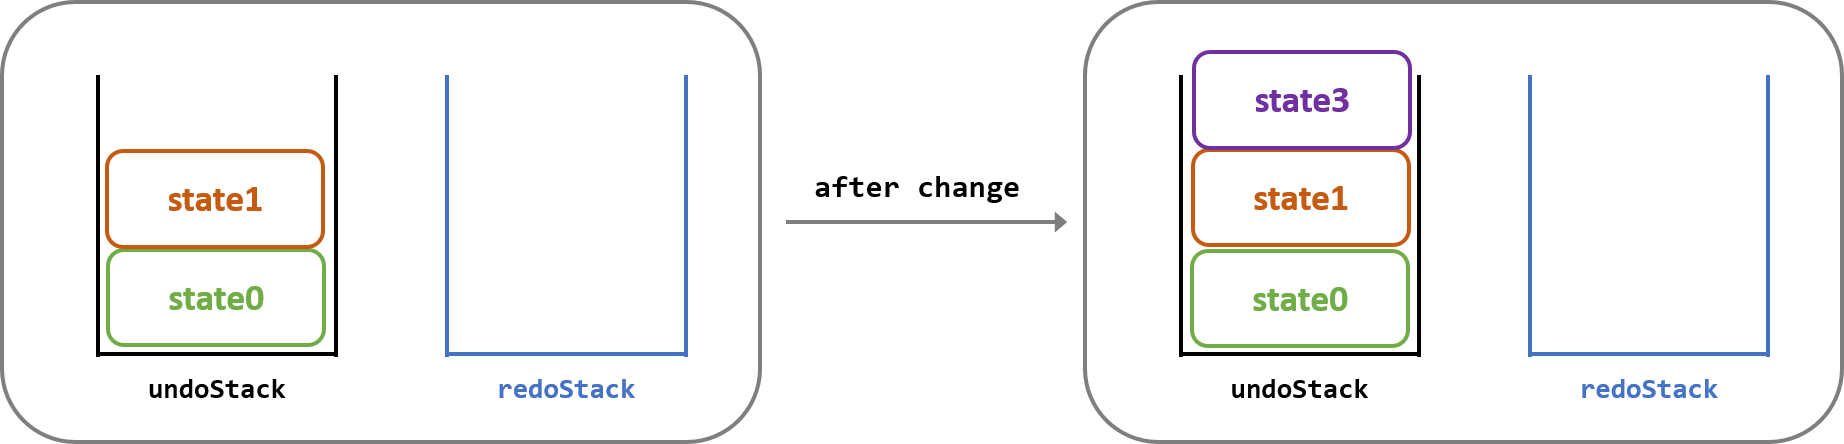
ScreenShotManager class. This is done via two stacks, one for undo, and the other for redo. When the application starts, both stacks are empty. After the applications loads the saved directory list file, the current state of the directories is pushed into the undo stack.
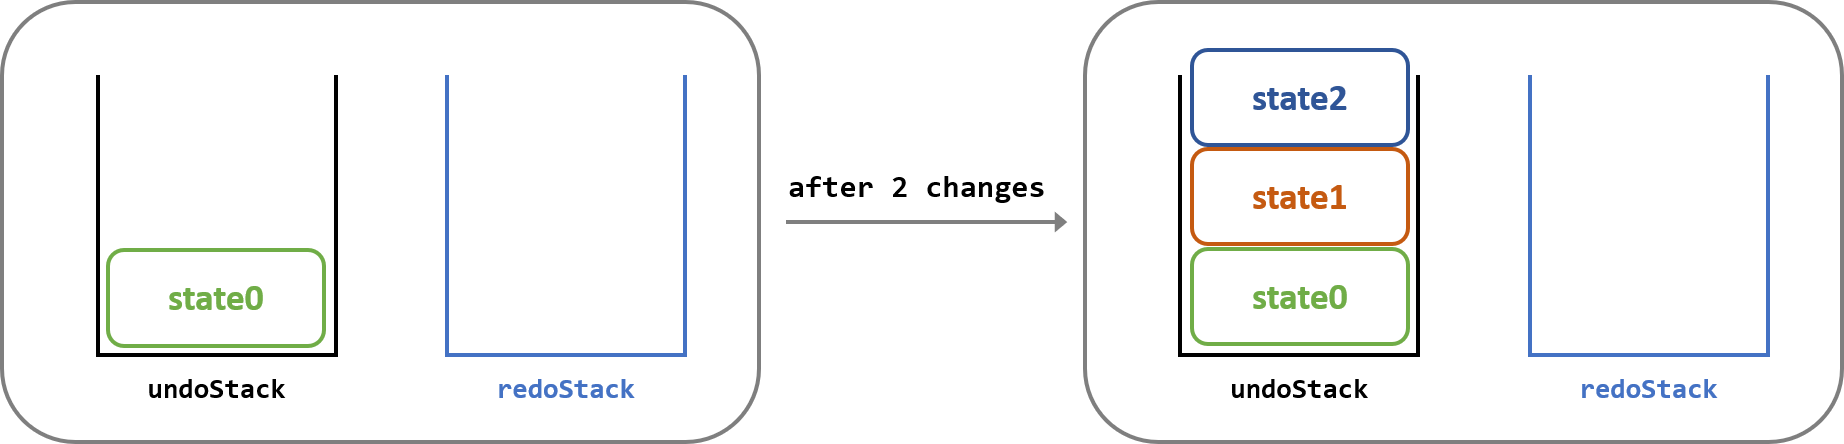
ScreenShotManager's saveScreenShot() method.
The new state is also saved by the application. See here to find out more about the storage implementation.
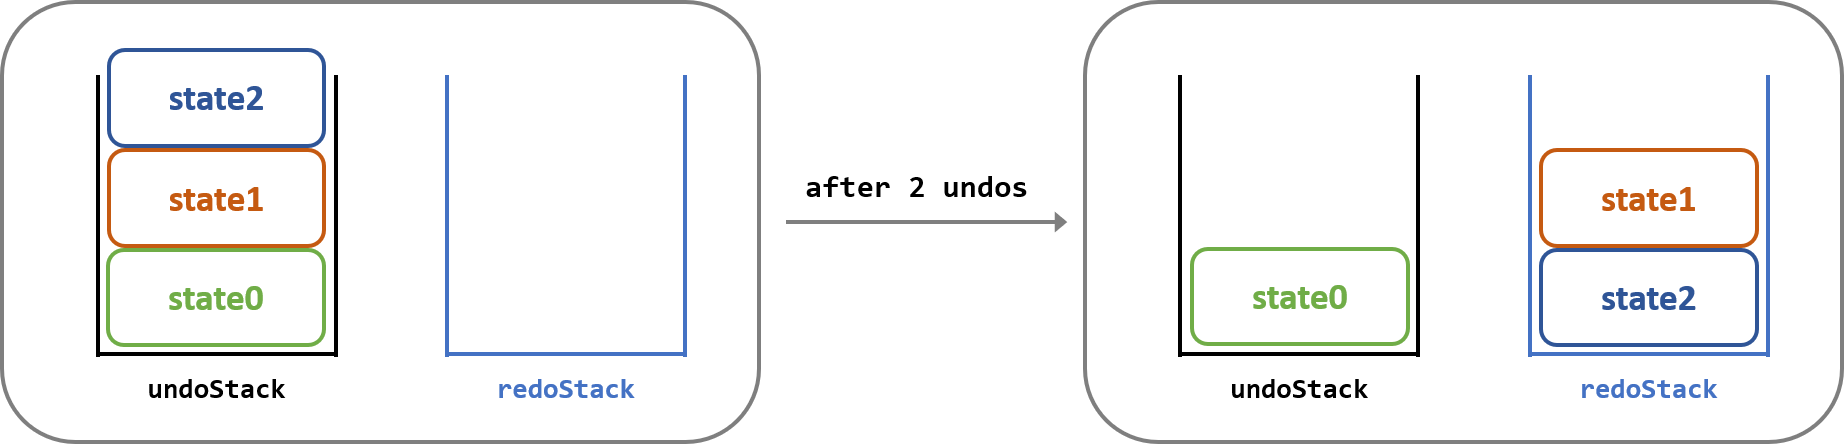
ScreenShotManager's undo() method.
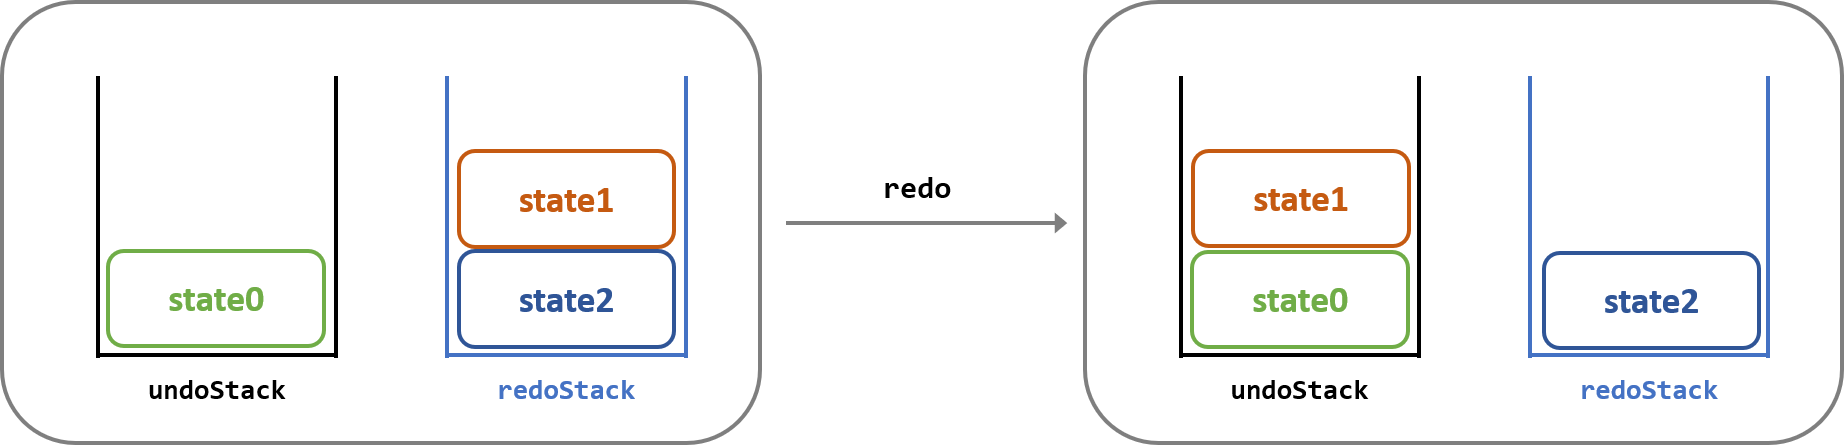
ScreenShotManager's redo() method.
saveScreenShot()).
An error message will be shown to the user when the user tries to undo when no recent change was made, such as at the start of the application, and when the user tries to redo when nothing was recently undone.
This is done in the
ScreenShotManager class by checking if the undo stack contains more than one element (first element is the start-up state), and if the redo stack is not empty respectively. If checking fails, an exception will be thrown. 😑
Below is a sequence diagram of the undo command in action:

Figure Undo Command Sequence Diagram
Design Considerations
Number of undos allowed
- Alternative 1: User can undo only once
- Pros: Easy to implement, only need to keep track of the state before the change. As such, it also requires less memory to save.
- Cons: May not be feasible as there may be instances when the user may want to undo more than once.
- Alternative 2: User can undo only a fixed number of times
- Pros: Allows user to undo more than once. Also, does not incur much memory either as a fixed number of states is saved only.
- Cons: Need to implement measures and checks for the stacks to ensure they do not exceed the limit, and what to do when it does. User may still request to undo more than the fixed number of times.
- Alternative 3: User can undo any number of times (current implementation)
- Pros: Allows user the freedom to undo any number of times (until the initial state, of course).
- Cons: May require more memory to save the many number of states, although it may not be very significant considering the data size of each state tend to be very small (states are saved as a String).
How undo and redo executes
- Alternative 1: Saves the state of the entire directory list (current implementation)
- Pros: Easy to implement, can reuse the
saveList()andloadList()methods in theStorageManagerclass. - Cons: Uses unnecessary memory as the state of the entire list is saved each time, even though only a small change is made.
- Pros: Easy to implement, can reuse the
- Alternative 2: Individual commands has an
undomethod, which is able to undo the changes they made.- Pros: Uses less memory since the command will only have to record the specific change.
- Cons: Need to ensure correct implementation of the
undomethod, and consider scenarios if the command fails to execute.
Storage Implementation
Overview
StorageManager class. The saving of the Directory Tree data is performed by the saveList() method, and the loading of the Directory Tree data is performed by the loadList() method.
In our current implementation, the data is saved into a
save.txt file in the user's device.
Implementation
Encoding and Decoding
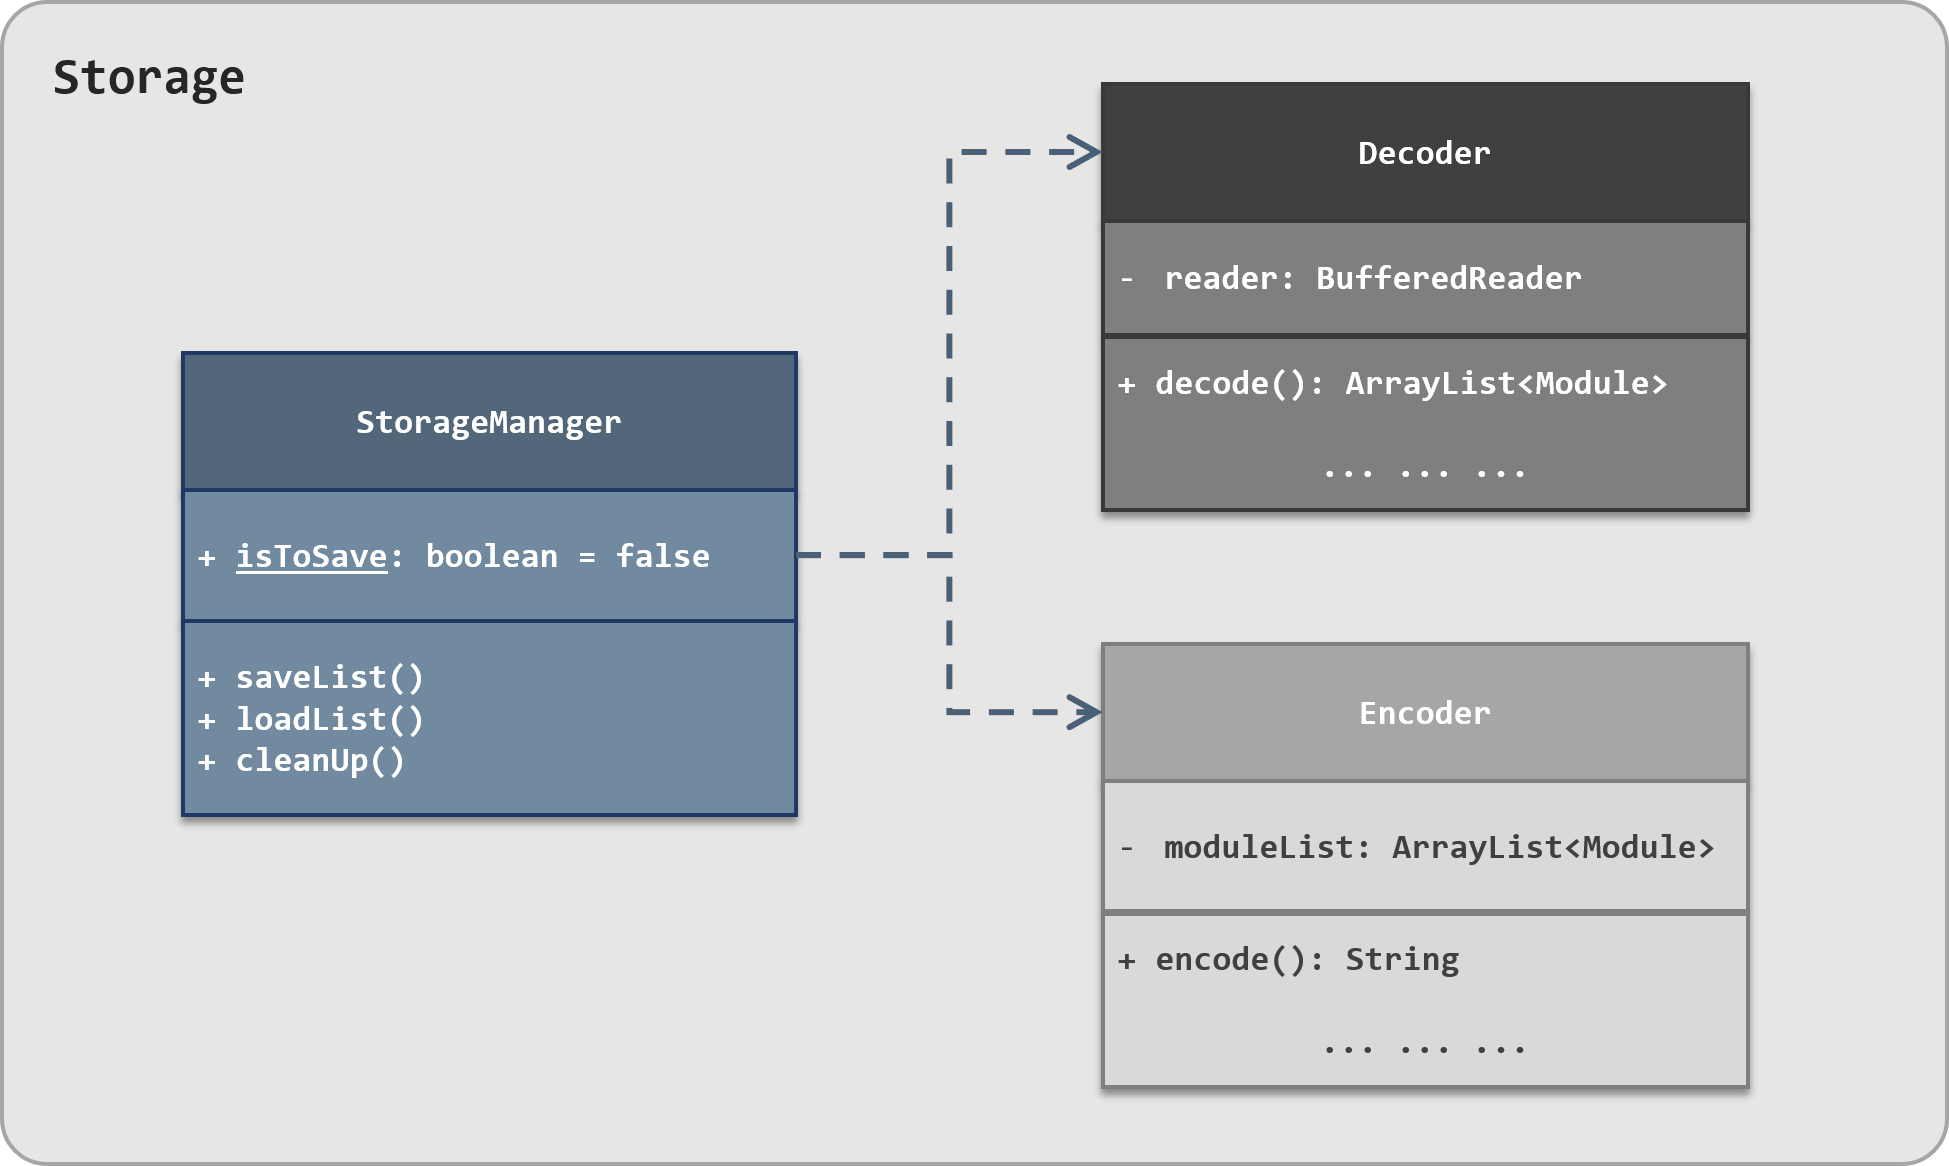 Figure Storage Manager Class Diagram
StorageManager class is supported by two other vital classes – Encoder and Decoder.
❶ Encoder
The
Encoder class contains methods to facilitate file saving. It converts the various Directory objects in the Directory Tree into a String format. This conversion is performed by the encode() method through a depth-first method.
The encoded String is then saved into a
save.txt file in the user's device by the StorageManager class.
❷ Decoder
The
Decoder class, conversely, contains methods to facilitate file loading. It converts the encoded String in the save.txt file back into the Directory Tree. This conversion is performed by the decode() method, and also via a depth-first method.
The decoded Directory Tree is then loaded into the application by the
StorageManager class.
The
StorageManager, Encoder and Decoder classes make up the Storage Component of Nuke.
Saving
The
StorageManager has a static boolean variable isToSave, which is set to false by default. It also has a static method setIsSave(), which sets the isToSave variable to true.
When a change is made through a command,
StorageManager#setIsSave() is called. This will notify the StorageManager to call saveList() to save the Directory Tree.
Below is a code snippet of the
AddModuleCommand when the StorageManager#setIsSave() is called:
@Override
public CommandResult execute() {
	... ...

	ModuleManager.add(toAdd);
	StorageManager.setIsSave();
	return new CommandResult(... ...);
	... ...
}
Main class when the StorageManager#saveList() is called:
private void runCommandLoopUntilExitCommand() {
	... ...

	if (StorageManager.isToSave()) {
	    ... ...
        storageManager.saveList();
		... ...
	    ScreenShotManager.saveScreenShot();
	}
	... ...
}
Notice that the
ScreenShotManager#saveScreenShot() is also called after the StorageManager saves the Directory Tree. The ScreenShotManager class is responsible for performing undo and redo operations in the application.
For more information about the
ScreenShotManager class or the undo and redo commands, click here.
Here is a sequence diagram of what happens during saving after a successful add command:
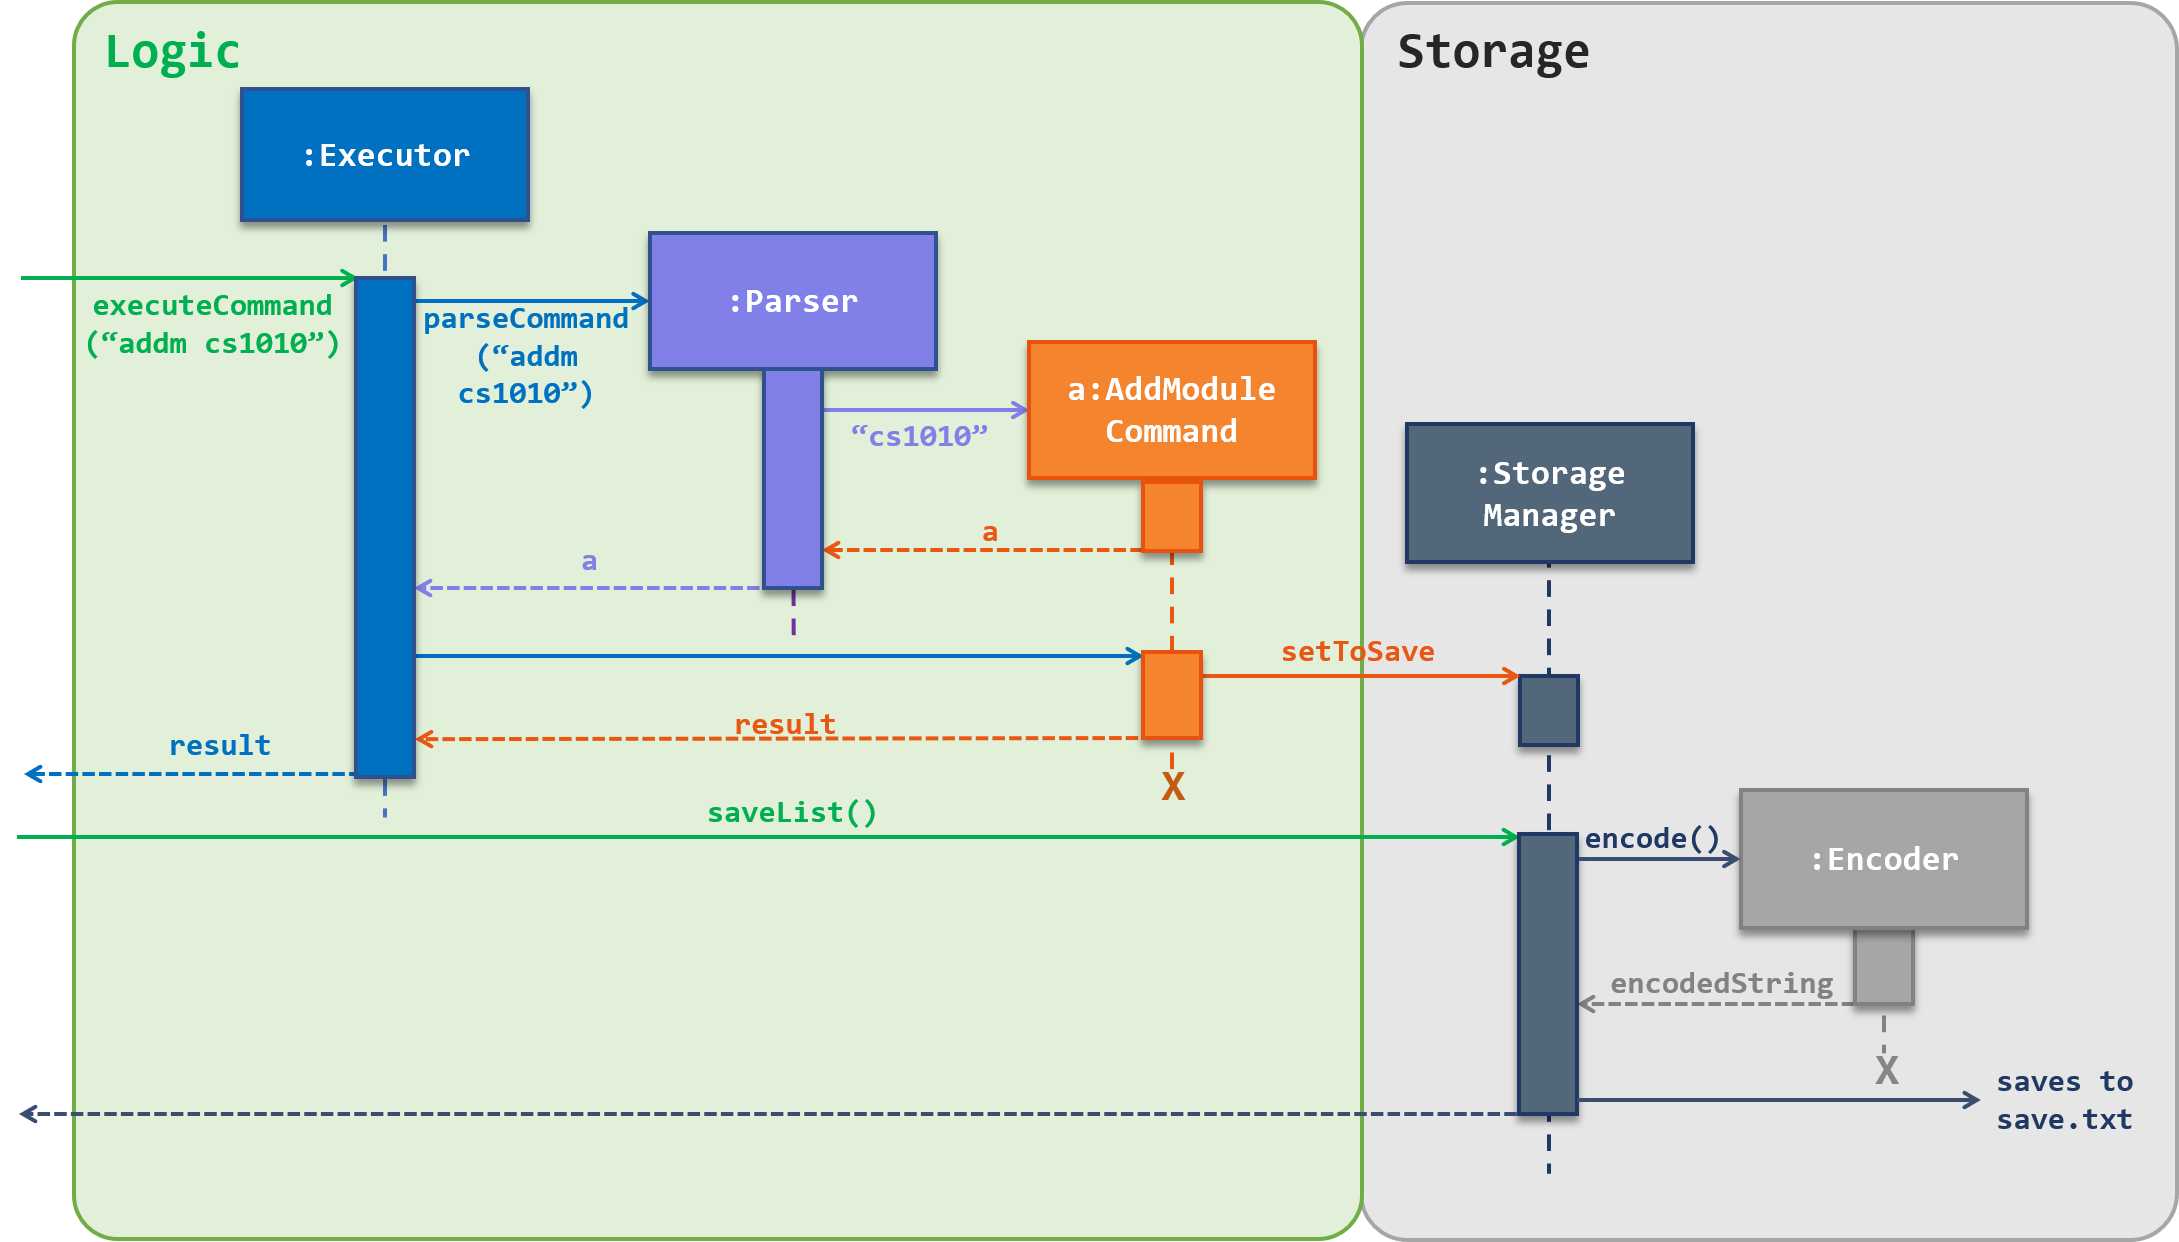
Figure Storage Manager Sequence Diagram
Design Considerations
When to Save
- Alternative 1: Save after every command execution
- Pros: Easy to implement since no checking for changes in the Directory Tree involved.
- Cons: Wasted performance to save when there is no change. Also, it will affect undo and redo operations. For instance, undoing a list command does not do anything to the Directory Tree, and this may confuse the user.
- Alternative 2: Save after every change (current implementation)
- Pros: This should be the preferred case since the application should save only when a change is made.
- Cons: We have to think of a way that can allow the application to know what is defined as a change and when it occurs.
Storage Security
- Alternative 1: Saves the Directory Tree as a String and directly into a
.txtfile (current implementation)- Pros: Easier to implement. Encoding and decoding the data is simpler.
- Cons: Security may be an issue since the saved file is readable, i.e. not encrypted, and can be accesses by anyone. Also, there is little way to notice if the saved file has been tampered externally.
- Alternative 2: Encrypt the data and saved file
- Pros: Security is enhanced, and warning can be shown to the user if the file has been tampered.
- Cons: We have to devise a way to encrypt and decrypt the data. We could possibly look into current encryption schemes like SHA and RSA for this, but it would require some work.
As of now, the current implementation of saving does not use any encryption schemes. This is generally because the Nuke application is intended for personal use, and the data involved is not intended to contain any personal information,
However, for future implementations of the application, we are looking towards extending the application into the cloud and provide other services as well. At that point, personal data could be involved, and we will definitely implement measures to ensure the security of the user's data 😄.
Appendix
Product Scope
Target User Profile
- is an NUS student
- has a need to manage a significant number of academic tasks efficiently and tidily
- willing to keep track of their academic tasks by recording them using an application program
- prefer Desktop apps over other types, and reasonably comfortable with the command line interface
- able to type fast and prefers typing over mouse input
Value proposition
Manage tasks faster and with greater efficiency due to greater organisation of tasks. The application is specifically designed for NUS students to manage academic tasks. Files can be attached to tasks, and opened directly through the application.
User Stories
Priorities: High (must have) - * * *, Medium (nice to have) - * *, Low (unlikely to have) - *
| Priority | As a … | I want to … | So that I can… |
|---|---|---|---|
* * * |
new user | see usage instructions | learn about existing features and how can I use them |
* * * |
student | add modules\tasks | have track on tasks of different modules |
* * * |
student | delete modules\tasks | remove modules and tasks I do not need to keep on track anymore |
* * * |
student | count my total tasks | keep track of how many tasks I have left and plan my time better |
* * * |
student | add different priorities to tasks | manage my time and do the most important things first |
* * * |
student | edit modules and tasks | correct or change some attributes |
* * * |
student | constantly check the deadline of tasks in ascending order | get tasks done on time |
* * * |
student | receive a reminder of urgent tasks | know which tasks should be done first |
* * * |
student | sort my tasks in terms of certain criteria | view my tasks of highest priorities |
* * * |
student | add tags to tasks | filter and view tasks with respect to certain tags |
* * |
student | receive a reminder of expired tasks | know I passed the deadline |
* * |
student | receive a reminder of tasks which are near the deadline | never forget to finish them on time. |
* * |
student | attach files to tasks | open the files from the program when I start on the tasks |
* * |
student | organize my files according modules and tasks | enjoy the ease of picking out relevant files |
* * |
student | filter tasks with certain criteria | easily view what is relevant at the moment |
* * |
student | enter shorter commands | save my time |
* |
student | get the files that will be covered one week ahead | prepare(print) them on weekends |
* |
student | add any custom modules | not restricted to a specific category of task |
Non-Functional Requirements
- Should work on any mainstream OS as long as it has Java
11or above installed. - User with above average typing speed for English text (not coding) should be able to utilize the product to manage tasks more efficiently compared to using a mouse.
- Data entered by the user should be able to saved and carried forward for the next time usage.
- The file containing the saved data should be portable so that the user can transfer to the other machine with any mainstream OS and continuing using the app without any additional configuration.
- The product should be able to run without any noticeable sluggishness in performance for typical usage when dealing with up to 100 academic tasks.
- The product should never crash and able to handle any input from the user.
- Should work on both 32-bit and 64-bit environments.
- Should not exceed 30MB in size given normal usage.
Glossary
Mainstream OS
Windows, Linux, Unix, OS-X
Average typing speed
40 words per minute
Depth First
To go recursively downwards until the bottom before back-tracking
Instructions for Manual Testing
Given below are instructions to test the application manually.
These instructions only provide a starting point for testers to work on; testers are expected to do more exploratory testing. We also recommend testers to have a stable Internet connection when carrying out the testing so that the application can successfully retrieve the module information from NUSMods API
1. Launch and Shutdown
- Initial launch
- Download the jar file from the release page and copy into an empty folder.
- Launch a terminal and navigate the to folder containing the jar file
- Run the jar file by entering command
java -jar Nuke.jarand hit enter(replaceNuke.jarby the actual file name you downloaded from the release page) - Expected output: Nuke startup screen and welcome message is displayed
- Shut down of application
- Enter command
byeand hit enter - Expected output: Nuke program terminates with farewell message displayed.
- Enter command
2. Add Command
All the Add Commands below are assumed to be executed at the root directory.
- Add module
- Correct usage:
- Test case:
addm cs2113t - Expected: the program will prompt the user with message:
SUCCESS!! Module CS2113T Software Engineering & Object-Oriented Programming is added.
- Test case:
- Wrong usage:
- Test case:
addm cs1111 - Expected: the program will prompt the user with message:
Sorry, the module is not provided by NUS currently. - Test case:
addm cs2113tafter executingaddm cs2113t - Expected: the program will prompt the user with message:
Sorry, the module already exists.
- Test case:
- Correct usage:
- Add category
- Correct usage:
- Test case:
addc Project -m cs2113tafter addingcs2113tas module - Expected: the program will prompt the user with message:
SUCCESS!! Category Project is created.
- Test case:
- Wrong usage:
- Test case:
addc Tutorial -m cs2113tafter addingcs2113tas module - Expected: the program will prompt the user with message:
Sorry, the category already exists. - Test case:
addc Project -m cs3235without addingcs3235as module - Expected: the program will prompt the user with message
Sorry, the module is not found.
- Test case:
- Correct usage:
- Add task
- Correct usage:
- Test case:
addt assignment2 -m cs2113t -c Assignment -d tmr 23:59 -p 15after addingcs2113tas module - Expected: the program will prompt the user with message:
SUCCESS!! Task assignment2 is created.
- Test case:
- Wrong usage:
- Test case:
addt assignment2 - Expected: the program will prompt the use with message:
Sorry, unable to execute the command at the current directory level. Either move to the appropriate directory level, or enter the full directory path. - Test case:
addt testingaveryveryveryveryverylongstring -m cs2113t -c Assignment -d tmr 23:59 -p 15after addingcs2113tas module - Expected: the program will prompt the user with message:
Sorry, the task description cannot exceed 25 characters.
- Test case:
- Correct usage:
- Add file
- Correct usage:
- Test case:
addf test.pdf -m cs2113t -c Assignment -t assignment2 -f c:\users\null\downloads\assignment2.pdfafter adding anassignment2task underAssignmentcategory andcs2113tmodule, assumingc:\users\null\downloads\assignment2.pdfexists. - Expected: the program will prompt the user with message:
SUCCESS!! File test.pdf is added.
- Test case:
- Wrong usage:
- Test case:
addf test.pdf -m cs2113t -c Assignment -t non-exist-task -f c:\users\null\downloads\assignment2.pdfwithout adding the respective task - Expected: the program will prompt the user with message:
Sorry, the task is not found.
- Test case:
- Correct usage:
-
Add tag
- Correct usage:
- Test case:
addg urgent -m cs2113t -c Assignment -t assignment2after adding anassignment2task underAssignmentcategory andcs2113tmodule - Expected: the program will prompt the user with message:
SUCCESS!! Tag urgent is added.
- Test case:
-
Wrong usage:
- Test case:
addg urgent -m cs2113t -c Assignment -t non-exist-task - Expected: the program will prompt the user with message:
Sorry, the task is not found. - Test case:
addg urgent -t assignment2 - Expected: the program will promit the user with message:
Sorry, unable to execute the command at the current directory. Either move to the appropriate directory level, or enter the full directory path.
- Test case:
- Correct usage:
3. Delete Command
All the Delete Commands below are assumed to be executed at the root directory.
And user has only added a module
cs2113t, a task called assignment2 under the category Assignment, with a file called test.pdf, with a tag urgent
- Delete modules
- Correct usage:
- Test case:
delm cs2113t - Expected: the program will prompt the user with message:
Confirm delete CS2113T Software Engineering & Object-Oriented Programming?and user enteryand hit enter, the program will prompt the user with message:SUCCESS!! Module(s) have been deleted.
- Test case:
- Wrong usage:
- Test case:
delm cs1111 - Expected: the program will prompt the user with message:
Sorry. No modules found.
- Test case:
- Correct usage:
- Delete category
- Correct usage:
- Test case:
delc Assignment -m cs2113t - Expected: the program will prompt the user with message:
Confirm delete Assignment?and user enteryand hit enter, the program will prompt the user with message:SUCCESS!! Category(s) have been deleted.
- Test case:
- Wrong usage:
- Test case:
delc Project -m cs2113t - Expected: the program will prompt the user with message:
Sorry. No categories found.
- Test case:
- Correct usage:
- Delete task
- Correct usage:
- Test case:
delt assignment2 -m cs2113t -c Assignment - Expected: the program will prompt the user with message:
Confirm delete assignment2?and user enteryand hit enter, the program will prompt the user with message:SUCCESS!! Task(s) have been deleted.
- Test case:
- Wrong usage:
- Test case:
delt non-exist-task - Expected: the program will prompt the use with message:
Sorry. No tasks found.
- Test case:
- Correct usage:
- Delete file
- Correct usage:
- Test case:
delf test.pdf -m cs2113t -c Assignment -t assignment2 - Expected: Expected: the program will prompt the user with message:
Confirm delete test.pdf?and user enteryand hit enter, the program will prompt the user with message:SUCCESS!! Files(s) have been deleted.
- Test case:
- Wrong usage:
- Test case:
delf non-exist.pdf -m cs2113t -c Assignment -t assignment2 - Expected: the program will prompt the user with message:
Sorry. No files found.
- Test case:
- Correct usage:
- Delete tag
- Correct usage:
- Test case:
delg urgent -m cs2113t -c Assignment -t assignment2 - Expected: the program will prompt the user with message:
Confirm delete tag urgent of the task assignment2?and user enteryoryes, the program will prompt the user with message:SUCCESS!! Tag(s) have been deleted. - Test case:
delg - Expected: the program will prompt the user with message:
Confirm delete tag urgent of the task assignment2?and user enternorno, the program will prompt the user with message:The deletion is aborted
- Test case:
- Wrong usage:
- Test case:
delg non-exist-tag -m cs2113t -c Assignment -t assignment2 - Expected: the program will prompt the user with message:
Sorry. No tasks with the tag found.
- Test case:
- Correct usage:
4. List Command
All the List Commands below are assumed to be executed at the root directory.
And user has only added a module
cs2113t, a task called assignment2 under the category Assignment, with a file called test.pdf, with a tag urgent
-
List modules
-
Test case:
lsm -
Expected: the program display a table containing all the modules added by the user as shown below:
-
-
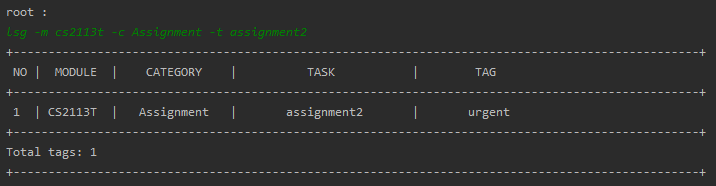
List tags
-
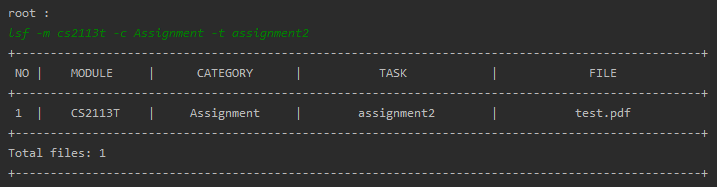
Test case:
lsg -m cs2113t -c Assignment -t assignment2 -
Expected: the program display a table containing all the tags of the task
assignment2under modulecs2113tand categoryAssignmentadded by the user as shown below:
-
- Correct Usage:
- Test case: enter
cd cs2113t - Expected: the program prompt will be changed to
root / CS2113T :fromroot :
- Test case: enter
- Wrong Usage:
- Test case: enter
cd .. - Expected: the program prompt the user with message:
Unable to traverse further.
- Test case: enter
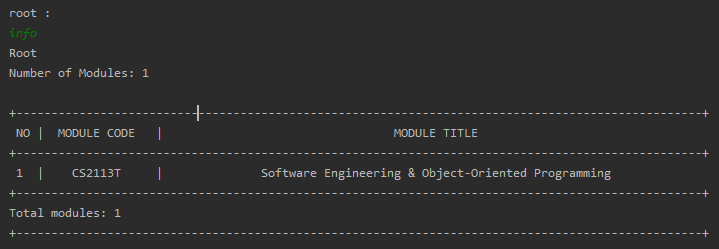
5. Info Command
For Info Command below are assumed to be executed at the root directory.
And user has added a module
cs2113t
-
Test case: enter
info -
Expected: the program will display the information about the current directory to the user as shown below:
6. Open File Command
All the List Commands below are assumed to be executed at the root directory.
And user has only added a module
cs2113t, a task called assignment2 under the category Assignment, with a file called test.pdf
- Test case: enter
open test.pdf -m cs2113t -c Assignment -t assignment2 - Expected:
test.pdfwill be opened automatically using the default pdf application.
Contact Us
We are currently still at the development stage of the Nuke application. Any feedback you give is welcomed as they can help us to improve Nuke even further! 😄